
Desserts
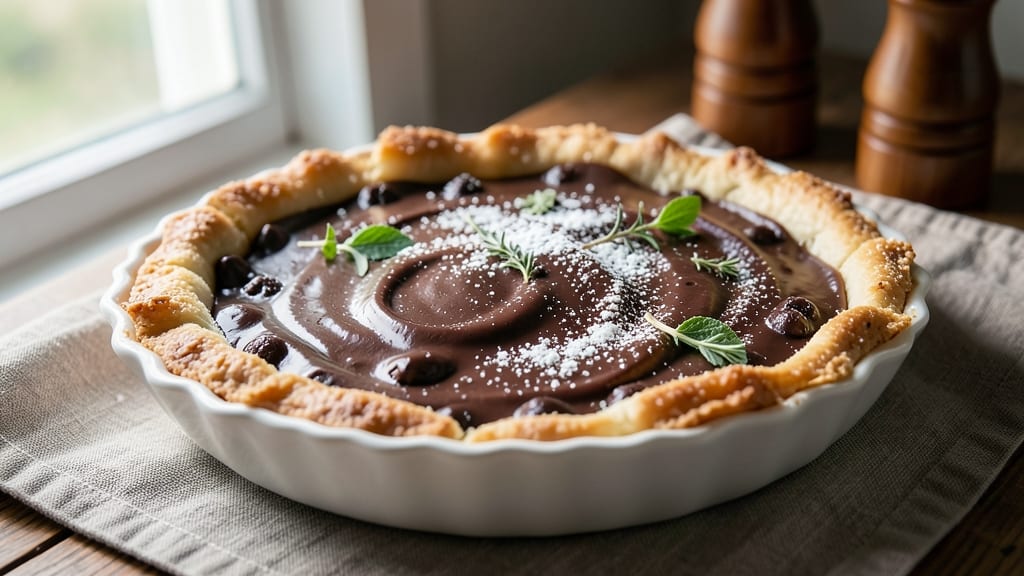
This best chocolate cream pie recipe from scratch delivers the ultimate homemade dessert with layers of buttery crust, velvety chocolate filling, and a glossy glaze that makes every slice look like it came from a bakery. 💛 The secret lies in a foolproof crust technique and a smooth custard base that stays perfectly set, even when sliced.
I've perfected this recipe over years of testing—no jiggly fillings or crumbly crusts here. The process starts with a classic pie crust that bakes to a golden, flaky perfection, providing the sturdy foundation every pie needs.
Then comes the chocolate custard filling, where proper tempering of the chocolate and slow cooking create that signature creamy yet firm texture. This isn't your average pie—it's restaurant-quality dessert made in your own kitchen, with just 15 minutes of active prep time.
By the time you're done, you'll have a pie with a crisp crust, luscious chocolate cream that holds its shape when sliced, and a glossy chocolate glaze that makes every bite look as good as it tastes.
The combination of textures—crunchy crust, creamy filling, and glossy top—creates a dessert experience that's impossible to resist. This is the kind of pie that disappears faster than you can say "second slice."
Perfect for special occasions or when you simply need to impress, this recipe scales beautifully and stays fresh for days when properly stored. Let's get started on creating your showstopping dessert.
Ingredients for best chocolate cream pie recipe from scratch
Buttery crust, velvety chocolate filling, and glossy glaze—this pie is pure indulgence in every bite.
| Ingredient | Amount | Notes |
|---|---|---|
| All-Purpose Flour 🌾 | 2 ½ cups | Sifted for flaky crust |
| Unsalted Butter 🧈 | 1 cup | Cold, cubed for crust |
| Granulated Sugar 🍚 | ½ cup | Plus 1 tbsp for crust |
| Salt 🧂 | ½ tsp | Fine sea salt |
| Ice Water 💧 | ½ cup | For pie crust |
| Semi-Sweet Chocolate Chips 🍫 | 12 oz | High-quality, 60% cacao |
| Heavy Whipping Cream 🥛 | 2 cups | Full-fat for richness |
| Large Eggs 🥚 | 4 whole | Room temperature |
| Granulated Sugar 🍚 | ¾ cup | For filling |
| Cornstarch 🌾 | 2 tbsp | For thickening |
| Vanilla Extract 🌿 | 1 tsp | Pure vanilla bean |
| Unsweetened Cocoa Powder 🍫 | ½ cup | Dutch-processed preferred |
| Powdered Sugar 🍚 | 1 cup | For glaze |
| Milk 🥛 | 2 tbsp | For glaze |
| Dark Chocolate Chips 🍫 | ¼ cup | For glaze |
The chocolate chips make all the difference—Ghirardelli or Valrhona are my go-tos for that melt-in-your-mouth texture. Trader Joe's has a great budget-friendly option too, so no need to splurge if you're watching costs. For the crust, keep that butter cold (I mean freezer-cold) and cut it into tiny cubes—this ensures maximum flakiness. The cocoa powder? Dutch-processed gives a smoother filling, but regular works too if that's what you've got. Eggs should be room temperature for a perfectly set custard, so take them out 30 minutes before you start.
No cocoa powder? Melted chocolate chips plus a splash of milk works in a pinch (just whisk it into the hot cream). Running low on vanilla? Vanilla bean paste is a great upgrade—just halve the extract. The glaze can be made ahead and reheated gently if it thickens too much. For a showstopper, add a pinch of sea salt to the glaze—trust me, it takes it to the next level. And if you're feeling fancy, toast the cocoa powder lightly before adding it to the filling for a deeper, nuttier flavor.
This pie tastes even better the next day—cover tightly and refrigerate for up to 4 days. For serving, let it sit at room temperature for 10 minutes first. The crust stays crisp if you store it in an airtight container, and the filling keeps its perfect set. Freeze individual slices for up to 3 months—just thaw overnight in the fridge. Pro tip: brush the baked crust with a little apricot jam before adding the filling for extra moisture and flavor.
Why You'll Love This Recipe
- No-Fuss Crust: I swear by that cold butter cut into flour with ice water—it’s the secret to a flaky, buttery crust that actually holds together. No food processor, no overworking the dough, just a few minutes of cutting and folding while you prep the filling.
- Rich Without Guilt: That sugar-butter ratio in the crust? It’s the kind of indulgence that makes you forget it’s "from scratch." The filling—smooth, velvety, and just sweet enough—lets the chocolate shine without tasting like dessert should be healthy.
- Party in a Pie: Serve it at a dinner party with zero stress (it’s make-ahead friendly, so you’re not stuck in the kitchen). Or slice it for breakfast the next morning—yes, really—and watch people ask for seconds. Works for holidays, birthdays, or just because.
- Budget-Friendly Luxury: All those pantry staples? You’re already using them. A single pie feeds six, and leftovers? Even better cold. Honestly, it’s one of those recipes where you spend less but end up with something that feels like a splurge.
Step-by-step instructions for chocolate cream pie
Here's how to create layers of perfection—flaky crust, velvety filling, and glossy glaze.
👨🍳 Step 1: Make the Perfect Pie Crust
In a large bowl, combine the 2.5 cups all-purpose flour, 0.5 cup granulated sugar, and 0.5 teaspoon salt. Cut in the 1 cup cold cubed butter using a pastry cutter or your fingers until the mixture resembles coarse crumbs with pea-sized butter pieces. Here's the thing—don't overwork it or you'll get tough crust.
Gradually add the 0.5 cup ice water, 1 tablespoon at a time, mixing gently with a fork until the dough just comes together. Form into a disk, wrap in plastic, and chill for at least 1 hour (or up to 2 days). This resting time is crucial—it relaxes the gluten and prevents shrinking. Roll out the dough between two sheets of parchment paper to 1/8-inch thickness and fit it into a 9-inch pie dish, trimming excess. Crimp the edges decoratively and prick the bottom with a fork.
🔥 Step 2: Bake the Crust to Golden Perfection
Preheat your oven to 375°F. Line the crust with a second sheet of parchment paper and fill it with pie weights or dried beans. Bake for 15 minutes, then remove the weights and bake for another 10-12 minutes until the edges are golden brown and the bottom is lightly browned. Here's where it gets fun—remove from oven and let cool for 10 minutes while you make the filling.
I like to brush the hot bottom crust with a little egg wash (1 egg yolk beaten with 1 tablespoon water) for extra shine. This step ensures you'll have a beautiful, crispy bottom layer that holds up to the creamy filling. Don't skip it—trust me, it makes all the difference.
🍳 Step 3: Create the Velvety Chocolate Filling
In a medium saucepan, combine 2 cups heavy whipping cream, 12 oz semi-sweet chocolate chips, 0.75 cup granulated sugar, 2 tablespoons cornstarch, and 1 teaspoon vanilla extract. Cook over medium heat, stirring constantly with a wooden spoon, until the mixture thickens enough to coat the back of the spoon—about 8-10 minutes. You'll know it's ready when it reaches 160°F and leaves a trail when you run your finger through it.
Immediately pour the hot filling into the cooled crust. Here's the critical part—let it cool completely at room temperature for at least 2 hours (or refrigerate for 4 hours). This slow cooling prevents cracking and gives you that perfect silky texture. I know it's tempting to rush, but patience pays off with a creamy, restaurant-quality filling.
🥘 Step 4: Prepare the Decadent Chocolate Glaze
In a microwave-safe bowl, combine 1 cup powdered sugar, 0.5 cup unsweetened cocoa powder, 2 tablespoons milk, and 0.25 cup dark chocolate chips. Microwave in 20-second bursts, stirring between each, until the chocolate is completely melted and the glaze is smooth—about 45-60 seconds total. The glaze should be thick but pourable, like honey.
Drizzle the glaze over the completely cooled pie, letting it drip down the sides for that professional bakery look. For extra flair, sprinkle with additional dark chocolate chips while the glaze is still wet. Let the glaze set for 1 hour before serving—this ensures it holds its shape and gives you clean slices. Real talk: the glaze is what takes this pie from good to showstopping.
⏰ Step 5: Chill and Serve for Maximum Enjoyment
Once the glaze is set, refrigerate the pie for at least 4 hours (overnight is even better). This chilling time is essential—it lets all the flavors meld together and gives you that perfect firm-yet-creamy texture in every bite. When ready to serve, slice with a warm knife (run it under hot water and dry) for clean cuts.
Each slice should reveal layers of crispy crust, velvety chocolate filling, and glossy glaze. Serve with a dollop of whipped cream if you're feeling extra indulgent. The contrast of temperatures—warm crust, cool filling, room-temperature glaze—makes every bite unforgettable. Trust me, this is the pie that'll have everyone asking for seconds!
Pro Tips For Making Best Chocolate Cream Pie Recipe From Scratch
- Chill the Dough Properly: I learned this the hard way—rolling out warm pie dough straight from the fridge makes it sticky and prone to shrinking. Wrap it tightly in plastic, place it between two baking sheets, and refrigerate for at least 30 minutes (or up to 2 days). This keeps it firm enough to handle without cracking when you transfer it to the pan.
- Cut Butter Cold, Not Soft: Your crust’s flakiness depends on this: cube the unsalted butter into ½-inch pieces and freeze them for 10 minutes before mixing with flour. When you toss them in, they should stay cool but not rock-hard—this creates those perfect layers. Skimp on this, and you’ll end up with a tough, dense bottom.
- Prevent Overbrowning Edges: The crust’s edges always burn before the filling sets. After blind-baking, brush the exposed dough with a thin layer of beaten egg white (or water mixed with a pinch of salt) before adding the filling. It acts as a barrier, giving you 10-15 extra minutes in the oven without turning to charcoal.
- Upgrade with Cornstarch: The filling’s the star, but here’s the non-negotiable: swap 2 tablespoons of granulated sugar for cornstarch in the chocolate custard. It thickens the cream without graininess and cuts down on cooking time by 3-4 minutes. Trust me, your slice will be silky instead of gluey.
Common mistakes when making perfect results
Overmixed Crust
I can't stress this enough—overworking the pie dough is the fastest way to ruin your crust. When you cut in the cold butter and add ice water, stop mixing as soon as the dough forms a shaggy mass.
Overmixing develops gluten, which leads to a tough, dense crust instead of the flaky layers you want. I've seen beginners work the dough for minutes, only to end up with a sad, brick-like bottom. 🧈
Skipping Chill Time
That 1-hour (or longer) chill for the dough isn't optional—it's non-negotiable. Skipping this step causes the crust to shrink during baking, creating an uneven, puckered mess. The cold butter needs time to firm up and relax the gluten structure.
I once baked a crust without chilling, and it looked like a sad, lopsided bowl instead of a beautiful pie shell. Trust me, patience here pays off.
Undercooked Crust
An underbaked crust is a recipe for disaster—it won't hold up to the filling and will turn soggy. Bake the crust until it's golden brown at the edges and the bottom is lightly browned. If you're unsure, press your finger gently—it should spring back slightly.
I've had crusts collapse under filling because they weren't fully baked. Don't rush this step—a properly baked crust is the foundation of your pie.
Rushing the Filling Cooling
Pouring that hot chocolate filling into the crust and expecting instant perfection? Don't even think about it. The filling needs to cool completely at room temperature (or refrigerate for 4 hours) to set properly. Rushing this step leads to cracks, weeping, or a filling that's too soft.
I've seen beautiful pies turn into sad, runny messes because someone couldn't wait. Slow and steady wins the race—this is where the magic happens.
Incorrect Glaze Thickness
The glaze should be thick but pourable—like honey, not watery syrup. If it's too thin, it'll pool at the bottom; if it's too thick, it won't drip elegantly. Microwave in 20-second bursts, stirring between each, until it reaches that perfect consistency.
I've had glaze run all over the counter or clump into a lump because of incorrect timing. Pay attention to those 20-second intervals—they make all the difference.
Serving Too Soon
Refrigerating the pie for at least 4 hours (overnight is ideal) isn't just about flavor—it's about texture. Serving it too soon means the filling won't be firm enough, and the glaze won't set properly.
I've had guests complain about "mushy" pie because I couldn't wait to slice it. Resist the urge—let it chill, and you'll be rewarded with clean slices and that perfect firm-yet-creamy texture. 💫
Nutrition facts
Frequently asked questions
Can I make this chocolate cream pie without a food processor?
The crust can be made entirely by hand using a pastry cutter or your fingers. For the filling, just whisk the ingredients vigorously by hand until smooth before cooking. The key is patience—stir constantly over medium heat and use a candy thermometer to reach 160°F for that perfect set. No fancy tools needed!
How do I prevent the filling from cracking?
Cracking happens when the filling cools too quickly. Let it cool completely at room temperature (about 2 hours) before refrigerating. Also, make sure your crust is fully cooled before adding the hot filling—temperature contrast matters! For extra insurance, chill the pie uncovered for 1 hour first, then cover and refrigerate.
What's the best way to store leftovers?
Slice the pie and store individual portions in an airtight container in the fridge for up to 4 days. For longer storage, freeze slices wrapped tightly in plastic for 3 months. Thaw overnight in the fridge—never at room temperature. The crust stays crisp if you reheat slices briefly in the oven at 350°F for 5 minutes.
Can I use dark chocolate instead of semi-sweet?
Yes, but adjust the sweetness! Dark chocolate (60-70% cacao) is more intense, so reduce the granulated sugar in the filling to 0.5 cup instead of 0.75 cup. For the glaze, use 70% dark chocolate chips and add 1 extra tablespoon of milk to balance the bitterness. Taste as you go—you can always add more sugar if needed.
Why did my crust turn out soggy?
Most likely, your crust wasn't baked long enough or wasn't properly pre-baked before adding filling. Always bake the crust until golden brown at the edges and lightly browned at the bottom. For extra insurance, blind-bake it with pie weights for 15 minutes, then bake uncovered for another 10 minutes. Also, make sure your filling is completely cooled before adding it.