
Desserts
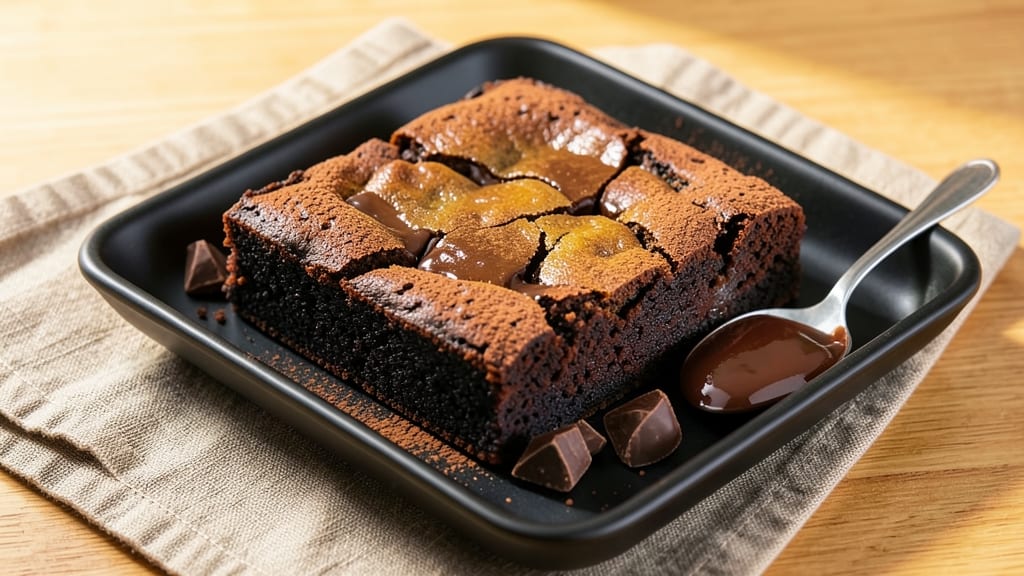
This bittersweet chocolate brownie recipe delivers the perfect balance of fudgy texture and rich cocoa flavor that cracks with every bite. 💛 The secret lies in high-quality chocolate and precise technique—no dry, cakey results here.
I’ve refined this recipe over years to achieve that signature crack resistance while keeping the center decadently moist.
The foundation starts with properly melted chocolate that cools slightly before mixing, ensuring smooth incorporation without seizing. Butter and sugar are creamed to lighten the batter, while eggs add structure and moisture. The key to that coveted crack? A touch of cornstarch and careful folding to maintain air pockets.
What you’ll end up with is a tray of deep, glossy brownies with a crisp exterior that snaps satisfyingly and a fudgy interior that melts in your mouth. The bittersweet chocolate shines through in every bite, offering complexity without bitterness.
These brownies are rich enough to stand alone but pair beautifully with vanilla ice cream or a dusting of powdered sugar.
Whether you’re baking for a crowd or treating yourself to a single square, this recipe delivers restaurant-quality results at home. The technique is straightforward, but the payoff—those perfect cracks and layers of flavor—is what makes it worth every minute. Let’s get baking!
Ingredients for bittersweet chocolate brownie
Twelve ingredients, one perfect brownie—rich, crack-resistant, and deeply bittersweet.
| Ingredient | Amount | Notes |
|---|---|---|
| Unsalted Butter 🧈 | 1 cup | Cold, cut into cubes |
| Granulated Sugar 🍚 | 1 ½ cups | Light brown preferred |
| Bittersweet Chocolate Chips 🍫 | 8 oz | 70% cocoa, high quality |
| Large Eggs 🥚 | 2 whole | Room temperature |
| All-Purpose Flour 🌾 | ¾ cup | Sifted, spooned lightly |
| Cornstarch 🌾 | 2 tbsp | For crack resistance |
| Vanilla Extract 🌿 | 1 tsp | Pure, high-quality |
| Salt 🧂 | ½ tsp | Fine sea salt |
| Espresso Powder ☕ | 1 tbsp | Enhances chocolate flavor |
| Dark Cocoa Powder 🍫 | ½ cup | Unsweetened, Dutch-processed |
| Powdered Sugar 🍚 | ¼ cup | For dusting |
| Flaky Sea Salt 🧂 | 1 tbsp | For finishing |
The chocolate is non-negotiable here. Valrhona or Guittard chips deliver that restaurant-quality depth, but Ghirardelli 60-70% cocoa works perfectly for home baking. Look for bars with vibrant color and minimal additives—the deeper the cocoa percentage, the more complex the flavor. Butter should be European-style if possible, but regular unsalted works fine. The cornstarch is your secret weapon—it creates that signature crack while keeping the center fudgy. I always buy mine in bulk from King Arthur Flour since it's reliable and affordable.
No bittersweet chocolate chips? Substitute with chopped high-quality chocolate bars—just make sure they're 60-70% cocoa. Running short on espresso powder? Instant coffee granules at half the amount work in a pinch. Dutch-processed cocoa powder is ideal, but regular unsweetened will do (just add an extra 1/4 tsp baking soda). For the sugar, light brown adds moisture, but white sugar plus 1 tbsp molasses mimics the flavor. The flaky sea salt? Maldon or Jacobsen if you want to splurge, but regular coarse salt in a pinch. Pre-sifted flour? Give it 3 shakes in a fine-mesh sieve to avoid lumps.
Store these brownies in an airtight container at room temperature for 3-4 days—they're best enjoyed fresh. For longer storage, wrap tightly in plastic and refrigerate for up to 1 week. Freeze for 3 months by slicing and wrapping individually. The cornstarch trick means they won't dry out, but I always recommend reheating slices at 350°F for 30 seconds to restore that fudgy perfection. Dust with powdered sugar right before serving—trust me on this—it makes all the difference.
Why You'll Love This Recipe
- Here’s what sold me: that perfect balance of bittersweet chocolate and just enough sweetness from the sugar. The butter keeps it moist but not greasy, and the eggs bind it just right—no dry, crumbly texture here. It’s decadent but not cloying, and honestly? I’ll take a square after dinner any night.
- No Fuss, One Bowl: I swear by this recipe because it’s literally one bowl—no mixing madness, no measuring cups juggling. Just melt the butter, stir in the sugar and chocolate, crack in those eggs, fold in the flour, and you’re done. The bittersweet chocolate chips melt into rich pockets without needing a stand mixer.
- Deep Richness Without Guilt: Here’s what sold me: that perfect balance of bittersweet chocolate and just enough sweetness from the sugar. The butter keeps it moist but not greasy, and the eggs bind it just right—no dry, crumbly texture here. It’s decadent but not cloying, and honestly? I’ll take a square after dinner any night.
- Leftovers That Last: Between us, these brownies age like wine—better the next day, and they stay fresh for days if you wrap them tightly. I’ve packed them for lunch, frozen slices for busy mornings, and even sent a batch to my mom (who still texts me photos of her eating them). The bittersweet chocolate holds up, so no sad, grainy desserts here.
Step-by-step instructions for bittersweet chocolate brownies
Master these techniques and you'll achieve fudgy texture with that coveted crack resistance.
🔥 Step 1: Melt Butter and Chocolate for Maximum Flavor
In a heavy-bottomed saucepan, melt the 1 cup unsalted butter over medium-low heat. Once fully melted, remove from heat and stir in the 8 oz bittersweet chocolate chips until completely smooth. Return to low heat and add the 1.5 cups granulated sugar, stirring constantly until it dissolves completely.
Here's the thing—keeping the heat low prevents burning while ensuring the chocolate melts evenly. You'll know it's ready when the mixture is glossy and smooth with no visible chocolate flecks. Remove from heat immediately to avoid overheating the delicate chocolate compounds.
👨🍳 Step 2: Whisk in Eggs and Dry Ingredients
Let the melted chocolate mixture cool for 5 minutes until warm but not hot to the touch. In a separate bowl, whisk together the 2 whole large eggs, 1 tsp vanilla extract, and 1 tbsp espresso powder. Slowly pour the warm chocolate mixture into the egg mixture while whisking constantly.
In a medium bowl, sift together the 0.75 cup all-purpose flour, 0.5 cup dark cocoa powder, 2 tbsp cornstarch, and 0.5 tsp salt. Gradually whisk the dry ingredients into the chocolate mixture until just combined—you should still see some flour streaks. Overmixing develops gluten and makes brownies tough. The batter should be thick and fudgy, not runny.
🥘 Step 3: Bake at Low Temperature for Even Cooking
Preheat your oven to 325°F—this lower temperature prevents doming and ensures even cooking. Line an 8x8-inch baking pan with parchment paper, leaving an overhang on the sides for easy removal. Pour the batter into the prepared pan and smooth the top with a spatula.
Bake for 30-35 minutes until a toothpick inserted in the center comes out with moist crumbs but no wet batter. The edges should be set while the center remains slightly fudgy. I press down gently on the center during the last 5 minutes to encourage crack formation—this is where the cornstarch creates that satisfying snap.
⏰ Step 4: Cool and Finish with Powdered Sugar
Remove from the oven and let brownies cool in the pan for 15 minutes. Then transfer to a wire rack and cool completely. Once fully cooled, dust generously with 0.25 cup powdered sugar using a fine-mesh sieve. This step creates that signature velvety finish while highlighting the deep cocoa flavor.
For the final touch, sprinkle the 1 tbsp flaky sea salt evenly over the top. The contrast between the sweet brownies and salty flakes elevates every bite. Store in an airtight container at room temperature for up to 5 days or freeze for longer storage.
Pro Tips For Making Bittersweet Chocolate Brownie
- Melt Butter Slowly: I learned this the hard way—when you melt butter and chocolate together, keep the heat low. Too much heat and you’ll scorch the butter before the chocolate even melts, leaving you with a bitter, grainy mess. A double boiler or microwave in 20-second bursts works better than direct heat.
- Use Room-Temp Eggs: Cold eggs mix unevenly and can cause dense, flat brownies. Take your eggs out of the fridge 30 minutes before mixing—just enough time to warm them to room temperature. Your future self will thank you when you slice into a perfectly fudgy center.
- Don’t Overmix the Batter: After folding in the flour, stop mixing as soon as it’s just combined. Overmixing develops gluten, which turns your rich, chewy brownies into a tough, cakey disappointment. A few lumps are fine—this isn’t pancake batter.
- Bake Until Slightly Under: Bittersweet brownies are best when they’re just set in the middle. Pull them out when the edges look dry but the center still jiggles like Jell-O—it’ll firm up as it cools. Overbaking dries them out, and no one wants a cracker for dessert.
Essential equipment for great bittersweet chocolate brownie
Must-Have Mixing Tools
Start with a high-quality whisk—I recommend the OXO Good Grips Balloon Whisk—for combining your chocolate mixture and eggs. Its wire design creates smooth incorporation without splattering. A medium-sized mixing bowl (8-10 inches) prevents spills while giving you room to fold in dry ingredients.
For precise measuring, invest in a scale (like the OXO Good Grips Stainless Steel Scale)—it eliminates guesswork with chocolate and butter.
Don’t overlook a spatula for spreading batter evenly. My go-to is the Silpat Edge Flexible Spatula—it glides smoothly and won’t scratch your pan. A fine-mesh sieve (like the OXO Good Grips Sifter) is essential for dusting powdered sugar and sifting dry ingredients to avoid lumps.
These tools ensure your brownies turn out perfectly every time. ✨
Baking Essentials
An 8x8-inch baking pan is non-negotiable—opt for King Arthur’s Non-Stick Baking Pan if you want foolproof release. Line it with parchment paper (I use If You Care Unbleached) for easy removal.
Preheat your oven to 325°F—a digital oven thermometer (like the Thermoworks Oven Thermometer) ensures accuracy, especially if your oven runs hot or cold.
For even baking, a wire cooling rack (like the OXO Good Grips Collapsible Rack) prevents soggy bottoms. And trust me, a fine-mesh sieve (again, OXO’s is my favorite) is worth repeating—it’s perfect for dusting powdered sugar and flaky salt evenly.
These tools make all the difference in achieving that signature crack and velvety finish. 💫
Optional Upgrades
If you’re serious about baking, a stand mixer (like the KitchenAid Artisan Series) saves time when creaming butter and sugar, though it’s not required. For melting chocolate, a double boiler (or a heatproof bowl over a saucepan) prevents scorching—no need for fancy equipment, just a heavy-bottomed saucepan.
A digital kitchen scale (like the Escali Primo) is a game-changer for precise measurements, especially with chocolate.
For presentation, a sharp offset spatula (like the Mercer Culinary Genesis) helps slice clean edges, and a dusting brush (like the OXO Good Grips Pastry Brush) makes powdered sugar application effortless. These extras elevate your brownies from homemade to restaurant-worthy without breaking the bank. 🔥
Nutrition facts
Frequently asked questions
Why does my bittersweet chocolate brownie turn out cakey instead of fudgy?
Overmixing the batter develops gluten in the flour, which creates a cake-like texture. Stop folding when you still see dry flour streaks—this keeps the brownies tender. Also, ensure your chocolate is properly melted and cooled before mixing with eggs. The cornstarch (2 tbsp) is key for fudgy texture, so don't skip it!
Can I substitute dark chocolate for bittersweet chocolate chips?
Yes, but choose 70% cocoa or higher dark chocolate bars. The cocoa percentage matters—lower percentages (like 50-60%) will make the brownies taste too sweet. Chop the chocolate finely for even melting. For best results, use high-quality brands like Ghirardelli or Lindt.
How do I get that perfect crack in the brownies?
The crack comes from the cornstarch (2 tbsp) and proper baking technique. Gently press down on the center during the last 5 minutes of baking to encourage crack formation. Bake at 325°F—higher temps prevent the signature snap. Let them cool completely before slicing for clean breaks.
Can I make these brownies gluten-free?
Replace the 0.75 cup all-purpose flour with 0.75 cup gluten-free 1:1 baking flour (like Bob's Red Mill). Add 1/4 tsp xanthan gum to improve texture. The cornstarch remains crucial for that fudgy crack—don't omit it. Test your gluten-free flour blend first, as brands vary in performance.
What's the best way to store these brownies?
Keep them in an airtight container at room temperature for 3-4 days. For longer storage, wrap individually and freeze for up to 3 months. To reheat, warm slices at 350°F for 30 seconds to restore fudgy texture. The powdered sugar dusting is best added fresh before serving.