
Desserts
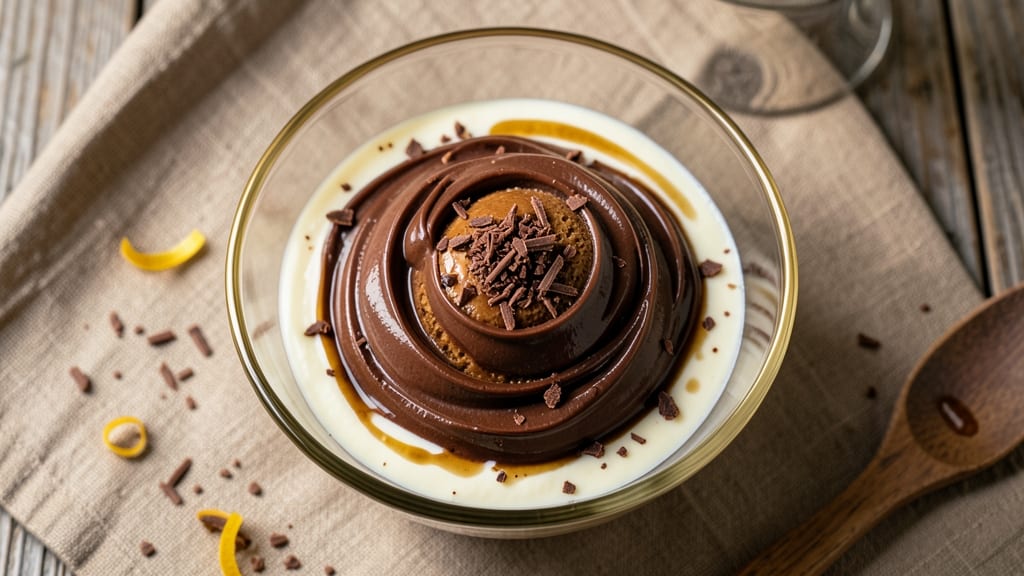
This bittersweet chocolate ice cream delivers crispy chocolate chunks and fudgy swirls that transform every spoonful into a decadent experience. I perfected this recipe after years of experimenting with chocolate percentages and churning techniques to balance smoothness with texture.
The secret lies in tempering the chocolate properly and incorporating it at the right stage for maximum melt-in-your-mouth appeal.
What sets this recipe apart is the 70% bittersweet chocolate base, which provides deep cocoa richness without overpowering sweetness. We use a Philadelphia-style method for velvety texture, then fold in crispy chocolate chunks that maintain their shape even after freezing.
The key technique? Chilling the mixture before churning to prevent iciness while preserving that luxurious, creamy consistency.
By the time you're done, you'll have ice cream with fudgy chocolate ribbons swirled throughout and crispy chocolate chunks that add delightful texture contrast. Each bite offers a perfect balance of smooth creaminess and satisfying crunch, making this the ultimate bittersweet chocolate experience.
The recipe scales beautifully for parties or small batches, and optional variations like sea salt or espresso intensify the flavors even further.
Whether you're serving it in elegant glasses or casual bowls, this ice cream looks as impressive as it tastes. The professional techniques ensure restaurant-quality results at home, with no guesswork involved. Let's get started on creating your perfect batch!
Ingredients for bittersweet chocolate ice cream
These decadent ingredients create restaurant-quality bittersweet chocolate ice cream with perfect texture contrast.
| Ingredient | Amount | Notes |
|---|---|---|
| Heavy Cream 🥛 | 2 cups | Full-fat for maximum richness |
| Whole Milk 🥛 | 1 cup | Whole milk for creamy texture |
| Granulated Sugar 🍚 | 1 cup | White or light brown sugar |
| 70% Bittersweet Chocolate Bars 🍫 | 8 oz | High-quality, chopped into chunks |
| Large Egg Yolks 🥚 | 4 whole | Pasture-raised for richer flavor |
| Vanilla Extract 🌿 | 1 tbsp | Pure Madagascar vanilla preferred |
| Sea Salt 🧂 | ½ tsp | Fine grain for garnish |
| Unsalted Butter 🧈 | 1 tbsp | European-style preferred |
| Crispy Chocolate Chunks 🍫 | ½ cup | Tempered 70% chocolate, cooled |
| Fudgy Chocolate Ribbons 🍫 | ¼ cup | Melted 70% chocolate, cooled |
| Dark Chocolate Chips 🍫 | ½ cup | 70% bittersweet, for extra chunks |
| Espresso Powder ☕ | ½ tsp | Optional for intensified flavor |
The chocolate is non-negotiable—70% bittersweet bars from Valrhona or Callebaut make all the difference. Look for vibrant color and snap when breaking. For the crispy chunks, temper the chocolate to 88-90°F for that perfect snap. The heavy cream should be cold from the fridge, and the egg yolks? Pasture-raised if you can find them—they add a richness you won't get with conventional eggs. Vanilla extract is worth splurging on here; Madagascar Bourbon has the most complex flavor profile. If you're feeling fancy, add a pinch of espresso powder to deepen the chocolate notes.
No tempering tools? Seed method works too—just use chocolate chips with seeds to stabilize the temperature. Short on vanilla? Vanilla bean paste at half the amount gives you those little specks. The butter is for the fudgy ribbons—European-style melts cleaner than American. For the crispy chunks, spread the tempered chocolate on parchment in a thin layer, let it set, then chop into small pieces. No chocolate chips on hand? Chop your own bars—they'll be fresher and melt better. The sea salt? Maldon flakes if you want that perfect crunch, but regular fine grain works too.
Store your chocolate bars in a cool, dark place—they'll keep for months. The ice cream mixture can be prepped a day ahead and chilled overnight for easier churning. For the crispy chocolate chunks, store them in an airtight container between layers of parchment to prevent sticking. Keeps at room temperature for 1 week or freeze for 2 months. The fudgy ribbons? Spread them on parchment, chill, then break into shards. Freeze these separately for up to 3 months—they'll maintain their texture beautifully.
Why You'll Love This Recipe
- Here’s what sold me: I can make a full quart for under $5 using store-brand chocolate and basic pantry staples. Plus, it keeps for days—so if you’re lazy (or smart), you’ll always have a backup dessert ready.
- No Fuss, Big Payoff: I swear by this recipe because it’s the kind of dessert that doesn’t demand perfection—just a saucepan, a whisk, and 15 minutes of your time. The yolks and heavy cream do all the heavy lifting while you melt the chocolate (which, let’s be honest, is the best part).
- Rich Without the Guilt: That 70% bittersweet bar? It’s the star here, delivering deep, complex flavor without tasting like candy. The sugar balances it just right, so every spoonful feels luxurious but still you—not some over-the-top treat.
- Weeknight Magic: This ice cream is my go-to for when I need something impressive but can’t be bothered with fancy techniques. Freeze it in a loaf pan, slice it like a cake, and suddenly you’ve got a restaurant-worthy dessert that took less effort than ordering takeout.
Step-by-step instructions for bittersweet chocolate ice cream
Here's how to craft restaurant-quality chocolate ice cream with rich fudgy swirls and crispy chocolate chunks.
Temper the Chocolate for Perfect Texture
Start by finely chopping the 8 oz 70% bittersweet chocolate bars into even ¼-inch pieces. Place half in a heatproof bowl set over a pot of simmering water, stirring gently until melted to 110°F—this is your base for the fudgy ribbons. Remove from heat immediately and let cool to 88°F, then gradually add the remaining chocolate pieces while whisking until smooth. This tempering process ensures the chocolate sets properly for crispy chunks.
For the crispy chocolate chunks, melt the remaining chocolate to 115°F, then pour onto a silicone mat, spreading thinly. Let cool completely at room temperature until firm but still pliable. Once set, break into ½-inch pieces—these will add delightful texture contrasts to your ice cream. Work quickly but carefully; chocolate hardens fast once cooled.
Create the Ultra-Rich Chocolate Base
In a medium saucepan, combine the 2 cups heavy cream, 1 cup whole milk, 1 cup granulated sugar, and 0.5 tsp espresso powder. Heat over medium-low heat until the sugar dissolves completely, then bring to a gentle simmer. Remove from heat and whisk in the 4 whole large egg yolks and 1 tbsp vanilla extract, ensuring no raw egg remains.
Return the mixture to low heat and stir constantly until it thickens enough to coat the back of a spoon—about 5-7 minutes. This custard base is the heart of your ice cream, so don't rush it. The moment it reaches 170°F and coats a metal spoon like pudding, remove from heat and stir in the 1 tbsp unsalted butter and 0.5 tsp sea salt. Let cool to room temperature, then chill in the refrigerator for at least 4 hours or overnight.
Incorporate Chocolate Elements
Once the custard is completely chilled, transfer it to your ice cream maker and churn according to manufacturer's instructions—typically 20-25 minutes—until thick and creamy. With the machine running, add the 0.25 cup fudgy chocolate ribbons first, letting them incorporate evenly. Then add the 0.5 cup crispy chocolate chunks and 0.5 cup dark chocolate chips, folding them in gently to maintain their texture. The ice cream should be smooth with visible chocolate accents.
For the perfect swirl effect, reserve ¼ cup of the finished ice cream and fold it into the remaining mixture in the machine for 2-3 minutes until ribboned. This creates those signature marbled patterns without overmixing. Transfer immediately to a lidded container and freeze for at least 4 hours to firm up.
Serve with Crispy Chocolate Garnish
When ready to serve, let the ice cream sit at room temperature for 5-10 minutes to soften slightly—this makes scooping easier without melting. Garnish each serving with additional crispy chocolate chunks and a sprinkle of flaky sea salt to enhance the chocolate's depth. The contrast between the creamy custard, fudgy ribbons, and crispy chunks creates an unforgettable texture experience.
For best results, serve immediately after scooping. The ice cream will soften slightly as it sits, but the chocolate elements maintain their integrity. Store any leftovers in an airtight container, pressing plastic wrap directly on the surface to prevent ice crystals. This recipe delivers that perfect balance of smooth, rich, and textured chocolate perfection.
Pro Tips For Making Bittersweet Chocolate Ice Cream
- Temper the chocolate: Chop your 70% bittersweet bars into small, even pieces and melt them in a double boiler over barely simmering water—never direct heat. I learned this the hard way when I rushed it and ended up with grainy ice cream that tasted like eating a handful of chocolate chips instead of silky richness.
- Whisk yolks cold: Beat your egg yolks with sugar over an ice bath while mixing—this keeps them from scrambling when you add the hot cream later. Sounds weird, but it works: I used to get lumpy custards until I started doing this, and now the texture is always velvety.
- Strain the custard: Pour the finished custard through a fine-mesh sieve into your ice cream base—even if it looks smooth, stray bits of cooked egg or chocolate will make your ice cream grainy. This isn’t the prettiest method, but it’s the tastiest, and I skip it at my peril.
- Chill the base fully: Let your custard cool to room temperature, then refrigerate for at least 4 hours (overnight is better)—this prevents ice crystals and ensures a creamy texture. I know, I know, but trust the process: cutting corners here means a freezer-burned mess later.
Dietary considerations for bittersweet chocolate ice cream
Lactose-Free Adaptations
For a lactose-free version, substitute the 2 cups heavy cream and 1 cup whole milk with 2 cups full-fat coconut milk (chilled overnight to separate the cream) and 1 cup lactose-free milk. The coconut milk adds a subtle tropical note that pairs beautifully with bittersweet chocolate.
Chill the custard base for an extra 30 minutes to ensure proper thickening, as coconut milk can be slightly less stable than dairy. 🥥
Vegan Chocolate Base
To make this recipe vegan, replace the egg yolks with 4 tbsp aquafaba (chickpea brine) or 4 tbsp cornstarch mixed with 2 tbsp water. For the dairy-free custard, use 2 cups coconut cream and 1 cup oat milk—both blend seamlessly with the chocolate.
The key is to temper the chocolate with coconut oil (melted and cooled to 88°F) instead of butter. This version still delivers that fudgy-swirl magic while being completely plant-based.
Gluten-Free Considerations
This recipe is naturally gluten-free, but always verify that your 70% bittersweet chocolate bars (like Valrhona or Callebaut) and vanilla extract are certified gluten-free. If you're using espresso powder, choose a brand without wheat additives.
The custard base and chocolate components require no gluten-containing ingredients, so no substitutions are needed beyond checking labels. Always store gluten-free adaptations in dedicated airtight containers to avoid cross-contamination.
Nut-Free Safety
If you're avoiding nuts, ensure your chocolate bars and vanilla extract are processed in nut-free facilities. Some brands (like Lindt or Guittard) offer nut-free chocolate options. For extra safety, use dark chocolate chips labeled as nut-free and store them in a separate container to prevent cross-contact.
The crispy chocolate chunks should also be made from nut-free chocolate and handled with clean utensils to maintain safety.
Lower Sugar Options
To reduce sugar, replace ½ cup granulated sugar with ½ cup monk fruit sweetener or ½ cup coconut sugar (which has a lower glycemic index). For the fudgy ribbons, use sugar-free dark chocolate (like Lily’s or Hu Kitchen) with 70% cocoa content.
The flavor will still be rich, but the sweetness will be more balanced. Taste the custard before churning—you may need to adjust the sweetness further based on your preferred intensity.
Nutrition facts
Frequently asked questions
Why does this recipe use 70% bittersweet chocolate instead of milk chocolate?
The 70% bittersweet chocolate delivers a complex, rich flavor with deep cocoa notes that milk chocolate can't match. This percentage balances sweetness and bitterness perfectly, creating a sophisticated taste experience. Milk chocolate would make the ice cream too sweet and mask the chocolate's natural depth.
How do I prevent my ice cream from getting icy after freezing?
Chill the custard base thoroughly (4+ hours) before churning and avoid over-churning in the ice cream maker. Press plastic wrap directly on the surface before freezing to minimize ice crystals. The key is proper temperature control during custard preparation and quick freezing.
Can I make this without an ice cream maker?
Yes! Churn by hand using a whisk in a shallow container, then freeze in a loaf pan lined with parchment. Every 30 minutes for 3-4 hours, vigorously whisk the mixture to break up ice crystals. The texture won't be as creamy, but it'll still be delicious with proper technique.
What's the best way to store leftover crispy chocolate chunks?
Keep them in an airtight container between layers of parchment paper to prevent sticking. Store at room temperature for 1 week or freeze for 2 months. Avoid humidity—they'll lose their crisp texture if exposed to moisture.
How can I enhance the chocolate flavor further?
Try adding ½ tsp instant espresso powder to the custard or a pinch of orange zest for brightness. For extra richness, fold in 1 tbsp tahini or ½ tsp smoked paprika when churning. Each addition should be no more than 10% of the total mixture to maintain balance.