
Desserts
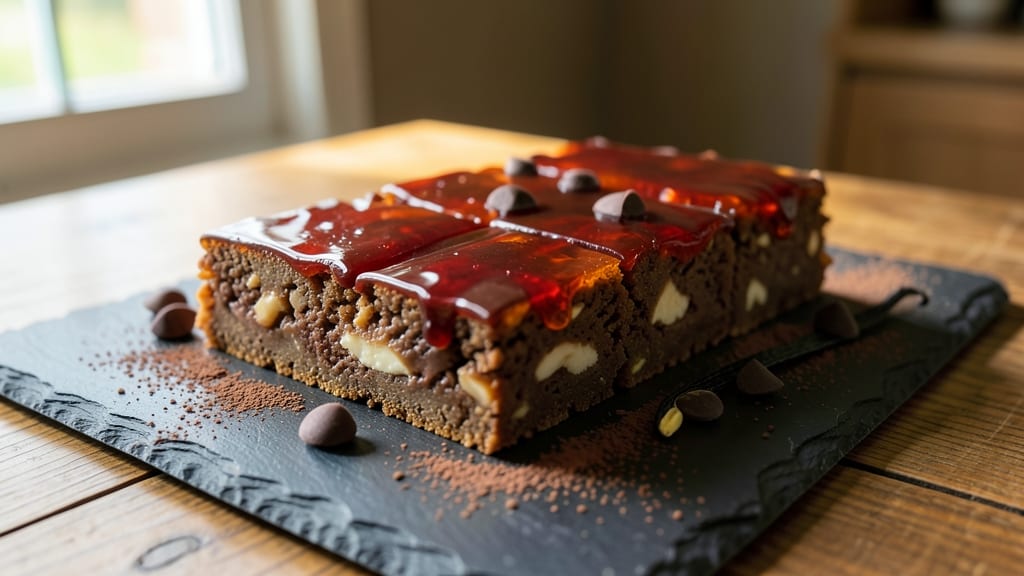
This cashew chocolate bar recipe delivers restaurant-quality richness without a single oven turn-on. The magic happens with soaked cashews blended into a velvety base, then combined with melted chocolate for a no-bake dessert that's creamy, decadent, and surprisingly simple to make.
I developed this version after years of testing—it's the perfect balance of nutty depth and chocolate intensity that holds together beautifully without baking.
The foundation starts with soaked cashews, which transform into a smooth, spreadable base when blended with dates or maple syrup for binding. This creates the structural backbone that holds the chocolate while keeping the texture luscious.
The key is temperature control—warm the chocolate just enough to blend seamlessly without melting the cashew mixture completely, ensuring each bite delivers that perfect silky-smooth contrast.
What you'll end up with is a fudgy yet firm chocolate bar with visible cashew flecks throughout, offering both visual appeal and complex flavor. The no-bake method means no risk of burning or uneven baking, and the bars develop even better flavor as they set in the fridge.
This recipe yields about 12 bars, making it ideal for gifting or satisfying cravings without guilt.
These bars keep beautifully in the fridge for up to two weeks, though they rarely last that long. The combination of cashew creaminess and chocolate richness creates a dessert that's addictively satisfying—perfect for vegan diets but universally loved. Let's create these decadent treats with just a few simple steps.
Ingredients for cashew chocolate bar
Twelve ingredients transform into restaurant-quality chocolate bars without heat or baking.
| Ingredient | Amount | Notes |
|---|---|---|
| Raw Cashews 🥜 | 2 cups | Unsalted, soaked for 4 hours |
| Pitted Dates 🍈 | 1 cup | Medjool preferred for sweetness |
| Pure Maple Syrup 🍯 | ½ cup | Grade B for richer flavor |
| Vegan Dark Chocolate Chips 🍫 | 1 ½ cups | 70% cocoa or higher |
| Unsweetened Cocoa Powder 🍫 | ½ cup | Natural, not Dutch-processed |
| Vanilla Extract 🌿 | 1 tbsp | Pure Madagascar bourbon |
| Sea Salt 🧂 | ½ tsp | Fine grain for sprinkling |
| Coconut Oil 🥥 | ¼ cup | Melted for mold coating |
| Raw Cacao Nibs 🍫 | ¼ cup | Optional for crunch |
| Pure Vanilla Bean Paste 🌿 | ½ tsp | For intense vanilla flavor |
| Almond Flour 🌰 | ¼ cup | For texture enhancement |
The cashews are the star here—soak them for at least 4 hours to soften completely. Trader Joe's or bulk bins at natural food stores have the best raw cashews, but any unsalted variety works. For the dates, Medjool is ideal, but regular pitted dates will do in a pinch. The maple syrup should be Grade B for that rich, caramel-like depth. I always double-check the cocoa percentage on the chocolate chips—70% or higher ensures that deep, complex flavor without being too bitter. The cocoa powder matters too; natural cocoa gives that authentic chocolate taste, while Dutch-processed is more mellow.
No vanilla extract? Vanilla bean paste is a game-changer if you have it—it's like having a vanilla bean without the hassle. Short on cocoa nibs? Extra chocolate chips work just as well for crunch. The almond flour can be swapped for more cashew cream if you're out, but it adds a lovely texture. For the chocolate, if you can't find vegan chips, melt a vegan chocolate bar and let it cool slightly before mixing. The key is keeping everything at the right temperature—lukewarm for blending, not hot. And don't skip the salt; it's what brings all the flavors together in that perfect balance.
These bars set beautifully in the fridge, but they're even better after 24 hours—the flavors meld and deepen. Store them in an airtight container with parchment paper between layers to prevent sticking. They keep for 2 weeks in the fridge or 3 months in the freezer. I like to portion them into individual squares for easy gifting or snacking. If you're making these ahead for a party, let them come to room temperature for 30 minutes before serving—they're much easier to cut and handle.
Why You'll Love This Recipe
- No-Fuss Mixing: I swear by the food processor for this one—just pulse the cashews, dates, and maple syrup until it sticks together like wet sand. No fancy techniques, no waiting for dough to rise, just 5 minutes of hands-off blending while you sip your coffee.
- Rich Without Guilt: That combo of raw cashews and dark chocolate? It’s like a hug for your taste buds, but the dates and maple syrup keep it naturally sweet—no refined sugar crash here. Honestly, I’ve cut out store-bought protein bars after trying this.
- Snack Attack Ready: These bars keep beautifully in the fridge for a week, so I always have grab-and-go energy when I’m rushing out the door. (Yes, even on a Tuesday night.) Plus, they’re the only snack my kids will eat without begging for cookies.
- Budget-Friendly Luxury: A single bag of cashews and dates stretches across multiple batches, and the cocoa powder adds depth for pennies. Between us, this tastes way fancier than anything from the health food aisle—but costs half as much.
Step-by-step instructions for cashew chocolate bars
Here's how to create these decadent, no-bake bars with perfect texture and rich flavor.
Soak and Prepare the Base Ingredients
Start by soaking the 2 cups raw cashews in hot water for 4 hours—this softens them perfectly for blending. While they soak, combine the 1 cup pitted dates, 0.5 cup pure maple syrup, 1 tbsp vanilla extract, and 0.5 tsp sea salt in a high-speed blender. Pulse until the dates break down completely, then blend on high for 1-2 minutes until completely smooth.
This mixture forms the base of your bars, so blending it thoroughly ensures a silky texture. If it looks too thick, add 1-2 tablespoons of water to help it blend smoothly. The dates provide natural sweetness while binding everything together.
Blend the Nutty Foundation
Transfer the soaked cashews (drained well) to the blender with the date mixture. Add the 0.25 cup almond flour and 0.5 tsp pure vanilla bean paste for depth of flavor. Blend on high for 3-5 minutes until completely smooth and creamy, scraping down the sides as needed.
The mixture should be thick but pourable—like a rich, nutty ganache. If it's too thick, add 1 tablespoon of water at a time until it reaches the right consistency. This step is crucial for achieving that perfect, fudgy texture in your bars.
Melt and Combine the Chocolate Layers
In a separate bowl, melt the 1.5 cups vegan dark chocolate chips and 0.25 cup coconut oil together in 30-second bursts in the microwave, stirring between each interval until fully melted and smooth. Add the 0.5 cup unsweetened cocoa powder and mix until fully incorporated.
Now, gently fold the melted chocolate mixture into the cashew base. Stir until fully combined—you want a marbled effect with both chocolate and cashew elements visible. This creates the signature layers of flavor and texture in each bite.
Assemble and Set the Bars
Line an 8x8-inch baking dish with parchment paper, pressing it into the corners to prevent sticking. Pour the mixture into the dish and spread it evenly using a spatula. Sprinkle the 0.25 cup raw cacao nibs evenly over the top for added crunch and visual appeal.
Refrigerate the bars for 2-3 hours until completely firm. The edges should pull away cleanly from the parchment, and the center should hold its shape when gently pressed. For extra stability, you can also freeze them for 1 hour before slicing.
Slice and Serve with Confidence
Once set, remove the bars from the refrigerator and carefully lift them out of the dish using the parchment paper. Using a sharp knife, cut the bars into 12 equal squares (about 2x2 inches each). For clean cuts, dip the knife in hot water between slices to prevent sticking.
These bars are best served at room temperature, allowing the flavors to fully meld. Store any leftovers in an airtight container in the refrigerator for up to 2 weeks or freeze for up to 3 months. Each bite delivers a perfect balance of creamy cashew richness, deep chocolate intensity, and subtle sweetness—no oven required!
Pro Tips For Making Cashew Chocolate Bar
- SOAK CASHEWS OVERNIGHT: I learned this the hard way—rushing the soak with hot water just doesn’t cut it. Toss raw cashews in boiling water for 10 minutes, then let them sit in fresh cold water for 8+ hours (yes, even if you’re impatient like me). The texture becomes buttery and uniform, not gummy or chalky, which makes the whole bar hold together like a dream.
- PIT DATES BY HAND: Food processors are fine, but I’ve found pitting dates by hand gives you more control. Slice them in half, then use a small knife to scoop out the pit—it’s faster than you’d think and prevents the pulpy bits from turning into a sticky mess in your mixture. (Your future self will thank you when blending.)
- MELT CHOCOLATE GENTLY: Skip the microwave—it’s the fastest way to seize your chocolate chips. Instead, melt them in a heatproof bowl over a pot of barely simmering water (about 170°F/77°C), stirring every 30 seconds. If you see any graininess, immediately remove from heat and whisk in a teaspoon of coconut oil to smooth it out.
- PRESS FIRM AND EVEN: Does it look weird? Yes. Does it work? Every single time. Use a small offset spatula or the bottom of a measuring cup to press the mixture into the pan in one smooth motion—no random patting. Then, run a knife along the edges to release cleanly. Uneven pressing = crumbly bars; this method guarantees a solid slab that slices like a pro.
Flavor customization for this cashew chocolate bar
Sweet and Spicy Twist
Add 1 tsp cayenne pepper or 2 tbsp chili powder to the melted chocolate mixture for a bold kick. I like to balance it with 1 extra tbsp maple syrup to prevent overpowering the sweetness. Top with crushed dark chocolate-covered espresso beans for a mocha-chili fusion that's surprisingly addictive. 🌶️
Orange Zest Infusion
Zest 1 orange (about 1 tbsp zest) and add it to the cashew base along with 1 tsp orange extract for a bright, citrusy twist. The acidity cuts through the richness beautifully. I also sprinkle freeze-dried orange powder on top before setting for extra pop and visual appeal.
Peanut Butter Swirl
Mix ½ cup creamy peanut butter (unsweetened) into the cashew base before combining with chocolate. Use a spoon to create swirls throughout the mixture for a marbled effect. This adds a nutty depth that complements the cashews perfectly. For extra texture, press chopped peanuts into the top before chilling. 🥜
Sea Salt Caramel Drizzle
After slicing, drizzle each bar with homemade sea salt caramel made by heating ¼ cup coconut sugar with 2 tbsp coconut cream until melted, then whisking in 1 tbsp coconut oil and ½ tsp flaky sea salt.
Let it cool slightly before drizzling for a luxurious finish that enhances the chocolate's natural sweetness.
Coffee Chocolate Boost
Add 1 tbsp instant coffee granules to the melted chocolate mixture for a mocha flavor that deepens the chocolate's complexity. Enhance with ½ tsp cinnamon and a pinch of cardamom for warmth.
Top with crushed dark chocolate-covered coffee beans before setting. This variation tastes like a decadent dessert but keeps the vegan-friendly profile. ☕
White Chocolate Vanilla Dream
Replace the dark chocolate with 1.5 cups vegan white chocolate chips and reduce the cocoa powder to ¼ cup. Add an extra 1 tsp vanilla bean paste and a pinch of almond extract for a sophisticated vanilla bean flavor.
Top with crushed white chocolate chips and a sprinkle of edible gold leaf** for an elegant touch that's perfect for special occasions. 💛
Nutrition facts
Frequently asked questions
Can I make these without a high-speed blender?
Yes! If you don't have a high-speed blender, use a food processor or even a regular blender with patience. Process the soaked cashews and date mixture in batches, scraping down the sides frequently. For the cashew base, blend until completely smooth—it may take 5-7 minutes total. The texture will be slightly grainier but still delicious!
Why do my bars crack or crumble when slicing?
This usually happens if the bars didn't chill long enough or if the chocolate was too warm when mixed. Let them set in the fridge for 3-4 hours (or overnight) for best results. For extra stability, freeze for 1 hour before slicing. Also, ensure your knife is sharp and dip it in hot water between cuts to prevent sticking.
Can I substitute maple syrup with something else?
For a neutral sweetener, use agave nectar or date syrup in a 1:1 ratio. If you prefer refined sugar, dissolve ½ cup granulated sugar in ¼ cup water first to create a syrup. Avoid honey or corn syrup—they won't blend smoothly with the cashew mixture. The key is achieving a pourable consistency.
How do I make these bars nut-free?
Replace the cashews with 2 cups cooked and cooled sweet potatoes or 2 cups cooked and drained chickpeas (both work surprisingly well!). For binding, add an extra 2 tbsp maple syrup and blend until ultra-smooth. The texture will be slightly denser but still rich and fudgy. Test with a small batch first!
Can I use store-bought nut butter instead of cashew base?
Not recommended—store-bought nut butters contain oils and emulsifiers that alter the texture. The cashew base needs the dates and maple syrup for proper binding and sweetness. However, you could blend 1 cup cashew butter (no sugar added) with ½ cup melted coconut oil and ½ cup maple syrup for a quicker shortcut. The result won't be identical but still tasty!