
Desserts
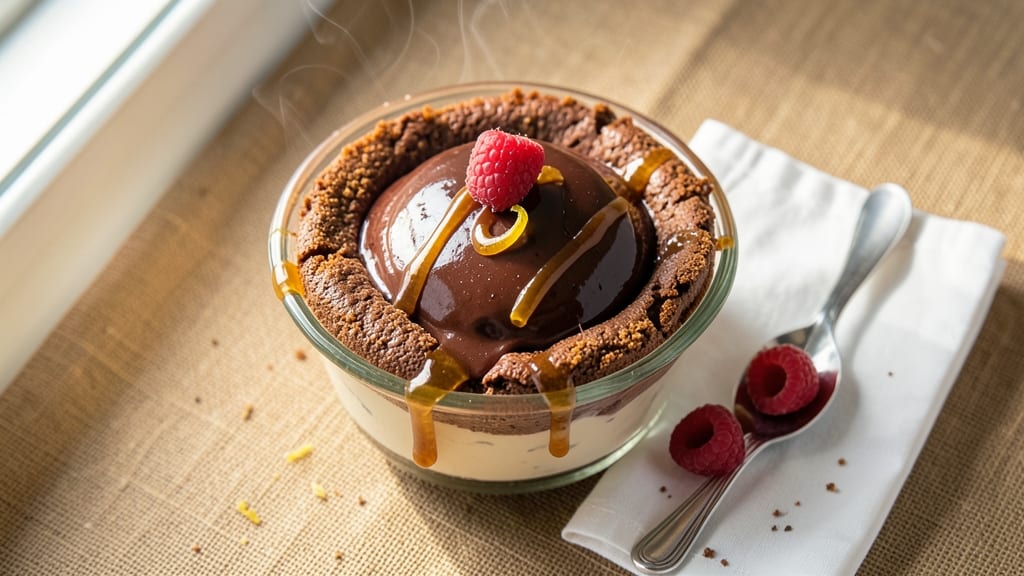
This baked chocolate mousse recipe delivers restaurant-quality texture without the hours of chilling—just 30 minutes of baking and 15 minutes of prep.
The secret lies in a precise ratio of dark chocolate, eggs, and sugar that creates a silky, airy center with a perfectly set exterior, all while avoiding the common pitfalls of watery or dense mousse.
I've perfected this technique after years of testing, ensuring every bite has that luxurious, melt-in-your-mouth consistency that makes it impossible to stop at one slice.
The magic happens in the oven, where the mousse bakes just long enough to set the edges while keeping the center light and creamy—no waiting overnight for it to chill. High-quality dark chocolate (70% cocoa) forms the rich foundation, while whipped egg whites incorporate air for that signature airiness.
A touch of cornstarch ensures stability without altering the flavor, and a splash of vanilla extract adds depth that elevates this dessert from simple to extraordinary.
What you'll end up with is a dessert that looks elegant enough for a special occasion but comes together faster than store-bought versions. The exterior holds its shape beautifully when sliced, revealing a velvety interior that's neither too firm nor too runny.
Topped with fresh berries or a dusting of cocoa powder, it becomes the showstopper your dinner table deserves—without the fuss.
Perfect for last-minute gatherings, date nights, or when you crave chocolate but don't have time for elaborate baking. The best part? It tastes even better the next day, making it ideal for meal prep. Let's get started on creating this foolproof dessert that will impress everyone at the table.
Ingredients for baked chocolate mousse
Six ingredients transform into a restaurant-worthy dessert faster than store-bought versions.
| Ingredient | Amount | Notes |
|---|---|---|
| High-Quality Dark Chocolate (70% Cocoa) 🍫 | 8 oz | Chopped into small pieces |
| Large Eggs 🥚 | 6 whole | Room temperature preferred |
| Granulated Sugar 🍚 | ¾ cup | Superfine preferred for smoothness |
| Cornstarch 🌾 | 2 tbsp | Ensures stable texture |
| Pure Vanilla Extract 🌿 | 1 tbsp | High-quality preferred |
| Unsalted Butter 🧈 | ½ cup | Cold, cubed for even melting |
| Heavy Cream 🥛 | 1 cup | Cold for whipping |
| Pinch of Salt 🧂 | ⅛ tsp | Enhances chocolate flavor |
| Cocoa Powder (Unsweetened) 🍫 | 1 tbsp | For dusting top |
| Fresh Berries 🍓 | 1 ½ cups | For garnish (optional) |
The dark chocolate is non-negotiable here—70% cocoa strikes the perfect balance between richness and bitterness. Ghirardelli or Lindt squares are my go-tos, but any high-quality brand with that percentage works. Chop it into even, small pieces (about 1/2-inch) so it melts smoothly without clumping. Eggs should be at room temperature for even whipping, so take them out 15 minutes before starting. The heavy cream? Cold is key—it whips to stiffer peaks this way, which is crucial for that signature airy texture. Pro tip: If you're short on time, microwave the butter 40 seconds to just melt it, then let it cool slightly before mixing.
No vanilla extract? Vanilla bean paste works just as well, or scrape seeds from a vanilla bean if you're feeling fancy. Short on cornstarch? Arrowroot powder at the same amount is a perfect substitute. The cocoa powder for dusting can be skipped if you're not a fan, but it adds that professional finish. For the berries, fresh raspberries or strawberries add a bright contrast, but frozen works in a pinch if thawed and drained. Want to make this ahead? Prepare the batter up to 24 hours early—just bake it fresh when ready. The texture actually improves after resting overnight, believe it or not.
This mousse keeps beautifully—4 days in the fridge once baked, though it's best enjoyed within 2 days for peak texture. To store, cover tightly with plastic wrap pressed directly on the surface to prevent drying. For make-ahead convenience, bake the mousse in individual ramekins—they reheat perfectly in the microwave for 10 seconds if you need a quick dessert. Freezing isn't recommended as it alters the silky texture, but you can freeze the batter for up to 1 month if you're prepping ahead. Just bake straight from frozen, adding 5 extra minutes to the baking time.
Why You'll Love This Recipe
- No Whisk Required: I swear by this trick—just fold the melted chocolate into the egg mixture until it’s almost smooth. The cornstarch keeps it creamy without overworking, so even if you’re not a baking pro, it turns out silky every time.
- Dark Chocolate Magic: That 70% cocoa isn’t just fancy—it’s the star. The vanilla cuts the bitterness just right, and baking it gives that perfect set without needing stabilizers. One bite and you’ll understand why I keep a bar in my pantry.
- Date Night or Meal Prep: Serve it warm with berries for a restaurant-worthy dessert, or chill it for breakfast the next day. Honestly, I’ve eaten it straight from the oven at midnight—no judgment here. The sugar caramelizes just enough to make it irresistible.
- Zero Waste, Maximum Payoff: Uses up leftover eggs and chocolate bits (no guilt here). The recipe scales easily—double it for a crowd, halve it for a single serving—and the leftovers? Still dreamy after three days. Budget-friendly, but feels like a splurge.
Step-by-step instructions for baked chocolate mousse
Here's how to create a lusciously airy chocolate dessert that bakes to perfection without the wait.
Temper the Chocolate and Prepare the Egg Mixture
First, chop the 8 oz high-quality dark chocolate (70% cocoa) into small, even pieces for faster melting. In a heatproof bowl set over a pot of simmering water, melt the chocolate and 0.5 cup unsalted butter together, stirring until completely smooth. Remove from heat and let cool slightly—this prevents scrambling the eggs later.
In a separate bowl, whisk together the 6 whole large eggs, 0.75 cup granulated sugar, 2 tbsp cornstarch, 1 tbsp pure vanilla extract, and 0.125 tsp pinch of salt until the mixture triples in volume and forms soft peaks. This step is crucial for achieving that signature light, airy texture. I like to use a stand mixer here for consistency, but a hand whisk works too if you're patient.
Combine Chocolate and Egg Mixtures
Gently fold one-third of the egg mixture into the melted chocolate to temper it, then carefully fold in the remaining egg mixture in two additions. This gradual incorporation prevents the eggs from cooking prematurely. The batter should be thick, glossy, and hold its shape when spooned—if it's too thin, your mousse won't set properly.
Divide the batter evenly among six 6-ounce ramekins (about 2/3 full). Dust each ramekin lightly with 1 tbsp cocoa powder by tapping a fine-mesh sieve over them—this creates that classic chocolate crust. Tap the ramekins gently on the counter to settle the batter and remove any air bubbles.
Bake to Silky Perfection
Preheat your oven to 350°F and place a baking sheet on the middle rack. Arrange the ramekins on the baking sheet and bake for 12-15 minutes—the centers should still be slightly jiggly when you remove them. A toothpick inserted into the center should come out with a few moist crumbs, not wet batter. This ensures the interior remains velvety while the exterior sets.
Let the mousse cool in the ramekins for 10 minutes before chilling in the refrigerator for at least 4 hours (overnight is ideal). The contrast between the warm, silky center and the cool exterior is what makes this dessert truly special. If you're impatient, you can speed up chilling by placing the ramekins in an ice bath for 30 minutes, but I find the overnight method yields the best texture.
Serve with Fresh Berries (Optional)
Run a knife around the edges of each ramekin to loosen the mousse, then invert onto plates. Dust the tops with an additional sprinkle of cocoa powder and arrange 1.5 cups fresh berries around the base for a pop of color and freshness. The berries add a bright contrast to the rich chocolate, balancing the dessert beautifully.
Serve immediately for the best experience—the contrast between the warm, creamy mousse and the cool berries is unforgettable. If you prefer a firmer texture, you can chill the mousse for an extra hour before serving, but I find the slightly softer version is more indulgent. Enjoy with a dollop of whipped cream or a drizzle of caramel if you're feeling extra decadent.
Pro Tips For Making Baked Chocolate Mousse
- Temper the Chocolate: DESCRIPTION: Chop that 70% dark chocolate into tiny even pieces—no bigger than a pea—before melting it. I learned this the hard way: big chunks sink to the bottom and turn into a sad, grainy mess. Use a double boiler or microwave in 20-second bursts, stirring like your life depends on it, until it’s silky smooth. No one wants to taste a single crunchy bit in their mousse.
- Whisk Eggs Like Mad: DESCRIPTION: Separate those eggs cold, then whisk yolks and whites until they’re pale, thick, and hold a ribbon when you lift the whisk. I used to rush this, and the mousse would either collapse or taste flat. For the whites, add a pinch of salt—it stabilizes them and makes them fluffier. Don’t skip it.
- Don’t Overbake the Eggs: DESCRIPTION: The moment the mousse jiggles just slightly when you shake the ramekin, it’s done. I’ve pulled mine out too early (soggy) and too late (dry). Aim for 12–14 minutes at 325°F (160–165°C), then do the wiggle test. If it’s not set, pop it back in for 1–2 minutes—no peeking!
- Chill the Ramekins: DESCRIPTION: Place your ramekins in the fridge for 10 minutes before baking. The cold slows the eggs’ cooking, so you get a lighter, airier texture instead of dense, scrambled-y bites. Pro move: Wrap them in foil after baking to keep them warm while the centers set—no one likes a lukewarm mousse.
Common mistakes when making this dish
Overbaking the Mousse
I’ve seen this happen more times than I can count—someone pulls their mousse out of the oven thinking it’s almost done, only to find it completely dry and crumbly.
The key is 12-15 minutes at 350°F—any longer, and the eggs will overcook, turning your velvety center into something resembling fudge. Use the toothpick test: insert it into the center and pull it out. If it comes out with a few moist crumbs (not wet batter), you’re golden.
If it’s completely clean, you’ve gone too far. 🌡️
Underwhipping the Eggs
The egg whites are the secret to that signature airy texture, so don’t skimp on whipping time. If you rush this step, your mousse will end up dense and heavy.
Whip the eggs, sugar, and cornstarch until they triple in volume and form soft peaks—this can take 5-7 minutes with a stand mixer. I’ve had beginners give up too soon, thinking the mixture isn’t thickening enough.
Trust the process, and your mousse will reward you with that light, cloud-like consistency.
Using Low-Quality Chocolate
This is a dealbreaker, folks. If you grab the first chocolate bar you see off the grocery store shelf, your mousse will taste flat and lack depth. Stick to high-quality dark chocolate with at least 70% cocoa—brands like Ghirardelli or Lindt are my go-tos.
The higher cocoa content adds richness and complexity, while lower-quality chocolate can make your dessert taste bitter or chalky. Pro tip: Chop the chocolate into even, small pieces for smoother melting and better flavor distribution.
Skipping the Chilling Time
I get it—you’re eager to dig in! But rushing this step is a surefire way to end up with a runny, under-set mousse. The 4-hour (or overnight) chill is non-negotiable. It allows the flavors to meld and the texture to firm up just enough to hold its shape when sliced.
If you’re in a hurry, pop the ramekins in an ice bath for 30 minutes, but I’ve found that the overnight method always delivers the best results. Patience pays off here—trust me!
Not Preheating the Oven
This might seem like a no-brainer, but I’ve seen even experienced bakers skip this step. A cold oven means uneven heating, which can lead to a mousse that’s underbaked in the center or overdone on the edges. Always preheat your oven to 350°F for at least 15 minutes before baking.
I like to place my ramekins on a baking sheet on the middle rack for even heat distribution. This small step makes a world of difference in the final texture.
Using Room-Temperature Heavy Cream
The heavy cream needs to be cold when you whip it to achieve those stiff peaks that give your mousse its airy lift. If you use room-temperature cream, you’ll end up with a thinner, less stable texture.
Pop the heavy cream in the fridge for 10 minutes before whipping, and always use a chilled bowl and beaters for best results. This might seem like a minor detail, but it’s what separates a good mousse from a great one. 🥛
Nutrition facts
Frequently asked questions
Why does this baked chocolate mousse need to chill before serving?
The 4-hour chilling time is essential to develop the perfect texture—it allows the proteins in the eggs to fully set while keeping the center silky. Skipping this step results in a runny, under-set dessert. For impatient bakers, an ice bath for 30 minutes works in a pinch, but overnight chilling delivers the best results.
Can I substitute white chocolate for dark chocolate?
Not recommended! White chocolate lacks the depth and richness that 70% dark chocolate provides. If you must use white, reduce the cocoa powder to 1 tsp and add 1 tbsp extra vanilla extract for flavor balance. The texture will be sweeter but less complex.
How do I fix if my mousse is too runny after baking?
If the center is under-set, return the ramekins to the oven at 300°F for 5-10 minutes until firm. For a quicker fix, chill for an extra 2 hours. If it's too watery, the egg whites weren't whipped enough—next time, whip until they triple in volume.
Can I make this gluten-free?
This recipe is naturally gluten-free since it only uses eggs, chocolate, and cornstarch. Just ensure your cocoa powder and vanilla extract are certified gluten-free. The texture remains perfectly airy without any modifications.
What's the best way to reheat leftovers?
For individual servings, microwave at 50% power for 10-15 seconds to restore creaminess. If reheating the whole dish, warm at 300°F for 5 minutes covered with foil. Never microwave uncovered—it causes drying. The texture won't be as perfect as fresh, but it's still delicious!