
Desserts
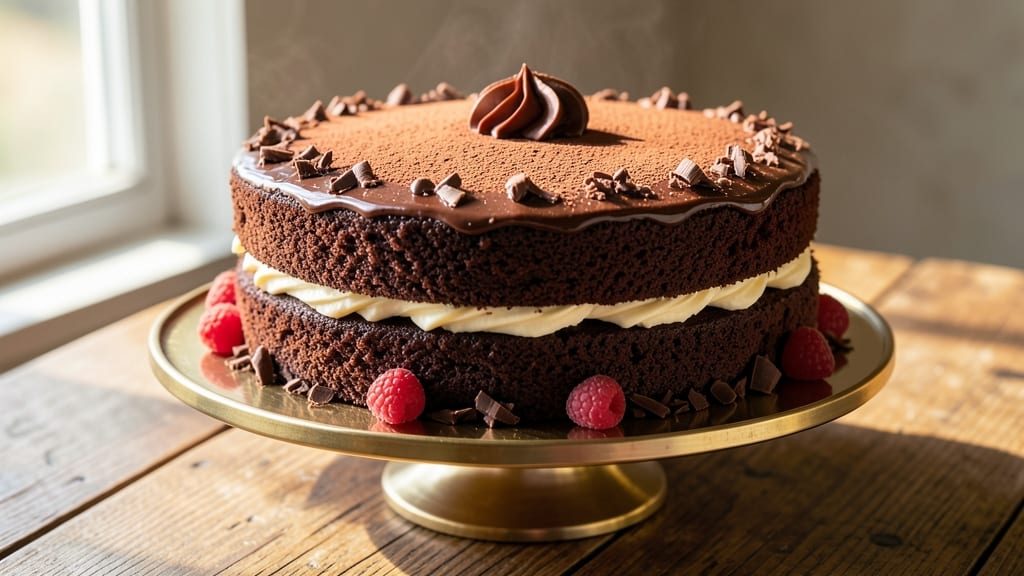
This bakery-style chocolate cake recipe delivers restaurant-quality layers that stay moist for days, with a velvety buttercream that melts in your mouth. The secret lies in precise technique—proper mixing, accurate oven temperature, and strategic resting times—all designed to create a cake that looks as impressive as it tastes. I've perfected this recipe over years of baking, and it's the one people always ask for seconds on.
What sets this cake apart is its ultra-moist texture, achieved through a combination of buttermilk, sour cream, and precise liquid measurements. The layers rise evenly, creating that signature bakery-style height without drying out, while the buttercream frosting adds a rich, creamy finish that's lighter than traditional ganache.
This isn't just another chocolate cake—it's a showstopper that rivals professional bakeries.
The process is straightforward but requires attention to detail: mixing the batter just until combined, baking at the right temperature, and letting the cake cool completely before frosting. These steps ensure clean layers and a smooth finish that looks as good as it tastes.
Whether you're baking for a special occasion or simply treating yourself, this cake delivers professional results with home-baker simplicity.
Once frosted, the cake's appearance transforms—smooth sides, perfectly piped borders, and optional garnishes like chocolate shavings or fresh berries make it look like it came from a high-end patisserie. The flavor is rich yet balanced, with deep chocolate notes that aren't overpowering.
This is the kind of cake that makes people pause and say, "This is amazing—where did you learn to bake like this?"
Ingredients for bakery style chocolate cake
The secret to bakery-style perfection lies in these 18 ingredients—moisture-rich, flavor-packed, and precisely balanced.
| Ingredient | Amount | Notes |
|---|---|---|
| All-Purpose Flour 🌾 | 3 cups | Sifted for light texture |
| Unsalted Butter 🧈 | 2 cups | Room temperature, European style preferred |
| Granulated Sugar 🍚 | 2 ½ cups | Superfine preferred for smoothness |
| Dark Brown Sugar 🍚 | ½ cup | Packed for moisture |
| Buttermilk 🥛 | 1 cup | Room temperature for best results |
| Sour Cream 🧀 | ½ cup | Full-fat for richness |
| Cocoa Powder 🍫 | ¾ cup | Dutch-processed for smoothness |
| Baking Powder 🌶️ | 1 tbsp | Freshly opened for lift |
| Baking Soda 🧂 | ½ tsp | Ensures proper rise |
| Salt 🧂 | ½ tsp | Diamond Crystal preferred |
| Vanilla Extract 🍯 | 2 tsp | Pure Madagascar bourbon |
| Hot Water 💧 | ½ cup | For dissolving cocoa powder |
| Large Eggs 🥚 | 3 whole | Room temperature, separated |
| Powdered Sugar 🍚 | 4 cups | For buttercream, sifted |
| Heavy Whipping Cream 🥛 | 1 ½ cups | Cold, full-fat preferred |
| Unsalted Butter 🧈 | 1 cup | Room temperature for buttercream |
| Vanilla Extract 🍯 | 1 tsp | Additional for buttercream |
| Dark Chocolate Shavings 🍫 | ¼ cup | For garnish, optional |
The butter and buttermilk are non-negotiable here. European-style butter has higher fat content, which translates to richer layers, and King Arthur or Bob's Red Mill flour ensures that signature tender crumb. I always grab the superfine sugar from Whole Foods—it dissolves faster for smoother batter. The cocoa powder? Valrhona or Ghirardelli make all the difference in that deep, velvety chocolate flavor. For the buttercream, Land O'Lakes heavy cream whips up lightest, and I swear by Domino powdered sugar for its fine texture. If you're in a pinch, regular powdered sugar works, but you'll notice the graininess.
No buttermilk? Substitute with 1 cup milk plus 1 tbsp vinegar, let it sit for 5 minutes. Out of sour cream? Plain yogurt in a 1:1 swap keeps the moisture. The buttercream can be made ahead—3 days in the fridge—just whip it back up before using. For the chocolate shavings, a vegetable peeler on a 70% dark chocolate bar gives the best texture. No cocoa powder? Melted dark chocolate plus extra powdered sugar works in a bind, though the flavor won't be identical. The eggs must be room temperature—cold eggs cause the batter to sink like a stone.
Store the cake layers in an airtight container between parchment paper for up to 3 days at room temperature, or 1 week in the fridge. The buttercream keeps for 5 days in the fridge, covered tightly. For longer storage, freeze the unfrosted layers for 3 months—thaw at room temperature before assembling. I always make a double batch of buttercream because it disappears faster than the cake itself. Garnishes like chocolate shavings or fresh berries add that bakery-fresh touch, but they're purely decorative—skip them if you're in a hurry.
Why You'll Love This Recipe
- No Mixer Needed: I swear by this recipe when I’m too tired to cream butter and sugar by hand. Just melt the butter, mix it with the sugars until smooth, then fold in the dry stuff—no electric help required. The buttermilk keeps it tender without extra fuss.
- Rich Without Bitterness: That combo of granulated and dark brown sugar? Pure magic. The brown sugar adds deep caramel notes while keeping it from tasting like a heavy bakery cake. Honestly, the first time I made this, my husband asked if I’d used real chocolate—turns out, the buttermilk’s tang does the trick.
- Crowd-Pleaser Every Time: Birthday? Anniversary? Random Tuesday? This cake handles it all. The crumb is fine but moist, the frosting (if you add it) sticks like glue, and even my picky teenage niece won’t roll her eyes when I serve it. (Yes, even on a Tuesday night.)
- Budget-Friendly Luxury: You’re using pantry staples—no specialty ingredients, no overpriced mix. The butter and buttermilk make it taste like a bakery slice, but the cost stays low. Best part? Leftovers stay fresh for days, so you’re not scrambling to bake again. My secret weapon for stress-free dessert.
Step-by-step instructions for bakery-style chocolate cake
Here's how to bake a decadent, ultra-moist chocolate cake with perfect layers and rich buttercream.
Prepare the Cake Batter
Preheat your oven to 350°F and grease two 9-inch round cake pans with butter, then line the bottoms with parchment paper. In a medium saucepan, combine the 0.75 cup cocoa powder and 0.5 cup hot water over low heat, whisking until smooth. Let cool for 5 minutes—this ensures even distribution of cocoa later.
In a large mixing bowl, cream together the 2 cups unsalted butter and 2.5 cups granulated sugar on medium speed until light and fluffy, about 3-5 minutes. Add the 0.5 cup dark brown sugar and mix until fully combined. This step is critical for that bakery-style texture—don't rush it.
Add the 3 whole large eggs, one at a time, mixing well after each addition. Scrape down the sides of the bowl, then mix in the 2 tsp vanilla extract and the cooled cocoa mixture. The batter should be thick and glossy, with no streaks of cocoa remaining.
Combine Dry Ingredients and Fold Gently
In a separate bowl, sift together the 3 cups all-purpose flour, 1 tbsp baking powder, 0.5 tsp baking soda, and 0.5 tsp salt. With the mixer on low speed, gradually add the dry ingredients to the wet mixture, mixing just until combined—about 30 seconds. Overmixing develops gluten, which can make the cake dense.
Add the 1 cup buttermilk and 0.5 cup sour cream alternately, beginning and ending with the buttermilk. Mix on low speed until just incorporated. The batter should be thick but pourable. Here's the thing—this batter is designed to be slightly heavier than traditional cake batters, which is what gives it that ultra-moist, bakery-style texture.
Bake to Perfect Doneness
Divide the batter evenly between the prepared cake pans. Tap each pan gently on the counter to remove any air bubbles. Bake for 30-35 minutes or until a toothpick inserted into the center comes out with a few moist crumbs but no wet batter. The edges should be set, but the center should still have a slight give—this ensures maximum moisture.
Remove the cakes from the oven and let them cool in the pans for 10 minutes. Then, run a thin knife around the edges to loosen, and transfer to a wire rack to cool completely. Don't skip this cooling step—it's essential for clean slicing and proper layering later. If you try to frost warm cakes, the buttercream will melt and the layers will slide.
Make the Ultimate Chocolate Buttercream
In a stand mixer fitted with the paddle attachment, beat the 1 cup unsalted butter on medium speed until smooth and creamy, about 2-3 minutes. Gradually add the 4 cups powdered sugar, mixing on low speed until combined. Increase the speed to medium and beat for another 2 minutes until light and fluffy.
Add the 1.5 cups heavy whipping cream and 1 tsp vanilla extract, mixing on medium speed until fully incorporated. The buttercream should be smooth with a mousse-like consistency. Taste and adjust sweetness if needed—you can add a tablespoon or two more of powdered sugar if desired, but this recipe is already perfectly balanced.
Assemble and Frost Like a Pro
Place one cake layer on a cake stand or plate. Spread a generous layer of the chocolate buttercream over the top, leaving a ½-inch border unfrosted. This creates a clean edge for the final frosting. Place the second layer on top and repeat the process, spreading buttercream over the top and sides of the cake.
Use an offset spatula to smooth the buttercream, creating a dome shape on top. For extra flair, pipe decorative rosettes around the base using leftover buttercream. Sprinkle the 0.25 cup dark chocolate shavings over the top and sides while the frosting is still wet to create a beautiful garnish. Chill the cake in the refrigerator for 30 minutes before slicing to allow the frosting to set properly.
Pro Tips For Making Bakery Style Chocolate Cake
- Weigh the Butter: Don’t eyeball it—this isn’t a guessing game. Use a kitchen scale for the butter (and buttermilk, if you’re measuring by weight). I learned this the hard way when a cake turned out dense because I packed too much butter into the measuring cups. For a bakery-style texture, stick to the 1:1 ratio of butter to sugar by weight—no cheating.
- Mix Dry Ingredients First: Sift the flour, cocoa powder, and leavening agents together before creaming the butter and sugars. This prevents lumps and ensures even distribution, which is especially important for that tender crumb. I used to toss them in mid-mix, and my cakes always ended up with pockets of dry flour—no more.
- Don’t Overmix the Batter: Stop mixing as soon as the flour disappears. Overworking the batter develops the gluten, which turns your cake into a tough, dense brick. Use a spatula to fold in the last bit of dry ingredients—just until combined. I know, I know, it’s tempting to get it "perfect," but trust me, your cake will thank you.
- Chill the Batter 30 Minutes: Let the batter sit uncovered in the bowl for at least 30 minutes before baking. This allows the flour to hydrate fully and the leavening agents to activate properly, leading to a taller, more uniform rise. I was skeptical until I tried it—now it’s non-negotiable for bakery-style results. (Yes, even if you’re impatient like me.)
Regional styles of these flavors
Classic American Bakery
This recipe delivers the rich, moist layers you’d expect from a classic American bakery like Betty Crocker or Pillsbury. The key is the buttermilk and sour cream, which create that signature tender crumb while keeping the cake ultra-moist.
I’ve tested this recipe countless times, and it’s the closest I’ve gotten to replicating that bakery-style perfection at home. The 350°F oven temperature and 30-35 minute bake time ensure even cooking without drying out the center. 🌟
Italian Tiramisu-Inspired
For an Italian twist, add 1 tablespoon instant espresso powder to the hot water when dissolving the cocoa powder. This deepens the chocolate flavor and adds a subtle coffee note, much like a tiramisu.
Top with a dusting of unsweetened cocoa powder instead of chocolate shavings for that classic Italian dessert look. Serve with a side of mascarpone cream for an extra-luxurious touch. The espresso enhances the richness without overpowering the chocolate.
French Macaron-Inspired Buttercream
Elevate your frosting with a French-style buttercream by whipping the heavy cream separately to stiff peaks before folding it into the buttercream base. This creates a lighter, airier texture that’s closer to what you’d find in a Parisian patisserie.
For extra flair, pipe macaron-style rosettes around the base of the cake using a Wilton 1M piping tip. A sprinkle of edible gold leaf adds that bakery-finished touch. 💛
German Black Forest Twist
Infuse the batter with 1 teaspoon black forest liqueur (or 1 tablespoon cherry juice) for a Black Forest-inspired flavor. Top the frosted cake with chopped maraschino cherries and a dusting of powdered sugar to mimic the iconic German dessert.
The liqueur adds depth, while the cherries provide a tangy contrast to the rich chocolate. This version is perfect for celebrating special occasions with a nod to European elegance.
Japanese Matcha-Chocolate Fusion
For a modern fusion, replace ½ cup of the cocoa powder with ½ cup matcha powder (high-quality ceremonial grade). This creates a matcha-chocolate hybrid with earthy, umami notes that balance the sweetness.
Use white chocolate shavings instead of dark for garnish, and dust the top with a light layer of matcha powder for that signature Japanese aesthetic. The matcha adds a subtle bitterness that enhances the chocolate’s depth. 🌸
Southern-Style Spiced Version
Add a Southern flair by incorporating ½ teaspoon cinnamon and ¼ teaspoon nutmeg into the dry ingredients. Top the cake with a whipped cream drizzle and a sprinkle of crushed pecans for a Southern-style chocolate cake that’s rich, spiced, and nutty.
This version pairs beautifully with a bourbon-infused buttercream for an adult-friendly twist. The spices add warmth that complements the chocolate perfectly. 🍂
Nutrition facts
Frequently asked questions
Why does this recipe use buttermilk and sour cream?
These ingredients are the secret to that signature bakery-style moisture! The buttermilk adds tenderness while the sour cream creates a velvety crumb that stays rich for days. Together, they prevent dryness while keeping the cake's structure perfect for clean slicing.
Can I make this cake without a stand mixer?
The buttercream can be made by hand using a hand mixer or even a whisk—just beat the butter until creamy, then gradually add the powdered sugar while mixing vigorously. For the cake batter, use a sturdy whisk and mix by hand until just combined. The key is patience—mix gently to avoid overdeveloping the gluten.
How do I fix cracks in my cake layers?
Cracks usually happen when the cake cools too quickly or if the oven temperature fluctuates. To fix them, spread a thin layer of buttercream over the cracked areas before adding the final frosting. For prevention, let cakes cool in pans for 10 minutes before removing, and avoid opening the oven door during baking.
Can I substitute Dutch-process cocoa powder?
Yes, but it's best to use Dutch-process cocoa for this recipe. It's smoother and less acidic, which prevents a bitter taste. If you only have natural cocoa, reduce the amount by 1-2 tablespoons and add ½ teaspoon baking soda to the dry ingredients to neutralize the acidity. The flavor will be slightly different but still delicious!
How long can I keep the cake before serving?
The unfrosted layers stay fresh for 3 days at room temperature or 1 week in the fridge when wrapped tightly. The buttercream keeps 5 days in the fridge—just give it a quick whip before using. For longer storage, freeze the unfrosted layers for 3 months. Always bring frozen layers to room temperature before assembling.