
Desserts
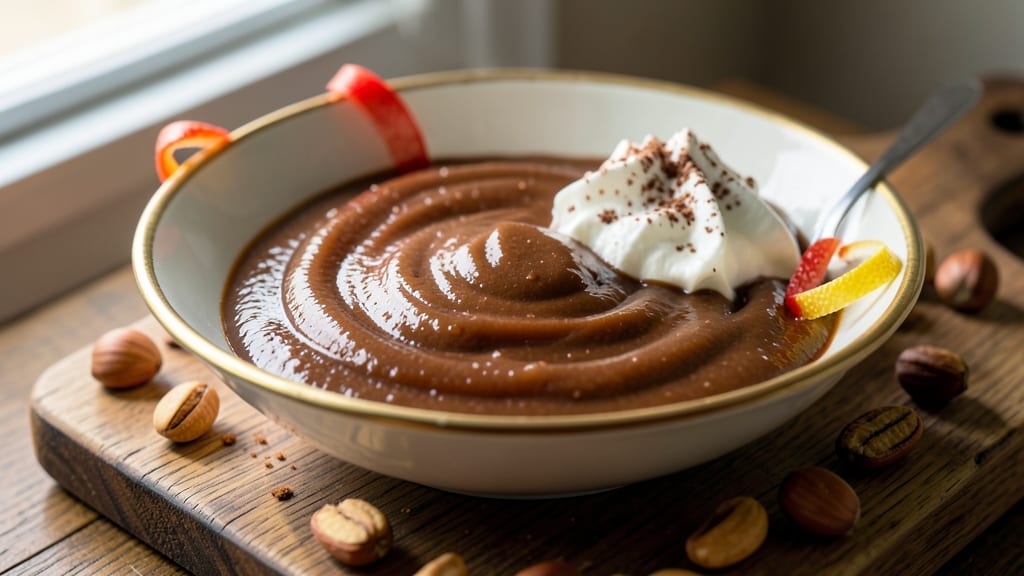
This banana chocolate jam recipe transforms ripe bananas and cocoa powder into a rich, fudgy spread with no refined sugar—just natural sweetness and deep chocolate flavor.
The secret lies in simmering the mixture until thick and glossy, creating swirls of caramelized banana and cocoa that taste like dessert in every spoonful. Perfect for vegans, this jam requires just five simple ingredients and takes less than 20 minutes to make.
The process is straightforward but delivers restaurant-quality results: ripe bananas break down into a velvety base, while cocoa powder adds depth without overpowering the natural sweetness. A pinch of cinnamon enhances warmth, and a splash of vanilla extract ties everything together.
Unlike store-bought versions, this jam thickens naturally as it cooks, ensuring a spreadable yet thick consistency that clings beautifully to toast or yogurt.
What makes this recipe truly versatile is its ability to elevate everything from breakfast to dessert. Use it as a no-bake filling for cookies or a glaze for cakes, or simply spread it on toast with peanut butter for a decadent morning treat.
The jam stores well in the fridge for up to two weeks, making it ideal for batch prep and gifting.
Best of all, this recipe proves healthy ingredients can taste indulgent. The natural sweetness of bananas balances the bitterness of cocoa, creating a harmonious flavor that’s both satisfying and guilt-free. Let’s get started—your taste buds will thank you.
Ingredients for banana chocolate jam
Five ingredients create this velvety, naturally sweetened chocolate-banana spread perfect for toast or desserts.
| Ingredient | Amount | Notes |
|---|---|---|
| Ripe Bananas 🍌 | 2 cups | Mashed to remove lumps |
| Unsweetened Cocoa Powder 🍫 | ½ cup | Natural or Dutch-processed |
| Pure Vanilla Extract 🥛 | 1 tbsp | High-quality Madagascar preferred |
| Ground Cinnamon 🌿 | ½ tsp | Freshly ground for warmth |
| Lemon Juice 🍋 | 1 tbsp | Freshly squeezed, balances sweetness |
| Pinch of Sea Salt 🧂 | ⅛ tsp | Enhances flavor depth |
| Extra-Virgin Olive Oil 🫒 | 1 tbsp | For glossy finish |
The bananas are the star—choose ripe, spotted ones for maximum sweetness and creaminess. Trader Joe's or local markets often carry the sweetest varieties, but any overripe bananas work. Cocoa powder quality matters: Valrhona or Guittard brands deliver the richest flavor. Measure cocoa accurately—too much makes it bitter. For the vanilla, Madagascar bourbon extract adds complexity, but any pure extract works. The cinnamon should be freshly ground—pre-ground loses potency quickly. Store your spices in airtight containers away from light.
No vanilla extract? Vanilla bean paste or even a scraped vanilla bean works. Running short on lemon juice? Lime juice at half the amount brightens the flavor similarly. The olive oil might seem odd, but it creates that signature glossy finish—don't skip it. For extra richness, add 1 tbsp of nut butter to the finished jam. If the texture seems too thin after cooking, simmer uncovered for 2-3 more minutes to thicken. The salt is crucial—it balances the sweetness and enhances all flavors, so measure carefully.
This jam thickens as it cools, so it's best stored in a clean glass jar with a tight seal. Keeps in the fridge for 2 weeks or freezes beautifully for 3 months. For gifting, portion into small jars—it makes a stunning present. Reheat gently in the microwave for 20 seconds before serving. The flavor actually improves after 24 hours as the ingredients meld. Make a double batch—you'll want it on everything from toast to ice cream.
Why You'll Love This Recipe
- No-Cook Magic: I swear by this—just mash those bananas, stir in the cocoa and cinnamon, and boom, it’s ready. No stove, no fuss, no waiting for water to boil. Honestly, I make a batch while chatting on the phone, and it’s always done by the time I hang up.
- Rich Without Sugar: That cocoa powder and vanilla extract? Pure flavor gold. The lemon juice brightens it up so it’s not heavy, and the cinnamon adds warmth that makes it taste like a hug. It’s dangerously addictive—my kids beg for it on toast, but I sneak bites straight from the jar.
- Spreads Like Butter: This isn’t just for toast. Slather it on pancakes, mix it into oatmeal, or even drizzle it over yogurt. I’ll be real: I’ve used it as a filling for muffins (yes, really) and it never lets me down. Versatile enough for breakfast or dessert, no excuses.
- Pantry Staple Power: You’re already using ingredients you have—bananas, cocoa, cinnamon. No weird substitutions, no last-minute grocery runs. And because it keeps for weeks in the fridge? I make a big batch and forget about it until I need a quick pick-me-up. Budget-friendly, time-saving, and always there when I need it.
Step-by-step instructions for banana chocolate jam
This method delivers rich, fudgy swirls with perfect balance—no refined sugar needed.
Prepare the Banana Base
In a medium saucepan, combine the 2 cups ripe bananas, 1 tablespoon lemon juice, and the 0.125 teaspoon pinch of sea salt. Mash the bananas thoroughly with a potato masher or fork until completely smooth, removing any lumps. This ensures even cooking and a velvety texture throughout.
Place the saucepan over medium heat and bring the mixture to a gentle simmer. Stir occasionally as it heats, breaking up any stubborn lumps with a wooden spoon. You'll notice the mixture thicken slightly as it warms, but it should remain loose enough to swirl easily. Let it cook for about 5 minutes until it reaches a temperature of 160°F—this activates the natural pectin in the bananas and creates the perfect jam consistency.
Incorporate Cocoa and Spices
Reduce the heat to low and gradually whisk in the 0.5 cup unsweetened cocoa powder until completely dissolved. This step is crucial—whisking prevents clumping and ensures an even chocolate distribution throughout the jam. Add the 0.5 teaspoon ground cinnamon and 1 tablespoon pure vanilla extract, mixing well to combine.
The mixture will darken as the cocoa integrates, creating a rich, molasses-like consistency. Taste at this stage—you should detect a deep chocolate flavor with a subtle warmth from the cinnamon. If the mixture appears too thick, add 1 teaspoon of water at a time until it reaches a smooth, pourable consistency. Continue cooking for another 3-4 minutes while stirring constantly to prevent sticking.
Add Olive Oil for Texture
Remove the saucepan from heat and stir in the 1 tablespoon extra-virgin olive oil. This final addition creates the signature fudgy swirls and adds a glossy finish. The oil also helps balance the intensity of the cocoa, preventing bitterness while enhancing the natural sweetness of the bananas.
Return the pan to low heat and stir continuously for 2-3 minutes until the mixture reaches a temperature of 170°F. You'll notice it thickens further and develops a glossy sheen—this is your signal that the jam is ready. The texture should be thick enough to hold its shape when spooned but still spreadable. If it's too thin, simmer for an additional 1-2 minutes to reach the proper consistency.
Test and Store Properly
Transfer the jam to a clean glass jar or airtight container. To test for doneness, place a small spoonful on a chilled plate and refrigerate for 5 minutes. When you run your finger through it, the jam should wrinkle slightly but still be spreadable—this indicates the perfect balance between firmness and creaminess.
Allow the jam to cool to room temperature before sealing. Store in the refrigerator for up to 2 weeks or freeze for up to 3 months. The flavors will continue to meld and deepen as it sits, making it even more delicious over time. This method yields a jam that's rich, complex, and naturally sweetened—ideal for toast, yogurt, or dessert applications.
Pro Tips For Making Banana Chocolate Jam
- Simmer Slow and Steady: I learned this the hard way—rushing the banana-chocolate mix on high heat turns it into a sad, grainy paste instead of a glossy jam. Keep it at a gentle simmer (around 180°F/82°C) so the bananas break down smoothly without burning. If it’s splattering too much, lower the heat and let it work its magic.
- Sift the Cocoa: Unsweetened cocoa powder clumps like a stubborn teenager, and those lumps? They’ll make your jam uneven and gritty. Sift it directly into the pot with the other dry ingredients—yes, even if you’re impatient like me. A fine mesh strainer does the trick if you’re skipping the sifter.
- Balance the Sweetness: Ripe bananas vary wildly in natural sugar content, so taste as you go. If the jam tastes bitter after cooking, add a splash of honey or maple syrup (1 tablespoon at a time) to round it out. I was skeptical until I tried it—this recipe actually needs a little help balancing the cocoa’s intensity.
- Strain for Smoothness: After cooking, let the jam cool slightly, then press it through a fine-mesh sieve to remove any banana skins or fibrous bits. This isn’t the prettiest method, but it’s the tastiest—trust me, you’ll notice the difference in texture. Skip this, and you’ll get a mouthful of texture surprises.
Essential equipment for great banana chocolate jam
Medium Saucepan
Start with a medium-sized stainless steel saucepan—I recommend a 3-quart capacity for this recipe. Stainless steel distributes heat evenly, preventing hot spots that can burn your jam.
Avoid nonstick pans; they don’t handle prolonged simmering well and can impart off-flavors. A 3-quart Le Creuset saucepan is my go-to for its durability and even heating. 🔥
Wooden Spoon
Use a long-handled wooden spoon for stirring—it prevents splatters and won’t scratch your pan. A 12-inch maple spoon works best because it’s sturdy enough to handle the thick mixture without bending.
Avoid metal spoons, as they can react with the lemon juice or cocoa over time. I keep one dedicated to sweet recipes to avoid cross-contamination.
Potato Masher
A potato masher is essential for breaking down the bananas into a smooth, lump-free base. I prefer a stainless steel masher because it’s easy to clean and won’t retain banana stains like plastic.
If you don’t have one, a fork or whisk works in a pinch, but you’ll need to strain the mixture through a fine-mesh sieve to remove any lumps.
Fine-Mesh Sieve
For an ultra-smooth texture, strain the banana mixture through a fine-mesh sieve after mashing. This removes any stubborn fibers or skin fragments, ensuring a silky jam. A 3-inch stainless steel sieve from OXO is my favorite—it’s durable and easy to clean.
Skip this step only if you’re confident your mashed bananas are completely smooth.
Digital Thermometer
Accurate temperature control is key to perfect jam consistency. A digital instant-read thermometer like the Thermoworks ThermoPop ensures you hit the 160°F and 170°F targets precisely. Without one, you risk undercooking (too runny) or overcooking (too thick).
I test the temperature at the end of each cooking stage to guarantee the ideal texture every time. ⏱️
Glass Jars for Storage
Store your jam in glass jars with airtight lids—I love Ball Mason jars for their sealability and aesthetic appeal. Glass preserves the jam’s flavor better than plastic and is safer for long-term storage.
Label the jars with the date to track freshness. For gifting, portion into small jars—they’re perfect for sharing and make a stunning presentation.
Nutrition facts
Frequently asked questions
Can I make this banana chocolate spread without olive oil?
Yes! While olive oil adds richness and gloss, you can substitute it with 1 tablespoon of neutral oil like avocado or coconut oil, or even 1/2 teaspoon of vanilla bean paste for extra flavor. The texture will be slightly less glossy but still delicious. For a lighter option, omit it entirely—the jam will just be slightly less fudgy.
How do I fix my jam if it's too thin or too thick?
Too thin? Return the pan to low heat and simmer uncovered for 2-3 minutes, stirring constantly. For extra thickness, mix 1/2 teaspoon of cornstarch with 1 teaspoon water, stir into the jam, and cook for 1 more minute. Too thick? Thin with 1 teaspoon water or lemon juice while warm. Always test consistency by chilling a spoonful for 5 minutes—it should wrinkle slightly when touched.
What's the best way to use this jam beyond toast?
This versatile jam works beautifully as a glaze for cakes or muffins, a filling for crepes or pancakes, or a swirl in yogurt and oatmeal. Try it as a dip for fresh fruit, a topping for ice cream, or even a filling for homemade chocolate truffles. For savory applications, pair it with sharp cheeses like goat cheese on crackers—its natural sweetness balances salty flavors perfectly.
Can I substitute maple syrup or honey for the banana sweetness?
Yes, but adjust carefully! Replace the 2 cups mashed bananas with 1 cup maple syrup or honey plus 1 cup water to maintain balance. Reduce the cooking time slightly (3-4 minutes total) since these sweeteners don't need to reduce like bananas. The texture will be slightly thinner, so simmer longer if needed. For best results, use organic, unfiltered maple syrup for deeper flavor.
Why does my jam taste bitter or grainy?
Bitterness usually means too much cocoa powder or undercooked bananas. Use 1/2 cup cocoa max and ensure bananas reach 160°F. Graininess often comes from lumps in mashed bananas or cocoa. Strain through a fine-mesh sieve after mashing, and whisk cocoa powder into warm (not hot) liquid to prevent clumps. For extra smoothness, blend the finished jam briefly before storing.