
Desserts
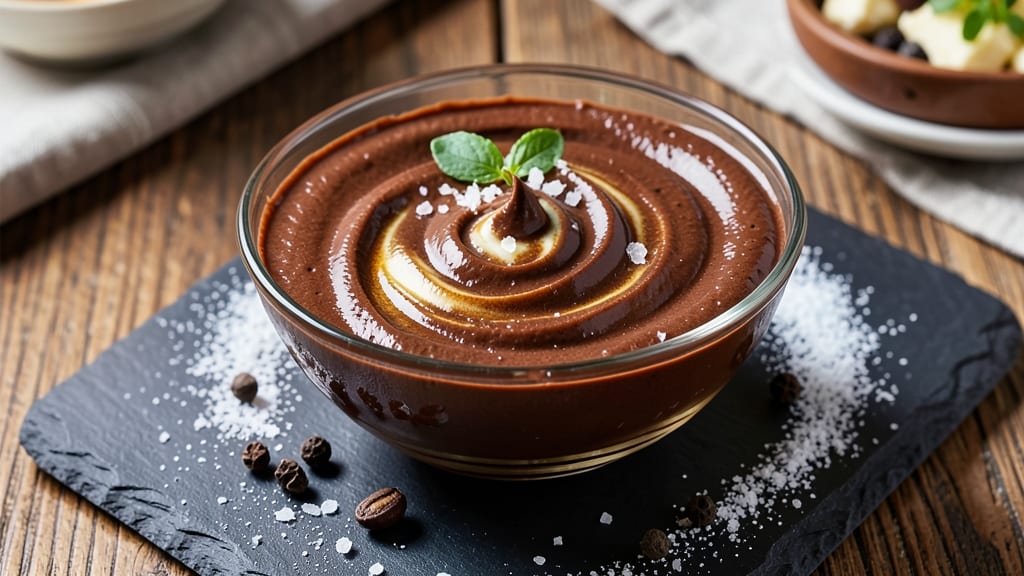
This bittersweet chocolate frosting recipe delivers the perfect balance of rich cocoa depth and velvety smoothness, elevated by a subtle espresso infusion that enhances every layer. The secret lies in tempering the chocolate properly—avoiding graininess while achieving that signature silky texture that turns cakes into showstoppers.
I developed this formula after years of testing, ensuring it's stable enough for piping but still rich enough to taste decadent.
The foundation starts with high-quality bittersweet chocolate (60-70% cocoa) melted with heavy cream and butter, then whipped to a glossy finish. A touch of espresso powder deepens the chocolate flavor without overpowering it, while vanilla extract adds warmth.
The key technique? Slowly incorporating the chocolate into the warm cream to prevent seizing, then beating until the mixture reaches that perfect ribbon stage.
What you'll end up with is a frosting so smooth it swirls effortlessly, with a velvety yet firm enough consistency to hold peaks. It's rich enough to satisfy chocolate lovers but balanced enough to complement delicate layer cakes or cupcakes.
The espresso infusion adds complexity that makes this frosting stand out from basic chocolate versions.
This recipe yields about 2 cups of frosting—enough to generously cover a 9-inch cake or pipe decorative swirls. For extra shine, brush the finished cake with a little additional espresso syrup.
The result? A dessert that looks as impressive as it tastes, with every bite delivering that perfect bittersweet chocolate experience.
Ingredients for bittersweet chocolate frosting
Eight ingredients transform into velvety swirls—rich cocoa meets espresso for a frosting that tastes like luxury.
| Ingredient | Amount | Notes |
|---|---|---|
| Bittersweet Chocolate (60-70% Cocoa) 🍫 | 8 oz | High-quality bars or chips, chopped |
| Heavy Whipping Cream 🥛 | 1 cup | Full-fat for best stability |
| Unsalted Butter 🧈 | ½ cup | Cold, cubed for easy incorporation |
| Espresso Powder ☕ | 1 tbsp | High-quality for deep flavor |
| Pure Vanilla Extract 🌿 | 1 tsp | Bourbon or Madagascar preferred |
| Granulated Sugar 🍚 | ¼ cup | Fine grain for smooth texture |
| Pinch of Salt 🧂 | ⅛ tsp | Enhances chocolate flavor |
| Vegetable Glycerin (optional) 💧 | 1 tsp | For extra shine and stability |
The chocolate is non-negotiable here. Valrhona or Lindt 70% bars are my go-tos—they melt smoothly and have that perfect balance of bittersweet. If you're using chips, chop them into even pieces so they melt uniformly. The heavy cream should be cold when you start, but not straight from the fridge—let it sit for 10 minutes so it whips properly. Store-brand butter works fine, but if you've got European-style (like Plugrá), use that. The espresso powder? Lavazza or Illy are my picks—cheap brands taste bitter. Pro tip: Toast the espresso powder lightly in a dry pan for 30 seconds to deepen the flavor.
No espresso powder? Instant espresso granules at half the amount work in a pinch, but the flavor won't be as nuanced. Short on butter? Coconut oil can substitute, but it changes the texture slightly—your frosting will be a touch softer. The vanilla extract is where you can splurge if you want. Bourbon vanilla adds a subtle caramel note, while Madagascar has brighter floral notes. For the sugar, if you're worried about graininess, pulse it in a food processor for 10 seconds. And that optional glycerin? It's a game-changer for shine—Trader Joe's sells it cheaply, or you can find it in baking sections.
This frosting keeps beautifully. Covered in the fridge for 5 days, it actually improves as the flavors meld. For longer storage, freeze it in airtight containers for up to 3 months. When you're ready to use it, let it come to room temperature before whipping—cold frosting gets lumpy. If it seizes up while you're working with it, just microwave it for 10 seconds to melt any lumps, then re-whip. Trust me, this frosting tastes even better the next day—make extra for cupcakes or cake layers.
Why You'll Love This Recipe
- I swear by this combo: melt the chocolate and butter together, then fold in the whipped cream—no mixer required. That’s it. The espresso powder sneaks in for depth, but you’d never guess how little you need.
- Three-Ingredient Core: I swear by this combo: melt the chocolate and butter together, then fold in the whipped cream—no mixer required. That’s it. The espresso powder sneaks in for depth, but you’d never guess how little you need.
- Rich Without Overpowering: The bittersweet chocolate (60-70%) gives that sophisticated bite, but the vanilla and cream soften it just enough to feel indulgent, not harsh. Honestly, it’s the kind of frosting that makes store-bought look like a sad afterthought.
- Holiday or Snack Attack: Slather it on cake layers for a birthday or holiday dessert, but I’ve also used it to elevate store-bought cookies or even drizzle it over ice cream when I’m lazy. Between us, that last one might be my guilty pleasure.
Step-by-step instructions for bittersweet chocolate frosting
Here's how to craft velvety, espresso-infused frosting that's rich, stable, and perfect for layering.
Infuse the Heavy Whipping Cream
In a small saucepan, combine the 1 cup heavy whipping cream and 1 tbsp espresso powder. Warm over medium-low heat until steaming but not boiling—you'll see tiny bubbles forming around the edges. Remove immediately when it reaches 160°F (just before simmering) to preserve the espresso flavor without bitterness. Let it steep for 5 minutes off heat, then strain through a fine-mesh sieve to remove any powder residue. This infusion creates the deep, complex base that sets this frosting apart.
I use a fine-mesh sieve here because even tiny particles of espresso powder can make the finished frosting grainy. The warm cream will fully incorporate the espresso flavor while maintaining its ability to whip later. Don't skip the straining—it makes all the difference in texture.
Melt Chocolate and Butter Together
In a heatproof bowl set over a saucepan of simmering water (double boiler), combine the 8 oz bittersweet chocolate and 0.5 cup unsalted butter. Stir gently until completely melted and smooth, then remove from heat. The chocolate should be 100% melted with no visible lumps—if you see any, return to the double boiler for another 30 seconds and stir vigorously. Let the mixture cool slightly to 100°F before proceeding; it should be thick but still pourable.
This cooling step is crucial—if the chocolate mixture is too hot when combined with the cream, it can cause the frosting to seize. I like to test the temperature by touching the back of my hand briefly; it should feel warm but not hot. The butter adds richness and helps create that signature velvety texture we're after.
Combine Ingredients for Stable Frosting
In a stand mixer fitted with the whisk attachment, beat the 1 cup infused heavy cream on high speed until soft peaks form. Gradually add the 0.25 cup granulated sugar, 1 tsp pure vanilla extract, and 0.125 tsp pinch of salt, mixing until fully incorporated. The mixture should look light and airy with no visible sugar granules. Add the 1 tsp vegetable glycerin (optional) if using, which helps create extra shine and stability.
With the mixer running on low speed, slowly pour in the melted chocolate-butter mixture. Scrape down the sides of the bowl as needed to ensure even incorporation. Increase speed to medium-high and beat for 3-4 minutes until the frosting is light, fluffy, and holds stiff peaks when the whisk is lifted. The frosting should be thick enough to hold its shape but still spreadable—this balance is what makes it perfect for layering.
Achieve Perfect Swirls and Stability
Transfer the frosting to a piping bag fitted with a star tip for decorative swirls. Pipe directly onto cakes or cupcakes, then use an offset spatula to create swirl patterns by dragging the spatula through the frosting in gentle, overlapping motions. For extra stability, chill the frosted desserts in the refrigerator for 15-20 minutes before serving—this allows the frosting to set slightly while maintaining its velvety texture.
This chilling step is particularly important if you're working in warm conditions. The frosting will firm up just enough to hold its shape but won't become grainy. For best results, use the frosting within 4 hours of making it, as the espresso infusion maintains its peak flavor when fresh. The combination of espresso, vanilla, and high-quality bittersweet chocolate creates a depth of flavor that's truly exceptional—worth every step of the process.
Pro Tips For Making Bittersweet Chocolate Frosting
- Temper the Chocolate: I learned this the hard way—chopping bittersweet chocolate into tiny, even pieces (think rice-sized) melts it faster and smoother in the cream. No giant chunks lurking at the bottom of your bowl.
- Use Cold Cream: Skip the fridge—whip your heavy cream straight from the fridge, but don’t let it sit out too long. Cold cream whips faster and holds its shape better, especially when you’re mixing in butter later.
- Balance the Bitterness: Espresso powder is your friend, but start with half the recipe’s amount. Taste as you go—you can always add more, but you can’t un-bitter what’s already there.
- Warm the Butter: Melt your unsalted butter to about 100°F (just until it turns liquid but isn’t hot). Drizzle it into the whipped cream while mixing—this keeps the frosting silky instead of grainy. (Yes, even if you’re impatient like me.)
Pro cooking tips for great bittersweet chocolate frosting
Temperature Control Secrets
Chocolate frosting makes or breaks on temperature precision. Always warm your heavy cream to 160°F—no higher—to infuse espresso flavor without scorching. For the chocolate, melt it to 100°F max before combining; hotter temps cause seizing. I use an instant-read thermometer (like Thermoworks) to track both stages. 🌡️
Pro tip: Let melted chocolate cool 5 minutes before mixing—this prevents the cream from curdling. If your frosting looks grainy mid-whip, microwave it 10 seconds to melt lumps, then re-whip. The goal is smoothness without heat damage to the delicate cocoa compounds.
Whipping Technique Matters
Use a stand mixer with a whisk attachment (not a hand mixer) for proper aeration. Start on high speed to incorporate sugar and vanilla, then slowly add the chocolate mixture while mixing on low.
This gradual incorporation prevents deflation. I beat for 3-4 minutes until stiff peaks form—look for glossy, ribbon-like consistency when the whisk is lifted. 💫
If your frosting isn't thickening, your cream might be overwarmed. Chill the bowl 10 minutes in the fridge before re-whipping. For extra stability, add 1 tsp vegetable glycerin (found in baking aisles)—it creates a silkier texture and prevents cracking when piped.
Espresso Infusion Hacks
For deeper flavor, toast 1 tbsp espresso powder in a dry pan for 30 seconds before infusing. This removes bitterness and enhances the caramel notes. Strain through a fine-mesh sieve to avoid gritty texture—even tiny particles ruin the velvety finish.
I prefer Lavazza or Illy brands for their balanced profile. ☕
No espresso powder? Use ½ tsp instant espresso granules dissolved in warm water, then added to the cream. The flavor won't be as complex, but it still adds a subtle coffee note. For a smoky twist, add ½ tsp smoked sea salt (like Maldon) to the finished frosting.
Fixing Common Mistakes
Problem: Frosting is too thin? You likely overmelted the chocolate or used warm cream. Fix by chilling the bowl 15 minutes, then re-whip. For extra thickness, add 1 tbsp powdered sugar at a time until desired consistency. Problem: Grainy texture? Your chocolate had lumps or was overheated. Melt again gently, then strain through a sieve before using. 🔥
Problem: Frosting separates? The cream was overwhipped or the chocolate was too hot. Whisk vigorously to re-emulsify, or microwave 10 seconds to melt any butter separation, then re-whip. Problem: Tastes bitter? Your espresso was overused or low-quality. Reduce to ½ tbsp or use vanilla bean paste to balance the flavor.
Nutrition facts
Frequently asked questions
Can I substitute dark chocolate for bittersweet in this frosting?
You can use dark chocolate, but the flavor will be slightly different. Bittersweet (60-70% cocoa) has a perfect balance of richness and sweetness, while dark chocolate (70%+) can taste more bitter. For best results, stick with bittersweet, but if you must substitute, use a slightly lower cocoa percentage (like 60%) and add an extra 1 tbsp granulated sugar to compensate. The texture should remain similar if you follow the same melting technique.
Why does my frosting taste bitter even with the right chocolate?
Bitterness often comes from overheating the chocolate or using too much espresso powder. Always melt chocolate gently to 100°F max, and reduce espresso to ½ tbsp if you're sensitive to coffee flavors. A pinch of salt (¼ tsp) or a splash of vanilla bean paste can also help balance the bitterness. For extra depth, try adding ½ tsp orange zest—it brightens the flavor beautifully.
How do I make this frosting dairy-free?
Replace the heavy cream with 1 cup full-fat coconut cream (chilled overnight) and use ½ cup dairy-free butter or coconut oil instead of regular butter. For the espresso infusion, use coconut cream instead of dairy cream. The texture will be slightly denser but still rich. Chill the bowl before whipping to help with aeration. For extra stability, add 1 tsp arrowroot powder mixed with 1 tbsp water to the whipped cream stage.
Can I make this frosting ahead of time?
This frosting actually improves when made a day ahead. Store it in an airtight container in the fridge for up to 5 days. Bring it to room temperature before whipping again—it may thicken slightly in the fridge. For longer storage, freeze it for up to 3 months. Thaw overnight in the fridge, then let it sit at room temperature for 1 hour before re-whipping. The flavors meld beautifully over time!
What's the best way to decorate cakes with this frosting?
For elegant swirls, pipe the frosting onto the cake using a star tip (Wilton 1M or similar), then use an offset spatula to create smooth, overlapping patterns. For rustic charm, spread it with a butter knife and drag a fork through it for a textured look. Chill the cake for 15-20 minutes after decorating to help the frosting set. For extra shine, brush the finished cake with a little espresso syrup** (mix 1 tbsp sugar + 1 tbsp water, heat until dissolved, then cool).