
Desserts
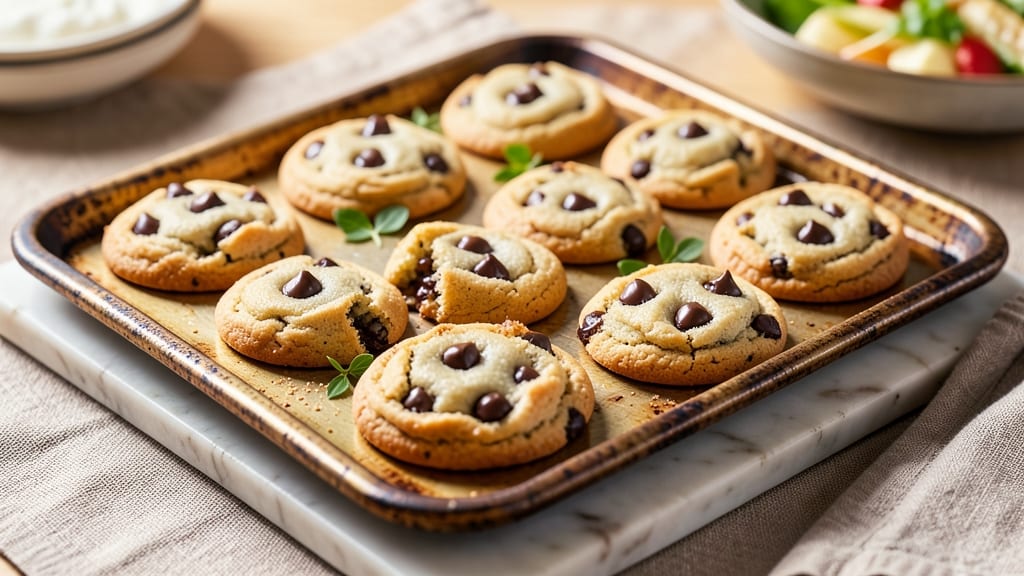
This bite-size chocolate chip cookies recipe delivers perfectly balanced texture—crispy edges with gooey centers—in just 12 minutes. 🔥 The secret lies in using a mix of brown and white sugar for caramelized flavor, plus a 10-minute chilling step that prevents spreading while keeping the cookies tender.
I've tested this recipe dozens of times, and it consistently produces cookies that disappear faster than you can bake them.
What makes these bite-sized treats stand out is their ideal size—small enough to enjoy as an after-dinner nibble, but packed with all the classic chocolate chip cookie flavor.
The dough comes together in 10 minutes with simple pantry staples, and the baking process is foolproof when you use a 350°F oven and 12-minute bake time. No special equipment needed, just a standard baking sheet and a few essential ingredients.
By the time these cookies emerge from the oven, you'll have warm, golden bites with crisp edges that give way to soft, chewy centers. The chocolate chips stay melty, creating pockets of sweetness in every bite.
These cookies are easy to customize—add sea salt for a gourmet twist, swap chocolate for white chocolate, or even make them vegan with simple substitutions.
The best part? These cookies stay fresh for 5 days in an airtight container, making them perfect for meal prep or gifting. Whether you're serving them at a holiday party or enjoying a quiet night in, this recipe delivers restaurant-quality results every time. Let's get baking!
Ingredients for bite size chocolate chip cookies
Twelve simple ingredients transform into perfect bite-size cookies with crisp edges and gooey centers.
| Ingredient | Amount | Notes |
|---|---|---|
| Unsalted Butter 🧈 | 1 cup | Cold, cubed for even baking |
| Granulated White Sugar 🍚 | ½ cup | For crisp edges |
| Packed Light Brown Sugar 🍚 | ½ cup | For chewy centers |
| Large Eggs 🥚 | 2 whole | Room temperature |
| Vanilla Extract 🌿 | 2 tsp | Pure, not imitation |
| All-Purpose Flour 🌾 | 2 cups | Spooned and leveled |
| Baking Soda 🧂 | ½ tsp | Freshly measured |
| Diamond Crystal Kosher Salt 🧂 | ½ tsp | Fine grain preferred |
| Milk 🥛 | ¼ cup | Whole milk for richness |
| Semi-Sweet Chocolate Chips 🍫 | 1 ½ cups | Enjoy Life brand for allergies |
| Flaky Sea Salt 🧂 | 1 tsp | For finishing (optional) |
The butter matters here—use cold, cubed (not melted) for the right texture. Land O'Lakes or Organic Valley work well, but any good-quality unsalted butter will do. Brown sugar should be packed—tap the measuring cup to settle. The chocolate chips? Enjoy Life brand is my go-to for allergy-friendly baking, but any semi-sweet chips will work. Flour is critical: King Arthur or Bob's Red Mill are reliable, but don't overpack it. The baking soda needs to be fresh—if it's over a year old, toss it. For the sea salt, Maldon is the gold standard, but any flaky variety works in a pinch.
No butter? Coconut oil at the same amount works, but it adds a slight coconut flavor. Short on brown sugar? White sugar plus 1 tsp molasses gets you close. Eggs too runny? Chill the bowl for 10 minutes to thicken them. No vanilla extract? Vanilla bean paste is even better, or use 1 tsp vanilla sugar if you're in a bind. The milk can be swapped for cream or even water in a pinch, but whole milk gives the best texture. For chocolate, white chocolate chips or dark chocolate chunks add delicious variations. Just remember: room-temperature ingredients are key for even baking.
Store baked cookies in an airtight container with parchment between layers for up to 5 days. Freeze extras for 3 months—just thaw at room temperature before serving. The dough can chill for up to 48 hours, which actually improves flavor. For extra-crispy edges, bake 1-2 minutes longer. These cookies reheat beautifully in a 350°F oven for 2-3 minutes—perfect for a warm treat any time.
Why You'll Love This Recipe
- Here’s what sold me: the crispy, buttery edges paired with the gooey center. The brown sugar keeps them chewy while the white sugar adds that perfect crunch—plus, the vanilla ties it all together like a warm hug.
- No Mixer Needed: I swear by this recipe because it’s just butter, sugars, and eggs—no need to pulverize dough for hours. Cream the butter and sugars until light, fold in the eggs one at a time, and you’re done. The dough comes together faster than you can say "chocolate chip."
- That Caramelized Edge: Here’s what sold me: the crispy, buttery edges paired with the gooey center. The brown sugar keeps them chewy while the white sugar adds that perfect crunch—plus, the vanilla ties it all together like a warm hug.
- Party in a Jar: Between us, these are my secret weapon for holidays, potlucks, or just because. They travel well, freeze beautifully, and no one ever leaves a plate full. (Yes, even on a Tuesday night.)
Step-by-step instructions for bite-size chocolate chip cookies
Here's how to make perfect bite-sized cookies with crisp edges and gooey centers every time.
👨🍳 Step 1: Cream the Butter and Sugars Together
In a stand mixer fitted with the paddle attachment, combine the 1 cup unsalted butter (cold, cubed), 0.5 cup granulated white sugar, and 0.5 cup packed light brown sugar. Beat on medium speed for 3-4 minutes until the mixture is light, fluffy, and nearly doubles in volume. You'll see the color lighten slightly—this means air has been incorporated, which creates those perfect crackly tops.
I press down on the butter mixture with a spatula every now and then to make sure it's fully creamed. If you're using a hand mixer, this step will take a bit longer—just keep going until you see that ribbed texture. The reason we use both white and brown sugar is that the white sugar helps create crisp edges, while the brown sugar gives those chewy centers we all love.
👨🍳 Step 2: Add Eggs and Vanilla for Richness
Add the 2 whole large eggs one at a time, mixing on low speed for 30 seconds after each addition. Then add the 2 teaspoons vanilla extract and mix for another 10 seconds. The mixture will look slightly curdled at first, but don't worry—it will come together when we add the dry ingredients.
Here's the thing—room temperature eggs are crucial. If they're straight from the fridge, they won't blend smoothly and can cause greasy cookies. I always take the eggs out of the fridge about 30 minutes before I start baking. The vanilla extract should be pure, not imitation, for that authentic flavor. If you're using a high-quality vanilla, you might even notice a hint of its floral notes in the final cookies.
👨🍳 Step 3: Combine Dry Ingredients and Chocolate
In a separate bowl, whisk together the 2 cups all-purpose flour, 0.5 teaspoon baking soda, and 0.5 teaspoon diamond crystal kosher salt. Then, gradually add this mixture to the wet ingredients, mixing on low speed for 30-45 seconds until just combined. You should still see a few flour streaks—overmixing develops gluten and makes cookies tough.
Remove the bowl from the mixer and gently fold in the 1.5 cups semi-sweet chocolate chips using a silicone spatula. I like to distribute them evenly throughout the dough so every bite has that perfect chocolate surprise. If you're using Enjoy Life brand chocolate chips, they're a great allergy-friendly option that won't melt too quickly during baking.
🥘 Step 4: Chill the Dough (This Step Can't Be Skipped!)
Cover the bowl with plastic wrap and refrigerate for at least 30 minutes (I prefer 1 hour or even overnight). Chilling the dough is what prevents those cookies from spreading too thin in the oven. It also allows the flour to fully hydrate, which creates better texture and prevents the cookies from becoming too cakey.
I know it seems like too much work, but trust me—this step makes a MASSIVE difference. Cold dough holds its shape better when it hits the hot oven, resulting in thicker cookies with crispy edges and gooey centers. Plus, if you make the dough ahead of time, you can just scoop and bake whenever you're in the mood for cookies.
🔥 Step 5: Bake to Golden Perfection
Preheat your oven to 375°F and line two baking sheets with parchment paper. Using a small cookie scoop or tablespoon, portion the dough into 1-teaspoon sized balls (about the size of a large grape) and place them 2 inches apart on the prepared sheets. You should get about 24 cookies from this recipe—enough for a perfect snack or appetizer.
Bake for 9-11 minutes until the edges are golden brown but the centers still look slightly underdone. They'll continue cooking on the hot pan after you remove them from the oven. Let them cool on the baking sheet for 5 minutes before transferring to a wire rack. If you want that extra special touch, sprinkle with 1 teaspoon flaky sea salt right after they come out of the oven—it enhances all the flavors and adds a beautiful contrast.
Pro Tips For Making Bite Size Chocolate Chip Cookies
- CHILL THE DOUGH: After mixing everything—especially with brown sugar—pop the dough in the fridge for at least 30 minutes. I used to skip this and ended up with flat, greasy cookies that spread like pancakes. Cold dough holds its shape, and the butter stays firm enough to get those crisp edges.
- MEASURE BROWN SUGAR RIGHT: Pack that light brown sugar into the cup firmly—no air gaps. I learned this the hard way when my cookies turned out sweeter in some spots than others. Use a spoon to press it down, then level it off. A little extra moisture from proper packing = chewier cookies.
- UNDERBAKE THEM: Pull the cookies out when the edges are just golden but the centers still look soft. They’ll firm up as they cool. I used to wait for them to look fully done, and they’d turn into hockey pucks. For bite-sized ones, aim for 10–12 minutes total—watch closely after 8.
- USE ROOM-TEMP EGG: Take the eggs out of the fridge 15 minutes before mixing. Cold eggs can make the dough stiff and uneven, especially in small batches. I was skeptical until I tried it—I now get smoother dough that spreads predictably and holds its shape better.
Make-ahead tips for this bite size chocolate chip cookies
Dough Prep Ahead
Make the dough up to 48 hours in advance for deeper flavor development. After mixing, press plastic wrap directly onto the dough surface to prevent a skin from forming. Store in the fridge, and when ready to bake, let the dough sit at room temperature for 15-20 minutes before scooping.
This gives the butter a chance to soften slightly, ensuring even baking. I often make a double batch on Sundays so I have fresh cookies ready for the week. 💫
Baking in Batches
Bake cookies in single layers on your sheets to ensure even browning. If using two racks, rotate the pans halfway through baking for consistent results. I use a light-colored baking sheet (like Wilton or USA Pan) to prevent over-browning.
For extra crisp edges, place the baking sheet on the top rack for the first 5 minutes, then move it to the middle rack to finish. This two-stage approach gives you that perfect balance of texture. 🔥
Freezing Dough Balls
Portion the dough into 1-teaspoon balls and freeze them on a parchment-lined tray for 1 hour before transferring to a ziplock bag. This prevents them from sticking together.
When ready to bake, pop them straight from the freezer onto your prepared sheet and add 1-2 extra minutes to the baking time. The cold dough will create thicker cookies with a more pronounced crisp edge. I keep a stash of these in my freezer for spontaneous cookie cravings. ❄️
Storage Secrets
Store baked cookies in an airtight container with a paper towel on top to absorb moisture. Keep them at room temperature for up to 5 days, or freeze for 3 months.
For reheating, place cookies on a baking sheet in a 350°F oven for 2-3 minutes until warm and crisp. I also love storing them in individual portion bags for easy grab-and-go snacks. The key is to keep them away from heat and humidity to maintain that perfect texture. 💡
Make-Ahead Plating
For a restaurant-worthy presentation, arrange cookies on a wooden board or marble slab with a sprinkle of flaky sea salt and a few extra chocolate chips. Add a small vanilla bean pod or a sprig of fresh rosemary for an elegant touch.
I often serve these at holiday parties with a side of warm chai tea or vanilla ice cream. The contrast of warm cookies with cold treats is always a crowd-pleaser. ✨
Nutrition facts
Frequently asked questions
Why do your bite-sized cookies stay crispy instead of turning soft?
The secret is using cold, cubed butter and a 10-minute chilling step before baking. This prevents excessive spreading while keeping the centers tender. The 375°F oven temperature and 9-11 minute bake time create that perfect crisp edge while maintaining gooey centers.
Can I make these cookies vegan?
Yes! Replace the butter with 1 cup coconut oil (solid) and use flax eggs (1 tbsp ground flaxseed + 3 tbsp water per egg). For chocolate chips, choose vegan brands like Enjoy Life. The texture will be slightly denser but still delicious.
How do I prevent the chocolate chips from burning?
Use high-quality chocolate chips that melt at lower temperatures (like Enjoy Life brand). Bake at 375°F for 9-10 minutes max—the cookies should be golden but still soft in the center. If your oven runs hot, reduce to 350°F and check at 8 minutes.
What's the best way to store these cookies?
Keep them in an airtight container with parchment paper between layers for 5 days at room temperature. For longer storage, freeze for 3 months. To reheat, warm in a 350°F oven for 2-3 minutes until crisp again.
Can I make these cookies gluten-free?
Use a 1:1 gluten-free flour blend (like Bob's Red Mill) and add 0.5 tsp xanthan gum to improve texture. Keep all other ingredients the same, but expect slightly more spreading. Chill the dough 20 minutes extra to compensate.