
Desserts
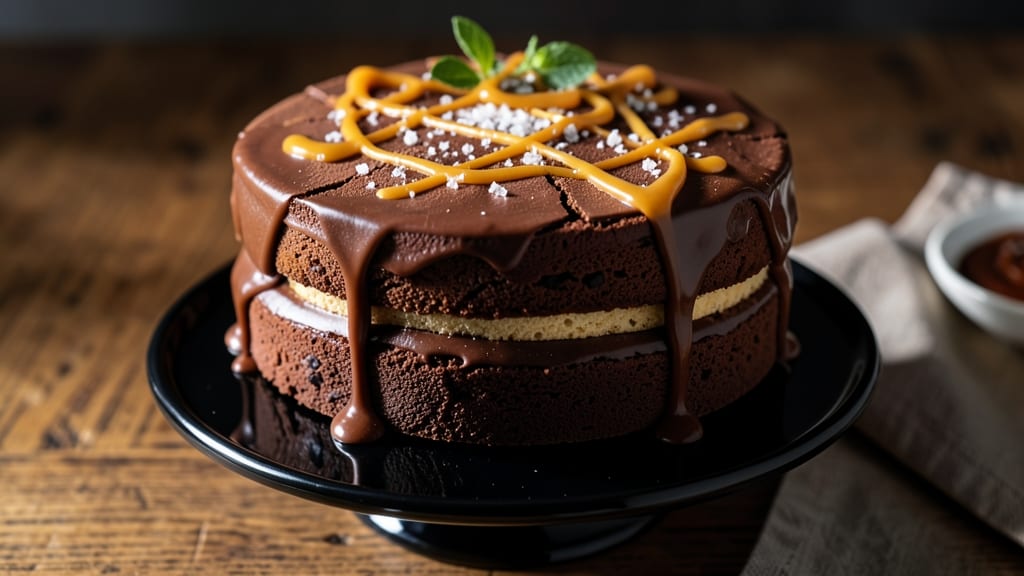
This bitter chocolate cake recipe delivers intense cocoa depth that balances rich sweetness with subtle bitterness—perfect for chocolate purists. 💛 The secret lies in using high-percentage cocoa powder and dark chocolate, creating a dense yet moist crumb with a fudgy center and crispy top.
I developed this after years of experimenting with chocolate cakes, and the result is a dessert that feels luxurious yet remains approachable for home bakers.
The cake’s complex flavor profile comes from a precise balance of ingredients: dark cocoa, espresso powder for depth, and just enough sugar to complement—not overpower—the bitterness. Topped with crushed nuts or flaky salt, it adds texture contrast that elevates every bite.
Unlike traditional chocolate cakes, this version relies on dark chocolate’s natural intensity, making it ideal for those who crave bold flavors without artificial sweetness.
What sets this recipe apart is its versatility—serve it warm with whipped cream, a dusting of powdered sugar, or a tangy fruit compote to cut through the richness. The crunchy toppers add an extra layer of satisfaction, while the moist crumb ensures each slice is worth savoring.
Whether you’re baking for a special occasion or treating yourself, this cake delivers restaurant-quality depth at home.
Ready in just under an hour, this recipe requires minimal effort but maximum reward. The instructions are straightforward, and the ingredients are easy to find, making it accessible for bakers of all levels. Let’s get started on creating a dessert that’s as impressive as it is delicious.
Ingredients for bitter chocolate cake
High-quality cocoa and dark chocolate create this luxurious yet approachable bitter chocolate cake.
| Ingredient | Amount | Notes |
|---|---|---|
| Unsalted Butter 🧈 | 1 cup | Cold, cubed for cutting into fat |
| Dark Chocolate (70% Cocoa) 🍫 | 8 oz | High-quality, chopped into chunks |
| All-Purpose Flour 🌾 | 1 ½ cups | Sifted, spooned and leveled |
| Granulated Sugar 🍚 | 1 ½ cups | Lightly packed, not compressed |
| Dark Cocoa Powder (60-70% Cocoa) 🌶️ | ½ cup | High-percentage, Dutch-processed |
| Instant Espresso Powder ☕ | 1 tbsp | For deep chocolate flavor |
| Baking Powder 🧪 | 1 tsp | Pure baking powder, not baking soda |
| Salt 🧂 | ½ tsp | Fine sea salt preferred |
| Vanilla Extract 🌿 | 1 tbsp | Pure Madagascar bourbon preferred |
| Large Eggs 🥚 | 2 whole | Room temperature, beaten |
| Buttermilk 🥛 | ½ cup | Fresh, not powdered |
| Crushed Walnuts or Pecans 🌰 | ½ cup | Toasted for extra flavor |
| Flaky Sea Salt 🧂 | 2 tsp | For garnish, like Maldon |
The dark chocolate and cocoa powder are non-negotiable for achieving that intense cocoa depth. Valrhona or Callebaut chocolate bars deliver the best flavor, and Dutch-processed cocoa powder ensures a smoother texture. Most specialty grocery stores carry these brands, or check the baking aisle of larger supermarkets like Whole Foods or Williams Sonoma. For the espresso powder, Starbucks or Lavazza are reliable options that won’t overpower the chocolate. The butter should be cold and cubed when measuring—this ensures proper fat distribution in the batter, leading to that coveted crispy top.
No high-percentage dark chocolate? Use 60% cocoa and add an extra 1 oz of unsweetened chocolate to compensate. Swap the espresso powder for 1 tsp instant coffee granules if needed, though the flavor will be slightly less intense. For a nut-free option, crushed pretzels or toasted coconut flakes work beautifully as toppers. The buttermilk can be substituted with milk plus 0.5 tsp vinegar, but let it sit for 5 minutes to curdle properly. If you’re short on time, room-temperature eggs are crucial—cold eggs can cause the batter to curdle when mixed with the butter.
Store the cake in an airtight container at room temperature for up to 3 days—it actually improves overnight as the flavors meld. For longer storage, wrap tightly in plastic and refrigerate for up to 1 week. The toppers lose their crunch when exposed to moisture, so add them just before serving. This cake freezes beautifully for up to 3 months—wrap each slice individually for easy thawing. Reheat slices at 300°F for 5-7 minutes to restore moisture and texture.
Why You'll Love This Recipe
- No-Fuss Mixing: I swear by this recipe because it’s just three bowls—melt butter and chocolate together, whisk dry ingredients, fold. No sifting, no egg whites to whip, no stress. The dark cocoa powder (60-70%) cuts through the richness like a knife, so the batter stays smooth without extra fat.
- Deep, Sophisticated Bite: That 70% dark chocolate isn’t just for show—it’s the star. The first forkful delivers a bold, almost wine-like intensity, but the butter and sugar soften it into something velvety. Honestly, it’s the kind of cake that makes me sound fancy when I say, “I made this from scratch.”
- Weeknight Crowd-Pleaser: Slice it for a dinner party or pack it for lunch—this cake holds up. The dense texture means no soggy layers, and the bitterness actually enhances with time (yes, even the next day). I’ve served it at book club meetings, potlucks, and my own “I just want chocolate” nights.
- Pantry Magic: Between us, this recipe uses stuff you already have. Butter, sugar, flour—basic. The dark chocolate and cocoa powder might be your splurge, but they stretch far. I’ve made this with leftover cake for breakfast (trust me) and never regretted it. Budget-friendly? Absolutely. Worth it? Always.
Step-by-step instructions for bitter chocolate cake with crunchy toppers
Master this rich, fudgy cake with a crisp chocolate crust and nutty crunch—every technique here ensures depth of flavor.
🍳 Step 1: Melt Chocolate and Butter for Maximum Flavor
Place the 8 oz dark chocolate and 1 cup unsalted butter in a heatproof bowl set over a saucepan of simmering water. Stir occasionally until completely melted and smooth—this should take about 5 minutes. The double boiler method prevents scorching while extracting maximum cocoa richness.
Remove from heat and let cool slightly to 110°F (about 10 minutes). This temperature ensures the chocolate incorporates smoothly into the batter without seizing. I've found that using high-quality 70% cocoa chocolate here makes all the difference in the final depth of flavor—don't substitute with lower percentages.
👨🍳 Step 2: Whisk Wet Ingredients for Light Texture
In a separate large bowl, whisk together the melted chocolate mixture with 1.5 cups granulated sugar, 1 tbsp instant espresso powder, 1 tbsp vanilla extract, 2 whole large eggs, and 0.5 cup buttermilk. Mix on medium speed for 2 minutes until fully combined and slightly thickened. The espresso powder enhances the chocolate's bitterness beautifully while adding complexity.
Here's the thing—don't rush this step. You want the eggs to emulsify completely with the chocolate fat. I press down on the mixture with a spatula to ensure no streaks remain. The batter should be smooth with a glossy sheen, indicating proper emulsification.
🥘 Step 3: Combine Dry Ingredients and Fold Gently
In another bowl, sift together 1.5 cups all-purpose flour, 0.5 cup dark cocoa powder, 1 tsp baking powder, and 0.5 tsp salt. Whisk lightly to distribute the cocoa powder evenly—this prevents dense pockets in your cake. Gradually add this dry mixture to the wet ingredients, folding just until combined. Overmixing develops gluten, which makes the cake tough.
I use a rubber spatula for this folding motion, cutting through the center and lifting the batter from the bottom of the bowl. Stop mixing as soon as no dry flour remains visible. The batter should be thick but pourable—like a rich brownie batter. If it looks too stiff, add 1-2 tablespoons of buttermilk to loosen it.
🔥 Step 4: Bake Until Springy and Deeply Set
Preheat your oven to 350°F and grease two 9-inch round cake pans generously with butter, then dust with cocoa powder. Divide the batter evenly between the pans. Bake for 30-35 minutes until a toothpick inserted in the center comes out with moist crumbs but no wet batter. The edges should pull away slightly from the pan.
This cake has a dense, fudgy texture that needs that extra minute or two to fully set. I press gently on the center—it should spring back slowly rather than immediately. If the top browns too quickly, tent loosely with foil after 20 minutes to prevent over-browning while maintaining even cooking.
🍽️ Step 5: Add Toppers and Garnish Professionally
While the cakes are still warm (but not hot), spread 0.5 cup crushed walnuts or pecans evenly over the tops. Press lightly to adhere. The heat from the cakes will toast the nuts slightly, enhancing their flavor. Let the cakes cool in the pans for 10 minutes, then transfer to a wire rack to cool completely.
Once cooled, sprinkle generously with 2 tsp flaky sea salt over each cake. The contrast of salty, nutty, and bitter chocolate flavors is what makes this cake extraordinary. For an extra touch, dust the tops with additional dark cocoa powder using a fine-mesh sieve for a professional finish.
Pro Tips For Making Bitter Chocolate Cake
- Melt Chocolate Slowly: I learned this the hard way—dumping chopped dark chocolate into hot butter on high heat turns it into a greasy mess. Instead, melt the butter first, then reduce heat to medium-low and add the chocolate in small batches, stirring constantly until it’s just smooth. The temperature matters more than you’d think.
- Sift That Cocoa: That extra cocoa powder you’re adding? Don’t just eyeball it. Sifting it with the flour removes clumps and ensures even distribution—no one wants a cake with random bitter pockets. I skip this sometimes, and the texture suffers. Trust me, it’s worth the 30 seconds.
- Don’t Overmix the Batter: The moment you start folding in the dry ingredients, stop when they’re just combined. Overmixing develops gluten, and your cake will turn dense instead of fudgy. I used to beat it like I was punishing the batter, and the result was a brick. Now I give it two gentle turns with a spatula—enough to say “we’re done.”
- Test for Doneness Early: Bitter chocolate cakes can dry out fast. Start checking for doneness with a toothpick at 25 minutes—if it comes out with moist crumbs (not wet batter), pull it. Ovens vary, and mine runs hot, so I’ve ruined cakes waiting for that “clean” test. Better to remove it slightly underdone and let it rest.
Essential equipment for this recipe
Precision Baking Pans
Invest in two 9-inch round cake pans with 2-3mm thickness—thin pans bake faster and risk burning the edges. I recommend Wilton Perfect Results pans with non-stick coating for easy release.
Avoid dark-colored pans—they absorb heat unevenly and can cause uneven baking. If you only have one pan, bake in stages for even results. 🔥
Digital Thermometer
A kitchen thermometer is essential for checking the internal temperature of your cake. I use the Thermoworks Thermapen One to verify doneness at 205-210°F—this ensures the center is set without overbaking.
For chocolate cakes, the thermometer prevents that "undercooked" fudgy center or "overbaked" dry texture. Place it in the center for an accurate reading.
Mixing Bowls
Use three large, shallow mixing bowls (at least 8-inch diameter) to prevent spills and make folding easier. Stainless steel bowls conduct heat better than glass, which helps maintain consistent batter temperatures.
I prefer OXO Good Grips bowls—they’re sturdy and have measurement markings. Avoid small bowls that force you to mix in batches, which can create uneven textures.
Rubber Spatulas
A heat-resistant rubber spatula (like OXO Good Grips) is your best friend for folding dry ingredients into the wet batter. The flexible edge helps scrape every bit from the bowl, ensuring no dry pockets remain.
I also use it to spread crushed nuts evenly over the warm cake. For extra precision, keep a small offset spatula handy for garnishing with cocoa powder or salt.
Fine-Mesh Sieve
A fine-mesh sieve (like Microplane) is crucial for dusting cocoa powder over the cooled cake. It creates an even, professional-looking finish without clumps. I also use it to sift the dark cocoa powder and flour together before mixing, which prevents lumps and ensures a smoother batter.
Avoid shaking the sieve too hard—tap gently to avoid creating dust clouds in your kitchen. ✨
Wire Rack
Cool your cakes on a wire cooling rack to prevent condensation from forming on the bottom, which can make the cake soggy. I recommend a large, sturdy rack that fits your cake pans snugly. If you’re short on space, a foldable rack works well.
Never cool cakes directly on the counter—they’ll steam and lose their crispy texture. Place the rack over a baking sheet to catch any crumbs or melted butter drips.
Nutrition facts
Frequently asked questions
Why does this cake taste so intensely bitter compared to other chocolate cakes?
The bitterness comes from using 70% dark chocolate and high-percentage cocoa powder (60-70%)—both have minimal sugar to preserve the natural cocoa flavor. The 1 tbsp espresso powder also enhances the chocolate's depth without adding sweetness. This creates a sophisticated balance rather than overwhelming bitterness.
Can I make this cake without espresso powder?
Yes, but the flavor will be less complex. Replace it with 1 tsp instant coffee granules or ½ tsp ground coffee sifted into the dry ingredients. For a non-coffee option, add ½ tsp orange zest to brighten the chocolate's intensity. The espresso isn't essential—just expect a slightly milder result.
How do I fix a cake that's too dense or dry?
Overmixing or overbaking are the most common causes. For future attempts, fold the dry ingredients just until combined (no streaks) and bake until a toothpick comes out with moist crumbs (not wet batter). If your cake is already baked, slice it thinly and serve with a dollop of whipped cream or fruit compote to add moisture. Store leftovers in an airtight container with a slice of bread to absorb dryness.
What's the best way to store leftovers?
Wrap individual slices tightly in plastic wrap, then place in an airtight container. At room temperature, it stays fresh for 3 days. For longer storage, refrigerate for up to 1 week or freeze for 3 months. To reheat, warm slices at 300°F for 5-7 minutes—this restores moisture without drying out the cake.
Can I substitute walnuts or pecans with other toppings?
Try toasted coconut flakes, crushed pretzels, or even crumbled bacon for a savory-sweet twist. For a chocolatey crunch, use chopped chocolate-covered espresso beans. Just ensure toppings are added while the cake is warm (but not hot) so they adhere properly. The key is contrast—salty, crunchy, or fruity elements all work beautifully.