
Desserts
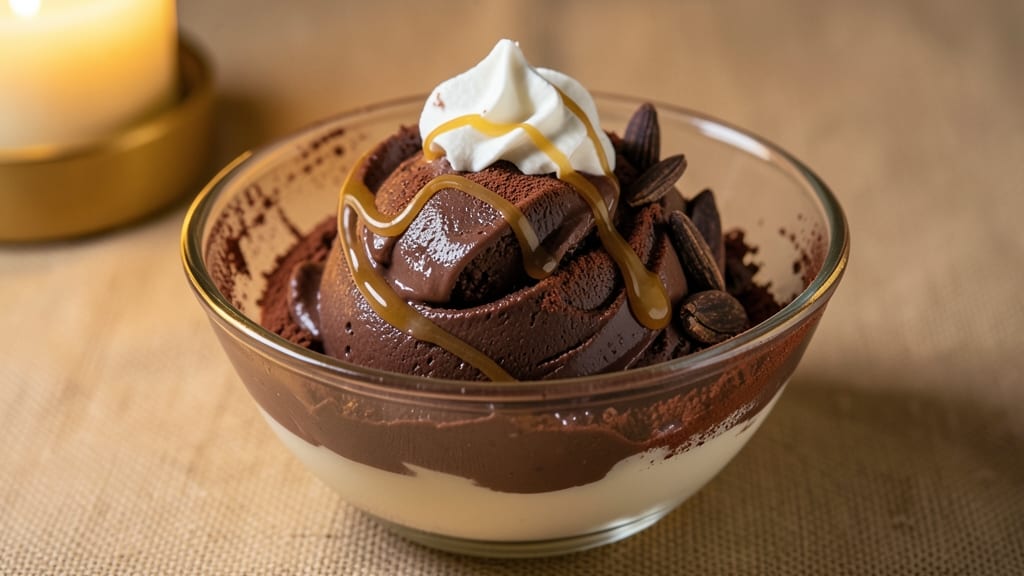
This bitter chocolate ice cream recipe delivers deep, complex richness that balances dark cocoa intensity with velvety smoothness—no artificial sweetness needed. 🌟 The secret lies in using high-quality dark chocolate (70% or higher) or Dutch-process cocoa powder, which creates that signature bittersweet profile without overpowering the palate.
Unlike overly sweet desserts, this version lets the chocolate shine while maintaining a creamy, luxurious texture.
We're using a French-style custard base for the perfect freeze—smooth, dense, and free from ice crystals. The process involves tempering eggs with sugar and warm milk before incorporating the chocolate, ensuring every spoonful is velvety.
Chilling time is critical here: at least 4 hours (or overnight) transforms the mixture into that coveted silky consistency.
What you'll end up with is a perfectly balanced dessert where the bitterness of dark chocolate meets creamy sweetness in harmony. The texture is dense yet smooth, with no icy patches—just pure, luxurious decadence.
Serve with a sprinkle of flaky sea salt or orange zest to enhance the chocolate's depth, or add toasted hazelnuts for crunch.
This recipe is vegetarian by default, and while it contains dairy, we'll note vegan adaptations in the instructions. The result? A sophisticated dessert that feels indulgent yet refined—ideal for impressing guests or treating yourself to a moment of pure chocolate bliss. Let's get started.
Ingredients for bitter chocolate ice cream
Dark chocolate bars, rich cream, and velvety custard—just what you need for this luxurious dessert.
| Ingredient | Amount | Notes |
|---|---|---|
| Dark Chocolate (70% or higher) 🍫 | 8 oz | High-quality bars or chips, chopped |
| Heavy Cream 🥛 | 2 cups | Full-fat for richness |
| Whole Milk 🥛 | 1 cup | Warmed for custard |
| Large Egg Yolks 🥚 | 4 whole | Freshly separated |
| Granulated Sugar 🍚 | ½ cup | Fine white sugar |
| Dutch-Process Cocoa Powder 🍫 | ¼ cup | For deep chocolate flavor |
| Vanilla Extract 🌿 | 1 tbsp | Pure Madagascar preferred |
| Flaky Sea Salt 🧂 | ½ tsp | For garnish |
| Orange Zest 🍊 | 1 tbsp | Freshly grated |
| Toasted Hazelnuts 🌰 | ¼ cup | Chopped, optional garnish |
| Unsalted Butter 🧈 | 2 tbsp | Cold, for swirling |
The chocolate is everything here. Valrhona or Lindt 70% bars are my go-to—they melt beautifully and deliver that deep, bittersweet flavor without artificial aftertaste. If you're using chocolate bars, chop them into even pieces (about 1/2-inch) for consistent melting. Trader Joe's and Whole Foods usually carry high-quality options, but check the cocoa percentage—anything below 70% will taste too sweet. The cocoa powder? Dutch-processed is key—it's smoother and less acidic, letting the chocolate's richness shine through. Pro tip: Toast the hazelnuts in a dry pan for 5 minutes until fragrant—it intensifies their flavor for that perfect crunch.
No dark chocolate bars? High-quality chocolate chips (like Ghirardelli or Guittard) work in a pinch, but they won't melt as smoothly. Running low on heavy cream? Half-and-half with extra butter mimics the richness, though texture might be slightly lighter. The vanilla extract matters—Madagascar bourbon has a deeper, more complex flavor than imitation extracts. For the orange zest, use a microplane to get fine, fragrant strips without the bitter pith. And if you're making this ahead, prep the custard base the night before—it chills faster and develops better flavor.
This custard keeps beautifully. Store the finished ice cream in an airtight container with parchment between layers to prevent freezer burn—it'll stay creamy for up to 2 months. The butter swirls are best added fresh, so reserve a small scoop before freezing. For a vegan adaptation, swap the heavy cream for full-fat coconut milk and use flax eggs (1 tbsp ground flaxseed + 3 tbsp water per egg yolk). The texture will be slightly denser but still luxurious. Garnish with the sea salt and zest right before serving—it brightens the chocolate's depth every time.
Why You'll Love This Recipe
- No Fuss, Big Payoff: I’ll be real—this recipe takes less effort than store-bought. Just temper those yolks with sugar, melt the chocolate, and let the cream do the work. No churning, no waiting hours—just 15 minutes of hands-on time before you pop it in the freezer.
- Deep, Decadent Crunch: That 70% dark chocolate isn’t just bitter—it’s rich. The yolks add silkiness, the cream keeps it velvety, and when it freezes, you get little pockets of fudgy intensity. Honestly, it’s the kind of ice cream that makes you slow down and savor every bite.
- Weeknight Magic: Between us, this is my go-to when I need dessert now. Leftovers? Even better. It keeps for a week in the freezer, so I can make a big batch and pull out a scoop whenever cravings hit. (Yes, even on a Tuesday night.)
- Budget Luxury: Here’s what sold me—this tastes like a high-end dessert but costs nothing like one. A few eggs, a block of chocolate, and some pantry staples? That’s it. No fancy equipment, no overpriced ingredients—just pure, satisfying indulgence without the guilt.
Step-by-step instructions for bitter chocolate ice cream
Here's how to craft velvety, intensely rich chocolate ice cream that balances deep cocoa notes with bright citrus and nutty crunch.
🍳 Step 1: Temper the Chocolate for Maximum Smoothness
Start by melting the 8 oz dark chocolate (70% or higher) in a heatproof bowl set over a saucepan of simmering water, stirring until smooth. Remove from heat and let cool slightly to 90°F—this tempering step prevents graininess. While it cools, warm the 1 cup whole milk and 2 cups heavy cream together in the same saucepan until steaming but not boiling.
Here's the thing—tempering chocolate properly makes all the difference. If it gets too hot, the chocolate will seize. Test by dipping a spoon in the milk mixture—it should feel warm but not scalding. Once the chocolate reaches 90°F, whisk it into the warm dairy until completely dissolved and silky. This creates your flavor base and prevents any gritty texture later.
👨🍳 Step 2: Whisk the Custard Base to Perfection
In a separate bowl, whisk together the 4 whole large egg yolks, 0.5 cup granulated sugar, and 0.25 cup Dutch-process cocoa powder until pale and slightly thickened—about 3-4 minutes with a hand mixer. Slowly pour the warm chocolate mixture into the egg mixture while whisking constantly to temper the eggs and prevent scrambling.
This is where the magic happens. The slow incorporation creates an ultra-smooth custard that will later churn into silky ice cream. Strain the mixture through a fine-mesh sieve into a clean saucepan to remove any lumps. Return it to low heat and cook, stirring constantly, until it reaches 170°F and coats the back of a spoon—this ensures proper thickening without curdling.
🥘 Step 3: Infuse and Finish the Custard
Remove the custard from heat and stir in the 1 tbsp vanilla extract, 1 tbsp orange zest, and 0.5 tsp flaky sea salt. Let it steep for 10 minutes to infuse the bright citrus and floral vanilla notes. Then, chill the custard in an ice bath for 15 minutes, stirring occasionally, until it reaches 40°F—this rapid cooling prevents overcooking and ensures smooth texture.
While it chills, toast the 0.25 cup hazelnuts in a dry skillet over medium heat until fragrant and golden. Chop them coarsely for garnish. The orange zest adds a sophisticated brightness that cuts through the bitterness, while the salt enhances all the flavors. Don't skip the chilling step—rushing this will result in icy, grainy ice cream instead of creamy perfection.
⏰ Step 4: Churn and Freeze for Ideal Texture
Pour the chilled custard into an ice cream maker and churn according to manufacturer's instructions until thick and creamy—about 20-25 minutes. Meanwhile, soften the 2 tbsp unsalted butter by placing it in a bowl set over warm water. Once the ice cream is thick but still soft, fold in the butter using a spatula for a luxurious, swirled texture.
Transfer the ice cream to a loaf pan and freeze for 4 hours until solid. Before serving, let it sit at room temperature for 5-10 minutes to soften slightly. The butter swirl adds a rich, velvety contrast to the intense chocolate flavor. For extra drama, sprinkle with additional flaky sea salt and toasted hazelnuts right before scooping.
🍽️ Step 5: Serve with Confidence
Scoop the ice cream into bowls and garnish with extra orange zest, chopped hazelnuts, and a pinch of flaky sea salt. The contrast of temperatures and textures—creamy ice cream with crunchy nuts and citrusy zest—elevates every bite. Serve immediately while still slightly soft for that perfect mouthfeel.
This isn't just any chocolate ice cream—it's a sophisticated dessert that delivers deep, complex flavors with a silky texture. The bitterness is balanced by the bright orange and nutty crunch, making each spoonful unforgettable. Store leftovers in an airtight container for up to 2 weeks, though I doubt it'll last that long!
Pro Tips For Making Bitter Chocolate Ice Cream
- TEMPER THE CHOCOLATE RIGHT: Chop that 70% dark chocolate into small, even pieces—no bigger than a dime—before heating the cream. I learned this the hard way when I used big chunks and ended up with a grainy mess that no whisking could fix.
- WHISK YOLKS TO THE POINT: Whisk the egg yolks and sugar until they’re pale, thick, and just about to ribbon—about 3-4 minutes. Over-whisking turns them into meringue, and under-whisking leaves them flat. Trust the texture, not the time.
- SKIP THE BOIL: Once the cream-chocolate mixture hits a gentle simmer, pull it off the heat immediately and let it cool to room temp before mixing with the yolks. I used to strain it hot, and the yolks scrambled every time—now I just wait.
- STRAIN FOR SMOOTHNESS: After tempering the chocolate in the cream, strain the whole mixture through a fine-mesh sieve into the yolk mixture. Yes, it’s extra work, but it catches any grit from the chocolate or cooked-on bits—your ice cream will thank you with a velvety finish.
Serving suggestions for this dish
Elegant Garnishes
Top your scoops with flaky sea salt—just a pinch enhances the chocolate's depth by highlighting its natural bitterness. I like Maldon for its delicate crystals that melt on the tongue.
For a pop of color, add fresh orange zest (use a microplane for fine strands) to brighten the rich flavors. 🍊
Crunchy Contrasts
Toasted hazelnuts provide the perfect crunch—lightly toast ¼ cup in a dry skillet for 5 minutes until fragrant. Chop them coarsely and sprinkle generously. For extra flair, drizzle with dark chocolate sauce (melt 1 oz chocolate with 1 tsp cream) or a swirl of caramelized honey for sweetness.
Coffee Pairings
A strong espresso (like La Marzocco) cuts through the ice cream's richness beautifully. For a dessert course, serve with dark chocolate-covered espresso beans on the side. If you prefer tea, Earl Grey with its bergamot notes complements the orange zest garnish wonderfully. ☕
Wine & Liqueur
Pair with a bold red wine like Cabernet Sauvignon (try a Napa Valley vintage) to match the chocolate's intensity. For a boozy twist, drizzle with Kahlúa or Grand Marnier before serving—just 1 tsp per scoop adds depth without overpowering.
A splash of chilled white wine (like Pinot Grigio) also works for a lighter contrast.
Presentation Tips
Use amber glassware to enhance the chocolate's deep hue. For a restaurant-style touch, layer the ice cream with whipped cream and chocolate shavings in a parfait glass.
Serve on a slate board with small bowls of garnishes for a shareable dessert experience. The presentation matters just as much as the flavor! 🍽️
Nutrition facts
Frequently asked questions
Why does this recipe use such dark chocolate?
The 70% or higher cocoa content is key to achieving that signature bittersweet profile. Darker chocolate contains less sugar and more intense cocoa flavors, which create the complex richness we're going for. Using anything below 70% will result in a sweeter, less sophisticated ice cream. Think of it like coffee—just as you wouldn't use decaf for a rich espresso, you wouldn't use milk chocolate for this recipe.
Can I make this without an ice cream maker?
Yes, but you'll need to be patient! Chill the custard completely, then freeze it in a shallow container, stirring vigorously with a fork every 30 minutes for the first 3 hours to break up ice crystals. This method creates a slightly grainier texture, but it'll still be delicious. For best results, transfer to a loaf pan after the first 2 hours to shape it properly.
What's the difference between Dutch-process and natural cocoa powder?
Dutch-process cocoa has been alkalized to reduce acidity, giving it a smoother, richer flavor that pairs perfectly with chocolate. Natural cocoa is more acidic and can taste bitter or even slightly sour. For this recipe, Dutch-process is essential—it enhances the chocolate's depth without adding harshness. If you only have natural cocoa, you might need to add an extra ½ tsp baking soda to neutralize the acidity.
How do I fix grainy ice cream?
Graininess usually means the custard wasn't chilled properly or the ice cream was over-churned. If you notice it after churning, try blending the ice cream in a food processor for 10 seconds to break up any ice crystals. For prevention, always chill the custard to 40°F before churning and don't over-churn—stop when it's thick but still soft. The butter swirl helps mask any minor texture issues.
Can I make this vegan?
Replace the heavy cream with full-fat coconut milk and use flax eggs (mix 1 tbsp ground flaxseed + 3 tbsp water per egg yolk). The texture will be denser but still luxurious. For the chocolate, use dairy-free dark chocolate (like Enjoy Life brand) with 70%+ cocoa. The bitterness will still shine through, just with a slightly different mouthfeel.