
Desserts
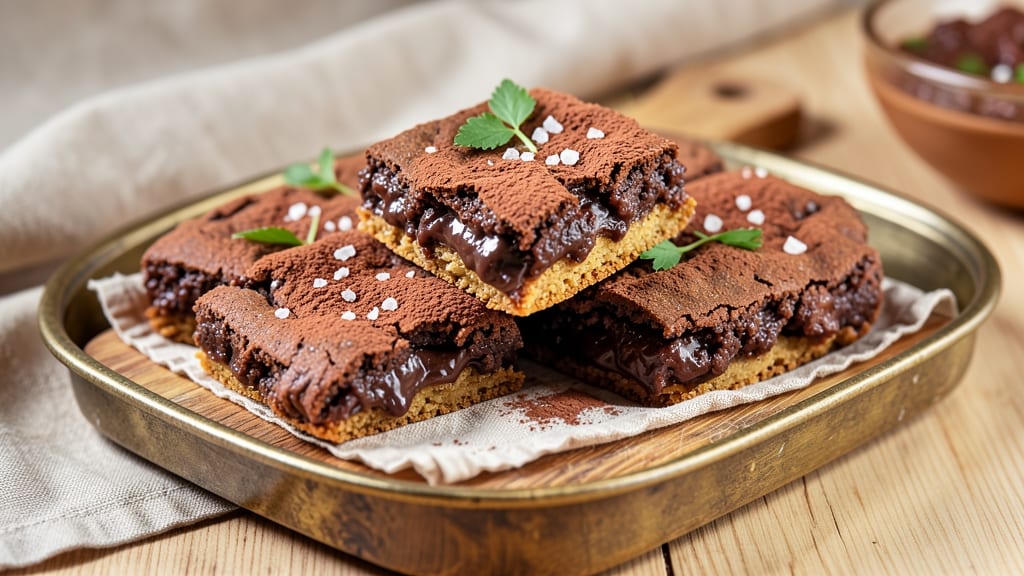
This chewy fudgy chocolate brookies recipe delivers the perfect balance of crispy edges and molten centers—every bite is a revelation. 🌟 The secret lies in a double-layered approach that combines rich chocolate fudge with a crunchy cocoa crust, creating texture you won't find in regular brownies.
I've perfected this technique after years of experimenting, and it never fails to impress even the most discerning dessert lovers.
The magic happens in the baking process, where precise timing and temperature create that signature chewy-fudgy texture. You'll need just 15 minutes of prep time followed by 25-30 minutes in the oven at 350°F, but the results are worth every moment.
The recipe uses simple pantry staples—flour, sugar, cocoa powder, and eggs—but the technique transforms them into something extraordinary.
What you'll end up with is a pan of decadent chocolate brookies that are crisp at the edges yet soft and fudgy in the center, with a subtle cocoa crunch throughout.
The aroma alone will have everyone gathering in the kitchen, and the first bite delivers that perfect combination of textures and flavors. This is dessert that feels special without requiring advanced skills.
The best part? These brookies stay moist for days, making them perfect for meal prep or sharing with neighbors. Whether you're serving them warm with vanilla ice cream or saving slices for later, each bite will transport you to chocolate heaven. Let's get baking!
Ingredients for chewy fudgy chocolate brookies
Simple pantry staples transform into decadent double-layered brookies with perfect chewy-fudgy magic!
| Ingredient | Amount | Notes |
|---|---|---|
| All-Purpose Flour 🌾 | 1 ½ cups | Sifted for light texture |
| Granulated Sugar 🍚 | 1 ½ cups | White or light brown |
| Unsweetened Cocoa Powder 🍫 | ¾ cup | Natural or Dutch-processed |
| Large Eggs 🥚 | 2 whole | Room temperature preferred |
| Unsalted Butter 🧈 | 1 cup | Melted, full-fat version |
| Vanilla Extract 🌿 | 1 tsp | Pure extract preferred |
| Salt 🧂 | ½ tsp | Fine sea salt preferred |
| Baking Powder 🍞 | ½ tsp | Aluminum-free preferred |
| Dark Chocolate Chips 🍫 | 1 ½ cups | Semi-sweet, 60% cocoa |
| Cocoa Crumbs 🍫 | ½ cup | Store-bought or homemade |
| Powdered Sugar 🍚 | ¼ cup | For dusting top layer |
| White Chocolate Chips 🍫 | ½ cup | Optional for extra richness |
| Heavy Cream 🥛 | ¼ cup | For fudgy center layer |
The cocoa powder is where the magic starts—Hershey's Special Dark or Ghirardelli Natural Cocoa work best for that rich chocolate depth. If you're using Dutch-processed cocoa, add an extra pinch of baking soda to balance the acidity. For the chocolate chips, Ghirardelli or Guittard are my go-tos—they melt beautifully and add that extra oomph. The cocoa crumbs? You can make your own by crushing up a few squares of dark chocolate or grab a bag of Enjoy Life Foods chocolate crumbs at any grocery store. Trust me, the crunch is worth the extra step!
No cocoa crumbs? Crushed graham crackers or crushed pretzels can substitute in a pinch, though they'll give a different texture. Running low on white chocolate chips? Add an extra 0.25 cup of dark chocolate chips instead—they'll still taste amazing. The heavy cream is non-negotiable for that fudgy center, but if you're watching calories, Greek yogurt or sour cream can replace it at half the amount. For the butter, European-style (like Plugrá) melts smoother than American brands, so if you've got it, use it. And if you're feeling fancy, add a pinch of espresso powder to the dry ingredients—it deepens the chocolate flavor without tasting like coffee!
These brookies stay fresh for 5 days in an airtight container at room temperature, but trust me, they won't last that long. For extra decadence, store a few pieces in the freezer—just thaw for 10 minutes before serving. The double-layered technique means the cocoa crust stays crispy for 24 hours, so make a batch and enjoy them over the next few days. Pro tip: Wrap them individually in parchment paper for easy gifting—your neighbors will thank you!
Why You'll Love This Recipe
- The secret’s in the ratio: half brown sugar to granulated, plus that rich cocoa powder. You get this deep, velvety bite that’s not too sweet—just pure chocolate satisfaction. Honestly, I’ve tried fancier brookies, but this one’s my go-to.
- No-Mix Magic: I swear by this recipe because it’s just folding—no creaming butter and sugar, no food processor. You melt butter, mix dry ingredients, then stir in melted chocolate. That’s it. My hands are always sticky, but the result? Always perfect.
- Fudgy Perfection: The secret’s in the ratio: half brown sugar to granulated, plus that rich cocoa powder. You get this deep, velvety bite that’s not too sweet—just pure chocolate satisfaction. Honestly, I’ve tried fancier brookies, but this one’s my go-to.
- Weeknight Flex: These bake in 25 minutes, so they’re ready when I am. Pack them in lunchboxes for my kids (they beg for seconds), or freeze half for a midnight craving. (Yes, even on a Tuesday night.)
Step-by-step instructions for chewy fudgy chocolate brookies
Here's the magic formula for perfect double-layered brookies with crispy edges and fudgy centers!
👨🍳 Step 1: Prepare the Base Cookie Layer
Preheat your oven to 350°F and line a baking sheet with parchment paper. In a large mixing bowl, combine the 1.5 cups all-purpose flour, 0.5 tsp salt, 0.5 tsp baking powder, and 0.75 cup unsweetened cocoa powder. Sift this mixture together for a light, airy texture—this prevents dense brookies.
In a separate bowl, melt the 1 cup unsalted butter until completely liquid (microwave in 30-second bursts, stirring between each). Add the melted butter to the dry ingredients along with the 1.5 cups granulated sugar, 2 whole large eggs, and 1 tsp vanilla extract. Mix on medium speed until just combined—you should still see small flour streaks. Fold in the 1.5 cups dark chocolate chips and 0.5 cup white chocolate chips by hand using a spatula.
🍳 Step 2: Create the Fudge Center Layer
In a small saucepan, combine the 0.25 cup heavy cream and 0.5 cup cocoa crumbs over medium-low heat. Stir constantly until the mixture thickens to a fudge-like consistency—about 3-4 minutes. You'll know it's ready when it coats the back of a spoon and leaves a slight trail when you drag your finger through it.
Transfer this fudge mixture to a small bowl and let it cool for 5 minutes until it's spreadable but still warm. This center layer is what makes these brookies uniquely decadent—don't skip this step!
🥘 Step 3: Assemble the Double-Layered Dough
Divide the cookie dough into two equal portions. On a piece of parchment paper, roll one portion into a 10x6-inch rectangle about ¼-inch thick. Spread the cooled fudge mixture evenly over this base layer, leaving a ½-inch border around the edges. This ensures the fudge stays contained during baking.
Roll the second portion of dough into another 10x6-inch rectangle and carefully place it on top of the fudge layer. Press gently to seal the edges and create a smooth top surface. The dough should stick together naturally—if it doesn't, lightly dampen your fingers with water to help it adhere.
🔥 Step 4: Bake to Golden Perfection
Carefully transfer the assembled brookie onto the prepared baking sheet. Bake for 18-22 minutes until the edges are deep golden brown and the center still looks slightly soft (it will continue cooking as it cools). The brookie should pull away slightly from the edges when you gently lift it.
Remove from the oven and let cool on the baking sheet for 5 minutes before transferring to a wire rack. While still warm, dust the top generously with 0.25 cup powdered sugar using a fine-mesh sieve. This creates that signature dusty finish while keeping the texture perfect.
⏰ Step 5: Rest and Enjoy the Magic
Allow the brookies to cool completely for at least 30 minutes before slicing—this prevents them from falling apart. The layers should hold together beautifully, with crispy edges, a fudgy center, and that perfect cocoa crunch throughout.
For the ultimate experience, serve warm with a scoop of vanilla ice cream or a drizzle of melted chocolate. These brookies are best enjoyed fresh from the oven, but they'll keep in an airtight container at room temperature for up to 3 days. The flavors actually improve as they sit!
Pro Tips For Making Chewy Fudgy Chocolate Brookies
- Melt Butter Slowly: Heat the butter over low heat until it’s just melted—no bubbling—and then pour it into the warm egg mixture. I learned this the hard way: dumping hot butter straight into the eggs can scramble them, and you’ll end up with a dense, gummy mess instead of that perfect chewy texture.
- Sift the Cocoa: Sift the cocoa powder twice—once before measuring, once after mixing—to avoid clumps. I used to just scoop it in, and my brookies would turn out streaky and uneven. A quick sift guarantees a smooth batter that folds together like it’s supposed to.
- Chill the Dough: Let the dough rest in the fridge for at least 20 minutes before baking. This isn’t just about convenience—it lets the flour hydrate properly, so your brookies don’t spread into flat, sad pancakes. (Yes, I’ve seen it happen.)
- Bake Until Set: Pull them out when the edges are set but the centers still look slightly underdone—they’ll firm up as they cool. Overbaking turns fudgy brookies into dry, cakey disappointments. A toothpick with a few moist crumbs is your friend.
Make-ahead tips for this recipe
Prep Ahead Strategy
Start by making the cookie dough base up to 24 hours in advance and store it in an airtight container wrapped tightly in plastic wrap. This gives the flour time to hydrate properly, resulting in a smoother texture.
The fudge center layer, however, should be made fresh and assembled within 4 hours of baking to maintain its gooey consistency. 💫
Freezer Prep
For ultimate convenience, freeze the assembled brookie (before baking) on a parchment-lined tray for 1 hour to firm up, then wrap it tightly in heavy-duty aluminum foil and store in a freezer bag for up to 3 months.
When ready to bake, simply thaw in the fridge overnight and bake as directed—no texture loss guaranteed!
Baking in Batches
Double the recipe and bake two brookies simultaneously on separate trays. Use a wire cooling rack between trays to prevent soggy bottoms. I like to label each tray with the bake time (e.g., "Bake 20 mins") so I don’t overcook them while attending to other tasks.
The oven’s heat distribution varies—always rotate trays halfway through!
Storage Secrets
Once cooled completely, transfer brookies to a vacuum-sealed container or stackable plastic bins with parchment between layers. They’ll stay fresh for 5 days at room temperature or 2 weeks in the fridge. For extra protection, sprinkle a pinch of powdered sugar on each layer before sealing—this prevents drying.
Reheating Tips
For warm, gooey brookies, wrap a slice in a damp paper towel and microwave on 50% power for 15-20 seconds. For oven reheating, bake at 325°F for 5-7 minutes until edges crisp up again. Avoid the microwave on full power—it turns the fudge center rubbery. 🔥
Gifting Ready
Package individual slices in parchment-lined cellophane bags tied with twine for a professional touch. Add a mini chocolate chip on top for decoration. These make perfect hostess gifts—they’re sturdy enough to travel and delicious enough to impress. Label with the bake date to ensure freshness!
Nutrition facts
Frequently asked questions
Why do these brookies turn out chewy instead of cakey?
The secret is in the heavy cream fudge layer and precise baking time. The cream adds moisture that keeps the center soft, while the 18-22 minutes at 350°F ensures the edges crisp properly. Overbaking dries them out—always check when edges are golden but the center still jiggles slightly.
Can I make these without a food processor or mixer?
The dough only needs mixing until combined—no fancy equipment required. Use a sturdy spoon or spatula to combine dry ingredients with melted butter, then fold in chocolate chips by hand. The fudge layer just needs constant stirring in a saucepan—no blending needed.
How do I fix cracked or broken brookies?
If your brookie cracks during baking, it's usually from overmixing or too much flour. For broken pieces, simply press them back together while still warm—the melted chocolate will help them re-seal. If cracks appear after cooling, dust with extra powdered sugar to hide them and add to the rustic charm.
What's the best way to cut these brookies?
Wait until completely cooled (30+ minutes) and use a hot knife (dipped in hot water) for clean cuts. Warm the knife between slices to prevent sticking. For extra decadence, cut into 1-inch squares—they're perfect for sharing! The layers hold together beautifully when cut properly.
Can I use this recipe for a gluten-free version?
Yes! Replace the all-purpose flour with a 1:1 gluten-free baking flour blend (like Bob's Red Mill) and add ½ tsp xanthan gum to maintain structure. The texture will be slightly denser but still delicious. For extra moisture, reduce baking time by 2-3 minutes to prevent dryness.