
Desserts
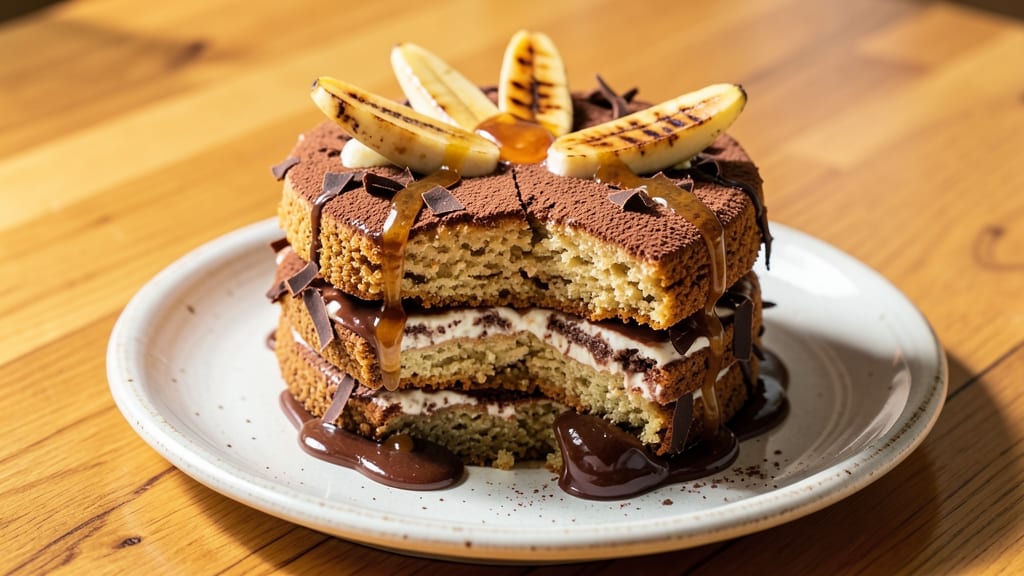
This banana chocolate yogurt cake recipe delivers the perfect balance of tender layers and rich chocolate swirls—no one will guess it's secretly healthy. 💛 The secret lies in ripe bananas and Greek yogurt, which keep the cake moist without needing extra fat.
I've baked this for years, and it's become my go-to dessert for gatherings or when I crave something indulgent yet lighter than traditional cakes.
The magic happens in the layers: a velvety yogurt-banana cake base with pockets of fudgy chocolate that melt in every bite. You won't need fancy equipment—just a mixing bowl, a whisk, and your favorite 8x8-inch pan.
The recipe is beginner-friendly, with straightforward steps that ensure foolproof results even on your first try. Plus, the natural sweetness from bananas means you can reduce sugar without sacrificing flavor.
What you'll end up with is a cake that's moist and rich, with a texture that's almost too good to be true. The chocolate swirls add depth, while the yogurt keeps it tender instead of dry.
It's the kind of dessert that disappears quickly, leaving only crumbs and happy faces behind. Serve it warm with a scoop of vanilla ice cream or dusted with powdered sugar for a restaurant-quality finish.
For extra flair, try adding a sprinkle of sea salt on top or swirling in peanut butter for a nutty twist. The recipe also adapts easily to dietary needs—just swap the yogurt for coconut yogurt and use flax eggs for a vegan version.
Let's get baking! Here's everything you need to make it perfect.
Ingredients for banana chocolate yogurt cake
Gather these simple, wholesome ingredients for a cake that's moist and rich without being heavy.
| Ingredient | Amount | Notes |
|---|---|---|
| Ripe Bananas 🍌 | 2 whole | Overripe with brown spots preferred |
| Greek Yogurt 🥛 | 1 cup | Plain, full-fat for moisture |
| All-Purpose Flour 🌾 | 1 ½ cups | Sifted for light texture |
| Granulated Sugar 🍚 | ¾ cup | Light brown sugar for depth |
| Unsalted Butter 🧈 | ½ cup | Room temperature, cubed |
| Large Eggs 🥚 | 2 whole | Room temperature for blending |
| Baking Powder 🧂 | 1 tsp | Freshly opened |
| Vanilla Extract 🌿 | 1 tsp | Pure alcohol-free preferred |
| Salt 🧂 | ½ tsp | Fine sea salt |
| Semisweet Chocolate Chips 🍫 | 1 cup | 60% cocoa or higher |
| Powdered Sugar 🍚 | ¼ cup | For dusting and swirl |
The bananas are the secret weapon here—look for ones with brown spots for maximum sweetness and moisture. Trader Joe's usually has perfect ones, or just leave a few on your counter until they ripen. Greek yogurt makes this cake tender without extra fat, so full-fat works best—skip the nonfat. The chocolate chips should be 60% cocoa or higher for that deep, fudgy flavor. I always buy Ghirardelli or Enjoy Life for the best melt-in-your-mouth texture. Don't worry if you don't have powdered sugar for dusting—just skip it and serve with ice cream instead.
No Greek yogurt? Sour cream or buttermilk works in a pinch, but the cake might be slightly denser. Short on chocolate chips? Melt a bar of chocolate and swirl it in—just make sure it's fully cooled before adding it to the batter. The vanilla extract matters here—alcohol-free versions have more pure vanilla flavor. If you're in a bind, imitation vanilla works, but you'll notice the difference. For extra richness, I sometimes add a tablespoon of cocoa powder to the dry ingredients, but it's optional. The baking powder needs to be fresh—if it's over a year old, toss it and buy new.
This cake keeps well for 3-4 days in an airtight container at room temperature, but honestly, it disappears faster than that. For longer storage, wrap it tightly and refrigerate for up to 1 week. The chocolate swirls soften in the fridge, so bring it to room temperature before serving. I always make a double batch—one for today and one to freeze. Wrap the frozen cake in plastic wrap and aluminum foil, and it'll stay fresh for up to 3 months. Leftovers? Reheat slices in the microwave for 10-15 seconds to bring back that warm, gooey texture.
Why You'll Love This Recipe
- No Mash Needed: I swear by this trick—just smash the bananas with a fork right in the bowl, no food processor required. The yogurt does the heavy lifting, blending everything into a velvety batter with zero fuss.
- Rich Without Overpowering: That Greek yogurt keeps it moist and light, while the butter and sugar create this perfect balance of sweetness and depth. Honestly? It tastes like a cross between a decadent brownie and a cozy cake—without needing fancy ingredients.
- Leftovers? Even Better: This cake actually improves the next day—more tender, flavors melded just right. I’ll be real: I’ve reheated slices in the microwave and served them cold with a dollop of yogurt, and no one’s ever complained.
- Pantry Staple Magic: You’re using things you already have—ripe bananas you’d toss, flour from your cabinet, and butter you’d melt anyway. Between us, it’s my go-to when I’m low on eggs or need something fast that still feels special.
Step-by-step instructions for banana chocolate yogurt cake
Here's how to create layers of moist banana cake with rich chocolate swirls—every bite is pure comfort.
👨🍳 Step 1: Mash Bananas and Mix Wet Ingredients
Start by mashing the 2 whole ripe bananas in a medium bowl until completely smooth—no lumps allowed. This ensures your cake stays moist instead of dry. Add the 1 cup Greek yogurt, 0.5 cup unsalted butter, 0.75 cup granulated sugar, 2 whole large eggs, 1 tsp vanilla extract, and 0.5 tsp salt. Mix until everything is fully combined and creamy.
I like to use a hand mixer for this step—it incorporates air into the batter, which helps create a lighter texture. The yogurt and mashed bananas work together to keep the cake incredibly tender, so don't skip this part. The mixture should be thick but pourable, like a smooth batter.
👨🍳 Step 2: Combine Dry Ingredients and Fold Gently
In a separate bowl, whisk together the 1.5 cups all-purpose flour and 1 tsp baking powder. Sift the flour mixture directly into the wet ingredients and gently fold with a spatula until just combined. Overmixing develops gluten, which can make your cake tough—stop folding when you still see a few flour streaks.
Now, fold in ½ cup of the 1 cup semisweet chocolate chips (reserve the rest for the swirl). The chocolate chips will add pockets of rich flavor throughout each layer. For the swirl, melt the remaining ½ cup chocolate chips with 2 tablespoons of the 0.5 cup unsalted butter in a microwave-safe bowl in 30-second intervals, stirring between each, until smooth.
🥘 Step 3: Layer and Swirl the Batter
Preheat your oven to 350°F and grease two 6-inch round cake pans (or one 9-inch pan if preferred). Pour half of the vanilla batter into the prepared pan and spread it evenly. Drizzle ¼ of the melted chocolate mixture over the batter, then swirl gently with a knife to create marbled streaks. Repeat with the remaining batter and chocolate.
Here's the thing—don't over-swirl. You want visible chocolate ribbons, not a completely blended cake. The contrast between the moist banana cake and fudgy chocolate is what makes this recipe special. Tap the pans gently on the counter to release any air bubbles before baking.
🔥 Step 4: Bake Until Golden and Springy
Bake the cakes for 25-30 minutes (or 30-35 minutes for the 9-inch pan) until a toothpick inserted in the center comes out clean. The edges should be golden brown, but the top might still look slightly underdone—that's okay. The residual heat will finish cooking it as it cools.
I know it seems weird, but don't open the oven door early to check. Every time you peek, you lose heat and moisture, which can lead to a dry cake. Trust the timer and the toothpick test. Let the cakes cool in the pans for 10 minutes, then transfer to a wire rack to cool completely.
🍽️ Step 5: Assemble and Dust with Powdered Sugar
Once completely cooled, place one cake layer on a serving plate and spread a thin layer of 2 tablespoons of the 0.25 cup powdered sugar mixed with 1 tablespoon of the 1 cup Greek yogurt (this acts as a "glue"). Top with the second layer and repeat the process. Dust the entire cake with the remaining 0.25 cup powdered sugar for that bakery-fresh finish.
Slice into wedges and serve immediately. The cake should be moist with a tender crumb, and each bite delivers that perfect balance of sweet banana and rich chocolate. Store leftovers covered at room temperature for up to 3 days, or refrigerate for up to 5 days (though I doubt it'll last that long!).
Pro Tips For Making Banana Chocolate Yogurt Cake
- Mash Bananas Like Ice Cream: I used to smash them with a fork and end up with a lumpy mess—this cake deserves smoothness. Use a potato masher or fork to break them up, then blend with the yogurt in a food processor for 10 seconds. The texture stays consistent, and the cake turns out lighter.
- Don’t Overmix the Batter: I learned this the hard way—gluing the flour into the yogurt mixture makes the cake dense. Stir just until combined, then stop. The yogurt’s tang and bananas’ moisture do the work; you’re just helping them along.
- Bake Until the Center Springs: The cake’s done when a toothpick comes out with moist crumbs, not wet batter. Most recipes say 30–35 minutes, but ovens vary—check at 28. If the edges brown too fast, tent with foil and let the center set.
- Add Cocoa Last, Not First: Mixing cocoa powder into the wet ingredients can turn the batter gray and dull. Fold it in with the flour at the very end—this keeps the chocolate flavor bright and the cake’s color rich. (Yes, even if you’re impatient like me.)
Pro cooking tips for banana chocolate yogurt cake
Banana Ripeness Matters
Your cake's success starts with the bananas—look for ones with brown spots (not blackened) for the perfect balance of sweetness and moisture. I swear by Trader Joe's or Costco for consistently ripe bananas.
Overripe bananas contain more sugar, which reduces the need for extra sweetener. If yours aren't ripe enough, place them in a paper bag with an apple overnight—the ethylene gas speeds up ripening. 🍌
Yogurt Texture Secrets
Using full-fat Greek yogurt is non-negotiable—it keeps the cake moist without making it dense. If you only have nonfat, mix it with 2 tablespoons of sour cream to improve texture.
For an extra boost, let the yogurt sit at room temperature for 10 minutes before mixing—it blends more smoothly. I've ruined cakes by skipping this step, so don't overlook it!
Chocolate Swirl Technique
The key to perfect swirls is patience. Melt the chocolate and butter in 30-second intervals, stirring between each, until completely smooth—no streaks allowed. For the swirl, pour the melted chocolate over half the batter, then use a butter knife to gently drag lines through the batter.
Rotate the pan ¼ turn between each drag for even distribution. Over-swirling blends everything together—stop when you see distinct chocolate ribbons. ✨
Baking Time Precision
Resist the urge to open the oven early! The cake needs 25-30 minutes at 350°F with no peeking. A toothpick should come out clean, but the center might still jiggle slightly—that's normal. If your oven runs hot, reduce the temperature to 325°F and add 5 minutes to the bake time.
I've learned this the hard way—dry cake happens when you overbake or peek too soon.
Layer Assembly Tricks
For a professional finish, spread the yogurt-powdered sugar mixture only on the edges of the bottom layer—this prevents sogginess. Use a small offset spatula to smooth the frosting evenly. Press the top layer gently but firmly to avoid crumbs.
For extra flair, dust with powdered sugar using a fine-mesh sieve instead of shaking it directly from the container—it creates a smoother, more even layer. 💫
Storage Hacks
This cake keeps best at room temperature in an airtight container for 3-4 days, but honestly, it disappears faster. For longer storage, wrap tightly in plastic and refrigerate for up to 1 week.
To reheat, microwave individual slices for 10-15 seconds—just enough to revive the warm, gooey texture. Freezing? Wrap the whole cake in plastic and foil, then thaw overnight in the fridge for the best results. No one will guess it was frozen! ❄️
Nutrition facts
Frequently asked questions
Can I use regular yogurt instead of Greek yogurt?
You can try, but Greek yogurt works best because it's thicker and adds more moisture to the cake. If you only have regular yogurt, mix it with 2 tablespoons of sour cream or 1 tablespoon of melted butter to improve the texture. The cake will still be delicious, just slightly less tender.
How do I make this cake vegan?
Swap the Greek yogurt for 1 cup coconut yogurt or 1 cup unsweetened almond yogurt, and replace the eggs with 2 flax eggs (2 tablespoons ground flaxseed + 6 tablespoons water, mixed and rested for 5 minutes). Use vegan butter and ensure your chocolate chips are dairy-free. The texture will be slightly denser but still moist.
Why did my cake turn out dry?
Dry cake usually happens from overbaking, peeking at the oven too soon, or using underripe bananas. Always bake until a toothpick comes out clean but not dry, and resist opening the oven door early. For extra moisture, add 1-2 tablespoons of milk or water to the batter if needed. The yogurt and butter are key for keeping it tender!
Can I make this in a single layer instead of two?
Use a 9x13-inch pan and bake for 30-35 minutes at 350°F. For extra richness, sprinkle ½ cup chocolate chips on top before baking. The single layer will be denser but still moist and delicious. Perfect for sheet cake lovers!
How do I store leftovers to keep them fresh?
Store in an airtight container at room temperature for 3 days or refrigerate for up to 1 week. For longer storage, wrap tightly in plastic and foil, then freeze for up to 3 months. Thaw overnight in the fridge—no need to reheat unless you prefer warm slices.