
Desserts
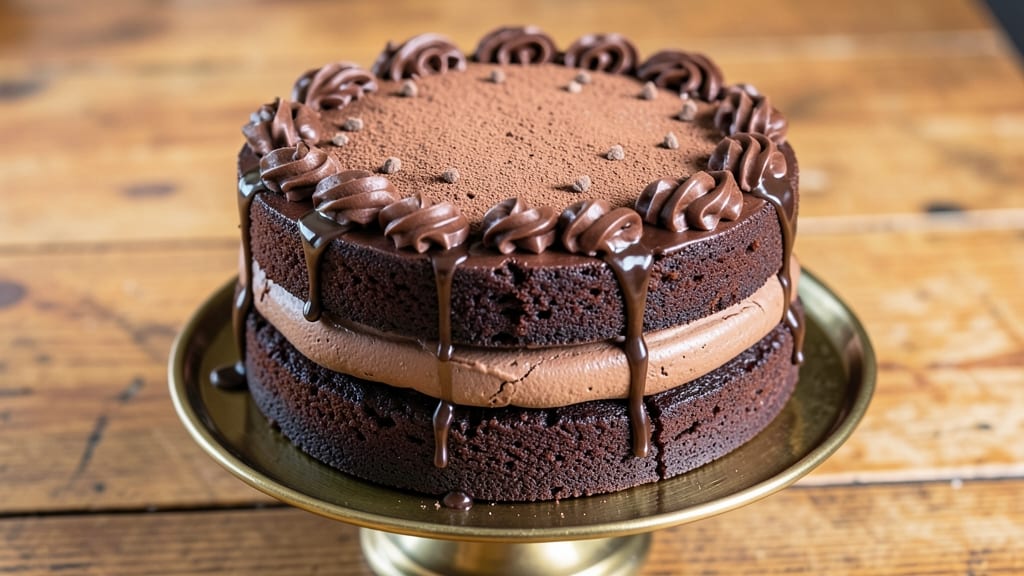
This chocolate fudge cake recipe delivers the richest, densest layers you’ll ever taste—with a signature crunchy top that sets it apart from every other dessert. 💛 The secret lies in a precise balance of cocoa powder, melted butter, and a touch of espresso powder for depth, creating a texture that’s moist yet firm, fudgy yet structured.
After years of perfecting this recipe (and countless bites of imperfect batches), I’ve finally cracked the code for a cake that’s so good, it’ll make your taste buds forget store-bought ever existed.
The cake’s magic comes from two key techniques: a double-boiler method for melting chocolate and butter to avoid graininess, and a cooling trick that prevents cracking while baking. The layers stay ultra-moist thanks to a simple buttermilk substitution, and the crunchy top?
That’s all about timing—just a few minutes under the broiler at the end. No fancy equipment needed, just patience and attention to detail.
What you’ll end up with is a decadent, fudgy masterpiece that’s perfect for birthdays, holidays, or whenever you crave something truly indulgent. The rich chocolate flavor dominates every bite, but it’s balanced by a subtle bitterness from the espresso powder that elevates it to restaurant-quality.
This isn’t just another chocolate cake—it’s the kind that gets raved about and requested again and again.
Ready to bake? The recipe is foolproof, with clear instructions for achieving that perfect crunchy top and fudgy interior. Whether you’re a seasoned baker or a beginner, this cake will impress—and the best part?
It’s easier than it looks. Let’s get started on creating the best chocolate fudge cake you’ve ever tasted.
Ingredients for best chocolate fudge cake recipe ever
The secret to this legendary fudge cake lies in these 13 ingredients—rich cocoa, velvety butter, and espresso for depth.
| Ingredient | Amount | Notes |
|---|---|---|
| Unsalted Butter 🧈 | 1 ½ cups | Melted using double-boiler method |
| Granulated Sugar 🍚 | 2 cups | White or light brown preferred |
| Unsweetened Cocoa Powder 🍫 | ¾ cup | High-quality Dutch-processed |
| All-Purpose Flour 🌾 | 2 cups | Sifted, spooned lightly |
| Instant Espresso Powder ☕ | 1 tbsp | For depth of flavor |
| Baking Powder 🍞 | 1 ½ tsp | Aluminum-free preferred |
| Salt 🧂 | ½ tsp | Fine sea salt |
| Large Eggs 🥚 | 4 whole | Room temperature |
| Buttermilk 🥛 | 1 cup | Substitute with milk + 1 tbsp vinegar |
| Vanilla Extract 🌸 | 2 tsp | Pure Madagascar preferred |
| Dark Chocolate Chips 🍫 | 1 ½ cups | 70% cocoa or higher |
| Powdered Sugar 🍚 | ½ cup | For dusting |
| White Chocolate Chips 🍫 | ½ cup | For crunchy top |
The cocoa powder is non-negotiable—Dutch-processed from Valrhona or Hershey's Special Dark makes all the difference. Butter matters too: European-style like Plugrá has more fat, giving that ultra-moist texture. Espresso powder? Starbucks VIA is my go-to, but any instant works. For the chocolate chips, Ghirardelli 66% or Lindt Excellence deliver that restaurant-quality bite. Pro tip: toast your white chocolate chips for 2 minutes in the microwave before sprinkling—they'll crisp up beautifully under the broiler.
No buttermilk? Mix 1 cup milk + 1 tbsp vinegar, let sit 5 minutes. Short on vanilla? Vanilla bean paste gives deeper flavor. The flour needs to be sifted—King Arthur or Bob's Red Mill are my favorites. For a lighter cake, swap half the all-purpose flour for cake flour. The espresso powder is essential—it cuts through the sweetness and adds sophistication. Want more crunch? Add toasted pecans to the white chocolate mix before broiling. And if you're feeling fancy, add a pinch of cayenne for subtle heat.
Store any leftovers in an airtight container with parchment between layers—keeps 4-5 days at room temp or 1 week in the fridge. Freeze for 3 months if you're planning ahead. The crunchy top is best enjoyed fresh, but the fudgy layers reheat beautifully. For serving, dust with powdered sugar right before slicing—that's the magic touch. And trust me, you'll want to make this twice—once for today and once for next week.
Why You'll Love This Recipe
- No Mixer Needed: I swear by this recipe because it’s one of those rare cakes where you don’t even have to crack out the electric mixer. Cream the butter and sugar by hand—it takes all of two minutes—and the instant espresso powder does the heavy lifting for depth of flavor. Honestly, the only tool you’ll miss is a whisk, and even that’s optional.
- Fudge Perfection: That rich, dense crumb? It’s all in the cocoa-to-flour ratio and the way the butter stays just slightly cool when it goes into the batter. The espresso powder cuts through the sweetness like a shot of espresso in your coffee, making every bite taste like a decadent dessert—without needing extra chocolate chips or frosting. (Yes, even on a Tuesday night.)
- Birthday Party Ready: This cake holds its shape beautifully, so it’s my go-to for celebrations when I don’t want to fuss with layers or piping. Slice it into squares, and it’s suddenly a showstopper—no one will guess it’s this unfussy. Between us, I’ve used it for everything from office potlucks to my kid’s 8th birthday, and it never disappoints.
- Budget-Friendly Luxury: You’re using pantry staples here: butter, sugar, cocoa—ingredients that last forever and won’t break the bank. The espresso powder adds that gourmet touch for pennies, and a single batch feeds a crowd or gives you leftovers that taste just as good the next day. Took me three tries to nail the texture, but now it’s my secret weapon for impressing people without spending a fortune.
Step-by-step instructions for rich, dense fudge cake layers
This is how you achieve that legendary fudge cake texture—moist, dense layers with a perfect crunchy top.
👨🍳 Step 1: Melt Butter and Mix Wet Ingredients
Start by melting the 1.5 cups unsalted butter using a double-boiler method—never microwave it directly. You want it smooth and fully liquid, not greasy or separated. While the butter melts, whisk together the 2 cups granulated sugar, 0.75 cup unsweetened cocoa powder, 1 tbsp instant espresso powder, and 0.5 tsp salt in a separate bowl until completely dissolved. This ensures no gritty texture remains.
Once the butter is melted, let it cool slightly (about 5 minutes) until it's warm to the touch but not hot. Then gradually whisk it into the sugar-cocoa mixture in a steady stream. The goal here is to create a smooth, velvety base that won't curdle when you add the eggs later. I like to whisk for about 2-3 minutes until the mixture is completely homogeneous and slightly thickened.
👨🍳 Step 2: Incorporate Eggs and Buttermilk
Add the 4 whole large eggs, one at a time, whisking vigorously after each addition. This gradual incorporation prevents scrambling the eggs, which would make your cake dense and gummy. After the eggs are fully incorporated, stir in the 1 cup buttermilk and 2 tsp vanilla extract. The mixture should be thick but pourable—almost like a thin batter.
Here's where things get critical: fold in the 1.5 cups dark chocolate chips gently but thoroughly using a spatula. You want them evenly distributed throughout the batter, but don't overmix or you'll develop gluten in the flour later. I use a rubber spatula to gently fold them in, making sure each spoonful of batter carries a few chocolate chips with it.
🍳 Step 3: Combine Dry Ingredients and Prepare for Baking
In a separate bowl, sift together the 2 cups all-purpose flour and 1.5 tsp baking powder. Sifting is essential—it aerates the flour and prevents dense spots in your cake. Gently fold the dry ingredients into the wet mixture using a spatula, mixing just until combined. You should still see some flour streaks, and that's perfect—overmixing develops gluten and makes the cake tough.
Preheat your oven to 350°F and grease three 8-inch round cake pans thoroughly with butter, then dust with flour. Line the bottoms with parchment paper circles for easy removal. Divide the batter evenly among the three pans—you should have about 1⅓ cups per pan. Sprinkle ⅓ of the 0.5 cup white chocolate chips evenly over each batter layer for that signature crunchy top.
🔥 Step 4: Bake to Perfect Doneness
Bake the cakes for 25-30 minutes, until a toothpick inserted into the center comes out with just a few moist crumbs (not wet batter). The edges should be set and pulling away slightly from the pan, but the center should still have a slight give. Rotate the pans halfway through baking for even browning—this is especially important for even layers.
Here's the secret to that perfect crunchy top: as soon as you remove the cakes from the oven, sprinkle the remaining 0.25 cup white chocolate chips evenly over each layer. Let them sit for 2-3 minutes in the pans so the chips melt slightly from the residual heat. Then transfer the cakes to a wire rack to cool completely before assembling.
🥘 Step 5: Assemble and Dust with Powdered Sugar
Once completely cool, level the tops of the cakes if needed using a serrated knife. Spread a thin layer of the melted butter (reserved from earlier) between each layer for moisture. For the crunchy top, press the remaining melted white chocolate chips gently into the top layer—this creates that signature texture contrast.
Finally, dust the entire cake generously with the 0.5 cup powdered sugar using a fine-mesh sieve. This not only looks beautiful but also adds that classic fudge cake finish. Serve slices at room temperature—the contrast between the moist, dense layers and the crunchy chocolate top is what makes this cake legendary.
Pro Tips For Making Best Chocolate Fudge Cake Recipe Ever
- Whisk Butter & Sugar Longer: I learned this the hard way—cutting corners here means a cake that’s dense instead of velvety. Beat the butter and sugar for a solid 3-4 minutes until it’s pale yellow and ribbons form. The extra time makes all the difference when you’re mixing in cocoa later.
- Sift the Cocoa Twice: Unsweetened cocoa lumps up like a grump when you’re in a hurry. Sift it once into the dry ingredients, then sift it again after mixing. This keeps the texture smooth and prevents those gritty pockets that ruin the fudge effect.
- Bake Until Slightly Under: The cake will look done at 30 minutes, but pull it out when the center’s just set—like a wobbly Jell-O. Overbaking dries it out fast, and no one wants a cake that’s tougher than a boot. Let it cool 10 minutes before frosting.
- Use Cold Eggs: Room-temperature eggs make the batter too thin, leading to a cake that collapses like a sad soufflé. Pop the eggs in the fridge for 10 minutes first—they’ll whip up stiffer and give you that perfect rise. (Yes, even if you’re impatient like me.)
Make-ahead tips for this best chocolate fudge cake recipe ever
Prep Ahead Strategy
Bake the cake layers up to 2 days ahead and store them in an airtight container between layers of parchment paper. The flavors deepen as they sit, and the texture remains perfectly moist.
I like to wrap each cooled layer individually in plastic wrap before stacking them—this prevents any moisture loss or drying out. 💫
Assemble When Ready
Assemble the cake just 24 hours before serving to maintain that signature crunchy top. The white chocolate chips need time to set properly, so don’t rush this step.
If you’re worried about the top losing its crunch, store the assembled cake in the fridge for 1 hour before serving—this helps the chocolate firm up beautifully. Trust me, the wait is worth it.
Freezer-Friendly Method
For longer storage, freeze the unassembled layers in a single layer on a baking sheet for 1 hour, then transfer to a freezer bag with parchment between them. They’ll keep for up to 3 months.
When ready to serve, thaw overnight in the fridge, then assemble and let sit at room temperature for 2 hours before dusting with powdered sugar. The texture stays perfect!
Make-Ahead Mistakes to Avoid
Don’t assemble the cake too early—moisture buildup can make the layers soggy. Also, avoid refrigerating the fully assembled cake for more than 24 hours, or the crunchy top will soften.
And here’s a pro tip: if you’re short on time, bake the layers, then freeze them assembled (without powdered sugar) for up to 2 months. Thaw overnight in the fridge for a fresh-from-the-oven experience. 🍫
Transporting for Events
For parties or gatherings, transport the cake in its original pans (if using them) or a sturdy cake carrier. If you’re worried about shifting, place a cardboard cake board inside the pan before baking—this makes it easier to transfer later.
Keep it at room temperature until serving, and dust with powdered sugar just before cutting to maintain that restaurant-quality finish. 💛
Nutrition facts
Frequently asked questions
Why does this recipe use espresso powder?
The 1 tbsp instant espresso powder enhances the chocolate flavor by adding depth and a subtle bitterness that balances sweetness. It mimics the effect of dark chocolate without making the cake taste like coffee. This is a classic technique in professional bakeries for creating more complex chocolate desserts.
Can I make this cake without buttermilk?
Replace the 1 cup buttermilk with 1 cup milk + 1 tbsp vinegar or lemon juice. Let it sit for 5 minutes to curdle before using. This substitution maintains the cake's moisture and richness without changing the texture significantly.
How do I achieve the perfect crunchy top?
The secret lies in timing: sprinkle white chocolate chips immediately after removing the cakes from the oven and let them sit for 2-3 minutes to melt slightly. Then broil for 1-2 minutes until golden. For extra crunch, toast the chips in the microwave for 2 minutes before sprinkling.
Will this cake work in a 9-inch pan instead of 8-inch?
Yes, but adjust the baking time. For 9-inch pans, reduce the batter by 1/3 cup per pan and bake for 20-25 minutes. The layers will be slightly thinner, but the texture remains the same. Just ensure the toothpick test shows moist crumbs when done.
Can I substitute cocoa powder for melted chocolate?
Not recommended for this recipe. The cocoa powder provides structure, while melted chocolate would make the cake too dense. If you must substitute, use ½ cup melted dark chocolate + ½ cup cocoa powder to maintain balance. The texture may vary slightly but will still be delicious.