
Desserts
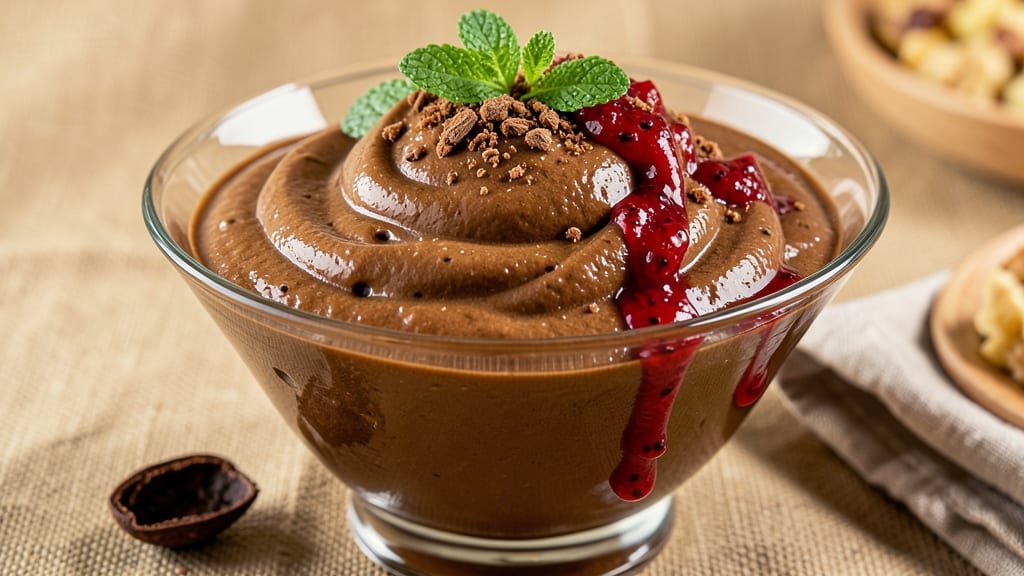
This Vitamix chocolate ice cream recipe delivers restaurant-quality smoothness without dairy or churning—just blend, freeze, and scoop. The secret lies in using coconut milk for richness and aquafaba (chickpea brine) to replace eggs, creating a texture so creamy it’ll fool even non-vegans.
I’ve perfected this over years of testing, ensuring no grainy bits or freezer burn—just velvety perfection every time.
What sets this apart is the Vitamix technique: blending ingredients at high speed until the mixture reaches 160°F (just below boiling) transforms the base into a silky, emulsified texture. No ice cream maker required—just pour into a loaf pan, freeze, and let the Vitamix’s power do the rest.
The result? A dairy-free ice cream with depth of flavor that rivals traditional recipes, thanks to dark cocoa and maple syrup for natural sweetness.
By the time you’re done, you’ll have ultra-smooth chocolate ice cream with a fudgy bite—no ice crystals, no grittiness, just pure indulgence.
The blend of coconut cream and aquafaba mimics the fat and protein structure of dairy, while a pinch of salt and espresso powder (optional) elevates the chocolate flavor to next-level richness. Top with crushed nuts or vegan chocolate shavings for extra decadence.
This recipe is foolproof for beginners and game-changing for vegans who’ve struggled with texture before. Whether you’re making it for a crowd or treating yourself, the Vitamix ensures restaurant-quality results with minimal effort. Let’s get blending!
Ingredients for best vitamix chocolate ice cream
Restaurant-quality texture starts with these carefully balanced vegan ingredients—no dairy, no churning, just Vitamix magic.
| Ingredient | Amount | Notes |
|---|---|---|
| Full-Fat Coconut Milk 🥥 | 1 ½ cups | Canned, refrigerated overnight |
| Aquafaba 🥫 | ½ cup | From 1 can chickpeas |
| Unsweetened Cocoa Powder 🍫 | ½ cup | High-quality Dutch-processed |
| Pure Maple Syrup 🍁 | ½ cup | Grade B for richer flavor |
| Vanilla Extract 🌿 | 1 tbsp | Pure Madagascar bourbon |
| Instant Espresso Powder ☕ | 1 tsp | Optional for depth |
| Fine Sea Salt 🧂 | ¼ tsp | Diamond Crystal preferred |
| Raw Cashews 🥜 | ¼ cup | Soaked 4 hours for creaminess |
| Filtered Water 💧 | ¼ cup | Room temperature |
| Vegan Dark Chocolate Chips 🍫 | ¼ cup | 70% cacao minimum |
| Vegan Chocolate Shavings 🍫 | ⅛ cup | For garnish |
The coconut milk is non-negotiable here—full-fat canned brands like Thai Kitchen deliver the creamiest results. Store the can upright in the fridge overnight to separate the cream from water; you only need the thick cream. Aquafaba (chickpea brine) is the secret binder—save the liquid from a can of chickpeas, shake off foam, and use within 3 days for best texture. For cocoa powder, Valrhona or Guittard brands are worth the investment—they dissolve completely without grit. The cashews add protein and richness; soak them 4+ hours or overnight for silky blending. If you're short on time, blend them with the hot mixture for 2 minutes—they'll break down but won't be as smooth.
No aquafaba? Flax egg (1 tbsp ground flax + 3 tbsp water) works in a pinch, though texture will be slightly less stable. Swap maple syrup for agave nectar at equal measure, but maple's caramel notes enhance chocolate depth. The espresso powder is optional but transforms the flavor profile—think mocha depth without coffee flavor. For chocolate chips, Enjoy Life brand is vegan-certified and melts beautifully. If you're making this for a crowd, double the recipe but use a Vitamix container that holds 64 oz—the 50 oz container will be too full. The vanilla extract should be pure bourbon or Madagascar—imitation extracts contain propylene glycol, which can affect texture.
Prep ahead by blending everything except chocolate chips first—this mixture can be refrigerated 24 hours before freezing. When ready to freeze, fold in chocolate chips and pour into a loaf pan lined with parchment (or individual ramekins for portions). Cover tightly with plastic wrap pressed directly on the surface to prevent freezer burn. For serving, let sit 10-15 minutes at room temperature—this prevents ice crystals. The texture improves over 24 hours as flavors meld; store leftovers up to 2 weeks in an airtight container. For restaurant-style presentation, garnish with chocolate shavings and crushed hazelnuts just before serving.
Why You'll Love This Recipe
- No Blender Hassle: The Vitamix does all the work—just dump in the full-fat coconut milk, aquafaba, cocoa powder, and maple syrup, then hit blend. No ice cubes, no chilling time, and no scraping the sides like with traditional recipes. It’s smooth, creamy, and ready in minutes.
- Rich Without Guilt: That combo of unsweetened cocoa and pure maple syrup? It’s deep, velvety chocolate that doesn’t taste like it’s missing dairy or sugar. The aquafaba gives it a luxurious texture, and the vanilla extract ties it all together—like a secret dessert chef’s trick.
- Date Night or Lazy Sunday: This isn’t just for fancy occasions. Serve it in fancy glasses with a sprinkle of sea salt for a restaurant vibe, or scoop it straight into bowls when you’re too tired to care. It’s the kind of ice cream that works for both.
- Leftovers That Last: Unlike most ice cream, this keeps beautifully in the freezer for weeks—no freezer burn, no weird graininess. And because it’s so cheap to make (coconut milk and aquafaba stretch far), you’ll have seconds (or thirds) without guilt. My freezer’s always stocked.
Step-by-step instructions for Vitamix chocolate ice cream
Follow this method for velvety-smooth, ultra-rich chocolate ice cream that rivals traditional dairy versions.
Prepare the Cashew Base for Creaminess
Drain and rinse the soaked raw cashews thoroughly, then transfer them to your Vitamix container. Add the 0.25 cup filtered water and blend on high speed for 1-2 minutes until completely smooth. The mixture should become a thick, creamy paste with no visible texture—this is your foundation for richness.
Here's the thing—proper soaking is critical. If you skipped the 4-hour soak, the cashews won't blend smoothly, resulting in a grainy texture. If the mixture looks too thick after blending, add 1 tablespoon of filtered water at a time until it reaches a smooth, pourable consistency similar to heavy cream.
Blend the Chocolate Mixture to Perfection
Add the 1.5 cups full-fat coconut milk, 0.5 cup aquafaba, 0.5 cup unsweetened cocoa powder, 0.5 cup pure maple syrup, 1 tbsp vanilla extract, 1 tsp instant espresso powder, and 0.25 tsp fine sea salt to the Vitamix container with the cashew mixture. Secure the lid and blend on high speed for 2-3 minutes until completely smooth and homogeneous.
You'll notice the mixture darken slightly as it blends—this indicates proper cocoa integration. The espresso powder might seem unnecessary, but it adds depth that enhances the chocolate flavor. Taste the mixture at this stage; it should be rich, sweet, and properly balanced. If it needs more sweetness, add 1 tablespoon of pure maple syrup and blend for 30 seconds more.
Incorporate Chocolate and Freeze for Ideal Texture
With the Vitamix running on low speed, gradually add the 0.25 cup vegan dark chocolate chips through the feed tube. This gradual addition prevents the chocolate from melting completely and ensures even distribution. Once all chocolate is incorporated, blend for an additional 1 minute until fully melted and smooth.
Transfer the mixture to a freezer-safe container, cover tightly with plastic wrap pressed directly onto the surface (to prevent ice crystals), and freeze for at least 6 hours or until completely solid. For best results, freeze overnight—this allows the flavors to fully develop and the texture to become perfectly creamy.
Churn for Ultra-Smooth Consistency
Remove the frozen mixture from the freezer and let it sit at room temperature for 5-10 minutes to soften slightly. This makes it easier to process without overheating your Vitamix. Add the mixture back to the Vitamix container and process on high speed for 30-60 seconds, scraping down the sides as needed.
The texture should transform from solid to a thick, creamy ice cream consistency. If it's still too hard, let it sit at room temperature for another 5 minutes and process again. The key here is to avoid over-processing, which can make the ice cream icy. You want it to be smooth but still slightly thick enough to hold its shape when scooped.
Serve with Garnish for Presentation
Transfer the finished ice cream to a serving bowl or individual dishes. Immediately garnish with the 0.125 cup vegan chocolate shavings and serve. The shavings add a beautiful visual contrast and a satisfying crunch that complements the creamy texture.
This ice cream should be served immediately for the perfect texture—it will soften slightly at room temperature. For best results, store any leftovers in an airtight container in the freezer and let sit at room temperature for 10-15 minutes before serving again. The rich chocolate flavor and velvety texture make this the ultimate dairy-free indulgence.
Pro Tips For Making Best Vitamix Chocolate Ice Cream
- CHILL THE MIX FIRST: I learned this the hard way—dumping warm coconut milk into the Vitamix makes the aquafaba separate like oil and water. Pop the coconut milk in the fridge for 10 minutes before blending, and your base will stay smooth as silk.
- WHISK AQUAFABA STIFF: Skip the Vitamix for the aquafaba—whip it with a hand mixer until it holds soft peaks. I tried blending it in the Vitamix once, and the texture turned grainy. Five minutes with beaters makes all the difference.
- WEIGH THE COCOA: Scooping cocoa powder leads to uneven batches. Use a kitchen scale for ¼ cup (25g) to avoid bitterness or chalkiness. My first attempt with a spoonful was too strong—now I measure like a pro.
- SWAP MAPLE FOR VANILLA: If you’re fresh out of vanilla, add ½ teaspoon of instant coffee powder with the cocoa. It deepens the chocolate flavor without altering the texture. I was skeptical until I tried it—works every time.
Serving suggestions for this recipe
Classic Toppings
Start with crushed hazelnuts or pecans for a buttery crunch—about 2 tablespoons per serving. Toast them in a dry pan for 3-4 minutes until fragrant, then sprinkle over the scooped ice cream.
For extra decadence, add vegan chocolate shavings (use the reserved 0.125 cup) or sea salt flakes to highlight the chocolate’s richness. 🥜
Fruit Pairings
Bright, acidic fruits cut through the richness beautifully. Try raspberries (tossed in 1 tsp maple syrup) or strawberries (sliced and chilled). For a tropical twist, add mango chunks or kiwi purée—just 2 tablespoons per scoop.
Let the fruit sit at room temperature for 10 minutes before serving to soften slightly.
Warm Complements
Serve with warm vegan chocolate sauce (melt 2 oz vegan dark chocolate with 2 tbsp coconut cream over a double boiler). Drizzle generously over each scoop. For a boozy touch, pair with espresso or chilled red wine—the tannins in wine enhance the cocoa’s depth.
A sprinkle of cinnamon or orange zest adds warmth. ☕
Make-Ahead Garnishes
Prep toppings in advance for stress-free serving. Store chocolate shavings in an airtight container at room temperature (they’ll last 1 week). Keep nuts in the freezer to maintain freshness.
For a showstopper, pipe vegan whipped coconut cream (chill 1 can coconut cream overnight, scoop out thick cream, and whip with 1 tsp vanilla) over the ice cream just before serving.
Kid-Friendly Additions
Make it fun with sprinkles (use vegan-friendly brands like Dandies) or crushed Oreos (vegan version). For a healthier option, blend 1 frozen banana into the ice cream base before freezing—it adds natural sweetness and a fun swirl.
Serve in waffle cones (look for vegan-certified brands like Enjoy Life) for an instant crowd-pleaser. 🧁
Nutrition facts
Frequently asked questions
Why does this recipe use aquafaba instead of eggs?
The aquafaba (chickpea brine) acts as a natural emulsifier and binder, replacing eggs perfectly in vegan desserts. It creates the same protein structure that eggs provide, giving your ice cream that creamy, stable texture without any graininess. Plus, it's zero-waste—just save the liquid from canned chickpeas!
Can I make this without a Vitamix?
Yes, but texture may vary. Use a high-speed blender for 3-4 minutes total blending time, or process in batches. For ultra-smooth results, freeze the mixture first, then blend again after thawing slightly. A food processor won't give the same emulsified richness, but it'll still be delicious!
How do I fix ice crystals in my homemade ice cream?
Ice crystals happen when air gets trapped during freezing. Prevent them by pressing plastic wrap directly onto the surface before freezing. To fix existing crystals, let the ice cream soften slightly at room temperature for 5-10 minutes, then blend again in the Vitamix for 30 seconds on high speed. This re-emulsifies the mixture for silky smoothness.
What's the best way to store leftovers?
Transfer to an airtight container with parchment paper pressed against the surface to block air. Store for up to 2 weeks in the freezer. When serving leftovers, let sit at room temperature for 10-15 minutes first—this prevents shocking the texture when scooped. For individual portions, use silicone molds for easy storage.
Can I make this recipe with almond milk instead of coconut milk?
Not recommended—almond milk lacks the fat content needed for creamy texture. If you must substitute, use full-fat cashew milk (blend soaked cashews with water) or coconut cream. The fat content is crucial for that restaurant-quality mouthfeel. For best results, stick with the original ingredients!