
Desserts
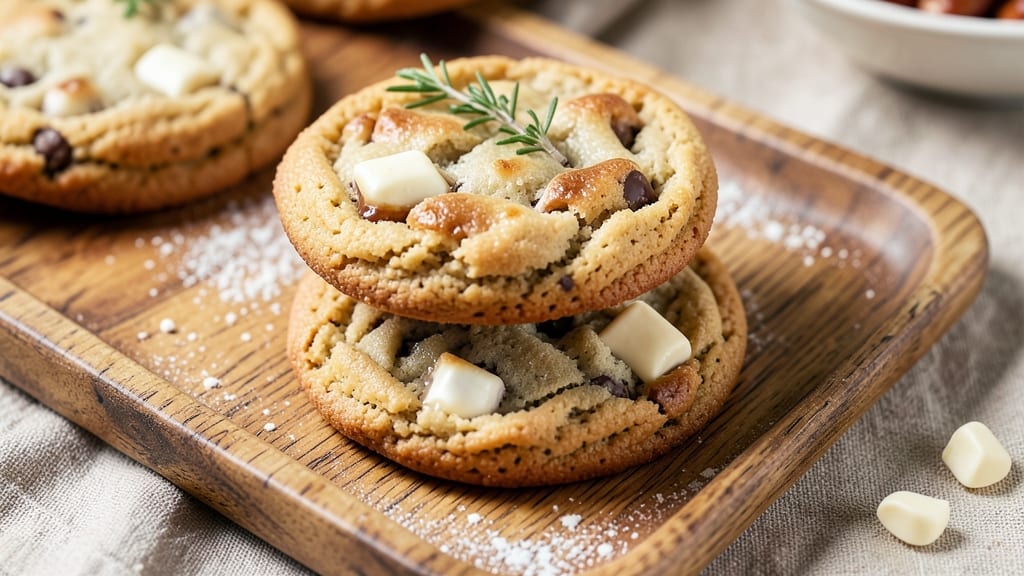
This chewy white chocolate chip cookies recipe delivers the perfect balance of caramelized edges and tender centers, all thanks to a brown sugar secret that transforms ordinary cookies into something extraordinary.
The key lies in using both brown and white sugar together, creating that signature chewy texture while preventing the white chocolate from melting prematurely in the oven.
I've perfected this technique over years of baking, ensuring every batch turns out with just the right amount of crispness at the edges and softness in the middle.
The beauty of this recipe is its simplicity—just seven core ingredients that come together in a single bowl, with no fancy equipment required. The brown sugar not only adds moisture for that chewy texture but also caramelizes beautifully during baking, creating those coveted caramelized bits that make these cookies irresistible.
White chocolate chips stay luscious and melty, never turning greasy, thanks to careful baking temperature control and distribution throughout the dough.
By the time these cookies emerge from the oven, you'll have golden-brown treats with perfectly chewy centers and pockets of melted white chocolate in every bite.
The aroma alone will have everyone gathering in the kitchen, and the taste—rich, buttery, and just sweet enough—will make these your new go-to cookie recipe. The secret to success is patience during baking and letting them cool on the sheet just slightly before transferring.
These cookies are ideal for holiday gatherings, teacher appreciation gifts, or simply satisfying that afternoon sweet tooth. The recipe makes about two dozen cookies, perfect for sharing or keeping a batch for yourself.
Once you try this version, you'll never go back to store-bought or basic white chocolate chip cookies again—they simply can't compare to the homemade perfection you'll achieve with this foolproof method.
Ingredients for chewy white chocolate chip cookies
Seven simple ingredients, one transformative technique—brown sugar magic for chewy perfection.
| Ingredient | Amount | Notes |
|---|---|---|
| Unsalted Butter 🧈 | 1 cup | Cold, cubed for even distribution |
| Light Brown Sugar 🍚 | ¾ cup | Packed firmly for accurate measurement |
| Granulated White Sugar 🍚 | ½ cup | Standard supermarket variety |
| Large Eggs 🥚 | 2 whole | Room temperature for even mixing |
| Vanilla Extract 💧 | 2 tsp | Pure, high-quality extract |
| All-Purpose Flour 🌾 | 2 ½ cups | Sifted for light texture |
| Baking Soda 🧂 | ½ tsp | Pure, fine-ground |
| Diamond Crystal Kosher Salt 🧂 | ½ tsp | Fine grain preferred |
| White Chocolate Chips 🍫 | 2 cups | High-quality, 1.5 oz per cup |
The sugars are non-negotiable here. Light brown sugar provides the moisture and caramelization for that signature chewy texture, while granulated white sugar ensures crisp edges. For the best results, use Domino or C&H brands—they're consistent and reliable. White chocolate chips should be high-quality like Guittard or Ghirardelli; cheaper brands melt unevenly. Store your sugars in airtight containers to prevent moisture absorption, and keep white chocolate chips sealed until ready to use—once opened, they last about 6 months in a cool, dark place.
No light brown sugar? Substitute with dark brown sugar at equal measure, though the flavor will be slightly more molasses-forward. Running out of white chocolate chips? Semisweet chocolate chips work in a pinch, but the flavor profile shifts. For vanilla extract, imitation will ruin the flavor—splurge on pure extract. The baking soda and salt are standard, but Diamond Crystal kosher salt dissolves more easily than table salt. If your flour is old, sift it through a fine-mesh sieve to maintain lightness in the cookies.
Butter should be cold when measuring—press firmly into the cup to pack it down. Store in the fridge until ready to use, then let sit at room temperature for 30-60 minutes before mixing. The dough can be refrigerated for up to 48 hours if wrapped tightly in plastic. Once baked, cookies keep at room temperature for 5 days in an airtight container, though they're best enjoyed fresh. For gift-giving, freeze portions on parchment-lined trays before transferring to containers—3 months of freezer life guaranteed.
Why You'll Love This Recipe
- No Mixer Needed: I swear by this recipe because it only requires a bowl and a fork—no fancy equipment, no stress. The butter and sugars get creamed by hand in minutes, and the dough comes together faster than you can say "vanilla extract."
- Sweet Spot Balance: That perfect chew? It’s all in the sugar combo—brown sugar for caramel depth, white sugar for crisp edges, and just enough egg to bind it right. Add white chocolate chips, and you’ve got a cookie that’s rich but not cloying.
- Party in a Jar: Honestly, this is my go-to for gatherings because it’s foolproof and always a hit. Double the batch, freeze half, and you’ve got snacks ready for holidays, potlucks, or just because. (Yes, even on a Tuesday night.)
- Budget-Friendly Luxury: You’d think white chocolate chips would break the bank, but this recipe uses them sparingly—just enough to feel indulgent without the price tag. Plus, the butter and sugars stretch further than you’d expect, making it a smart treat for any occasion.
Step-by-step instructions for chewy white chocolate chip cookies
Here's the method that guarantees caramelized edges and a perfectly chewy center every time.
Cream Butter and Sugars to Maximum Volume
In a stand mixer fitted with the paddle attachment, beat the 1 cup unsalted butter (cold and cubed) with the 0.75 cup light brown sugar and 0.5 cup granulated white sugar on medium speed for 3-4 minutes. You'll notice the mixture lighten in color and nearly double in volume as air incorporates—this creates those signature crackly tops and chewy texture.
The light brown sugar is key here; its molasses content promotes caramelization for those coveted chewy bites. Scrape down the sides of the bowl with a silicone spatula every 30 seconds to ensure even mixing. Stop when the mixture is pale and fluffy—overmixing at this stage can develop gluten prematurely.
Incorporate Eggs and Vanilla for Emulsion
Add the 2 whole large eggs one at a time, mixing on low speed for 30 seconds after each addition until fully combined. Then add the 2 teaspoons vanilla extract and mix for another 10 seconds. The eggs bind the ingredients while the vanilla adds depth of flavor that complements the white chocolate.
Here's the thing—room temperature eggs incorporate more smoothly than cold ones. If your eggs are straight from the fridge, let them sit in warm water for 5 minutes before using. The mixture should look slightly curdled at first, but this will resolve as you add the dry ingredients.
Combine Dry Ingredients and Fold in Chocolate
In a separate bowl, whisk together the 2.5 cups all-purpose flour, 0.5 teaspoon baking soda, and 0.5 teaspoon diamond crystal kosher salt. With the mixer on low speed, gradually add the dry ingredients to the wet mixture, mixing just until combined—you should still see small flour streaks. This prevents overdevelopment of gluten, which would make the cookies tough.
Remove the bowl from the mixer and gently fold in the 2 cups white chocolate chips using a silicone spatula. Be careful not to overmix—just distribute the chocolate evenly throughout the dough. The white chocolate should be evenly dispersed but still visible as pockets of melted goodness in each bite.
Chill the Dough for Optimal Texture
Cover the dough bowl with plastic wrap and refrigerate for at least 1 hour, though I prefer 2 hours for best results. This chilling period allows the flour to fully hydrate and the butter to solidify slightly, which prevents excessive spreading in the oven. It also gives the white chocolate chips time to soften slightly, ensuring they melt beautifully during baking.
Don't skip this step—I learned the hard way that skipping the chill leads to cookies that spread too thin and lose their signature chew. The dough will firm up noticeably after chilling, making it easier to handle and portion. For even better results, you can chill the dough overnight.
Bake to Golden Perfection with Caramelized Edges
Preheat your oven to 350°F and line two baking sheets with parchment paper. Using a cookie scoop or tablespoon, portion the chilled dough into 1.5-tablespoon sized balls (about 24 cookies total) and place them 3 inches apart on the prepared sheets. The dough will hold its shape better when cold.
Bake for 11-13 minutes until the edges are golden brown but the centers still look slightly underdone. They'll continue cooking on the hot pan after removal. The white chocolate chips should be softened but not completely melted—you want pockets of gooey white chocolate in each bite. Let the cookies cool on the baking sheet for 5 minutes before transferring to a wire rack to prevent over-spreading.
Pro Tips For Making Chewy White Chocolate Chip Cookies
- CREAM BUTTER SLOWLY: I used to rush this step and end up with greasy cookies—don’t. Mix the brown sugar, white sugar, eggs, and vanilla first, then gradually add the butter (cold, cubed) one tablespoon at a time. The dough should hold together when pressed but still feel slightly shaggy. If it looks like wet sand, you’ve gone too far.
- CHILL DOUGH TWICE: The first 30-minute rest in the fridge is non-negotiable, but here’s the trick: after scooping, pop the dough balls back in the fridge for another 10 minutes. This prevents the cookies from spreading too much in the oven and keeps the white chocolate chips from sinking to the bottom mid-bake.
- USE A LIGHT TOUCH: White chocolate melts faster than milk chocolate, so resist the urge to overmix after adding the chips. Toss them in just until evenly distributed—any more, and the dough tightens, leading to dense cookies. (I learned this after a batch turned out like hockey pucks.)
- BAKE UNTIL GOLDEN-BROWN: These cookies are done when the edges are set but the centers still look slightly underbaked—they’ll firm up as they cool. Pull them at 345°F when the edges are golden, not when the tops look fully set. Overbaking turns them dry, and nobody wants that with white chocolate.
Serving suggestions for this recipe
Classic Milk Pairings
Warm whole milk or half-and-half poured over fresh cookies is my go-to—it enhances the caramelized edges and balances the sweetness of the white chocolate. For a richer experience, try cold heavy cream drizzled over the warm cookies. I recommend Organic Valley or Horizon for the best flavor consistency.
Coffee and Tea
A freshly brewed cup of dark roast coffee or Earl Grey tea complements these cookies beautifully. The bitterness of the coffee cuts through the richness, while the bergamot in tea adds a sophisticated citrus note.
For an adult twist, serve with a shot of vanilla syrup or caramel sauce on the side.
Ice Cream Sandwiches
For a decadent treat, sandwich two cookies with a scoop of vanilla bean ice cream or white chocolate ice cream. I love using Ben & Jerry's or Häagen-Dazs for that creamy, luxurious texture. Press gently to avoid melting, then serve immediately for the best experience.
Gift Presentation
When gifting these cookies, arrange them on a platter with a dusting of powdered sugar and a few extra white chocolate chips on top. Add a small jar of vanilla bean paste or chocolate sauce on the side for dipping.
Wrap in clear cellophane with a ribbon for a professional touch that feels special.
Seasonal Variations
In summer, serve these cookies chilled with a scoop of mint chip ice cream. For fall, sprinkle with crushed pecans or pumpkin spice before baking. In winter, pair with a cup of hot chocolate made with Ghirardelli chocolate bars for a cozy dessert.
Make-Ahead Serving
Store baked cookies in an airtight container at room temperature for up to 5 days. To reheat, place them on a baking sheet and warm in a 300°F oven for 3-5 minutes to restore that fresh-from-the-oven texture. Perfect for last-minute gatherings or unexpected guests! 🌟
Nutrition facts
Frequently asked questions
Why do these cookies need both brown and white sugar?
The brown sugar creates that signature chewy texture through caramelization, while the white sugar gives crisp edges. Together, they balance moisture and structure—brown sugar adds chewiness, white sugar promotes browning. For extra chew, slightly increase the brown sugar to 3/4 cup.
Can I substitute white chocolate chips with milk chocolate?
Yes, but expect a different flavor profile! Milk chocolate adds creaminess but lacks white chocolate's delicate sweetness. Use the same amount, but reduce baking time by 1 minute—milk chocolate melts faster. For best results, stick with white chocolate for that signature taste.
How do I prevent my cookies from spreading too much?
Chill the dough for at least 2 hours (or overnight) to firm up the butter. Use a cookie scoop for even portions, and bake on a parchment-lined sheet at 350°F. Avoid overbaking—they'll finish cooking on the tray. For extra structure, add 1/4 cup cornstarch to the flour.
What's the secret to perfectly melted white chocolate chips?
Bake at 350°F for 11-13 minutes—just until edges are golden. The white chocolate should soften but stay slightly firm in the center. If chips melt too fast, reduce oven temp to 340°F next time. Let cookies cool 5 minutes on the tray before transferring.
Can I make these cookies gluten-free?
Yes! Replace the 2.5 cups all-purpose flour with a 1:1 gluten-free baking flour blend (like Bob's Red Mill). Add 1/2 teaspoon xanthan gum to mimic gluten's structure. Expect slightly denser cookies—adjust baking time to 10-12 minutes for doneness.